Continue to Site

Eng-Tips is the largest engineering community on the Internet

Intelligent Work Forums for Engineering Professionals

  • Congratulations KootK on being selected by the Eng-Tips community for having the most helpful posts in the forums last week. Way to Go!

API 579 - Dent vs Out-of-roundness 1

Daniel Canzian

Structural
Dec 12, 2024
2
I am conducting an API-579 study on a pressure vessel (ASME VIII) that was allegedly subjected to vacuum conditions. As a result, there are four dents located at the spots where the supports for an internal head are welded to the internal shell. I am treating these as "dents" under Part 12 of API-579. However, in addition to these dents, there is also a circumferential deformation just above the internal head.

I am unsure whether this circumferential deformation should be treated as a "dent" under Part 12 or as "out-of-roundness" under Part 8. Could someone clarify this for me?

In the past, I dealt with another pressure vessel that had a similar circumferential deformation, but it was deformation for outward, and I treated it as a "bulge." Did I handle that correctly?

Thanks
 

Attachments

  • Captura de tela 2024-12-12 152541.png
    Captura de tela 2024-12-12 152541.png
    1 MB · Views: 24
Replies continue below

Recommended for you

Please disregard @r6155 's comment.

Whether the deformations are classified as a dent or an out-of-roundness, you'll get to the same answer. Especially if you end up going down the road of a Level 3 Assessment - the analysis will be the same thing.

What's the magnitude of the deformations? Wall thickness? Material?
 
@ TGS4
What kind of person are you to treat me so disrespectfully?
 
It has been noticed in the past that r6155 makes such comments without any logic/justification.

Having said this, OP - please look into the definitions given in API 579 and apply your best judgment.
 
@r6155 - a good engineer does not proclaim a vessel either fit for service OR scrap without all necessary information. Declaring it to be “SCRAP” in the absence of any information is a severe dereliction of your duty as an engineer. Accordingly, my advice (really my duty) to the OP is to ignore your so-called advice.

Try not to make such over-arching proclamations without all of the necessary information. Seriously - you don’t even know the magnitude of the deformation. Who does that?
 
Without any documentation and without knowing the cause of these defects, this pressure vessel is considered SCRAP.
 
No, the vessel needs to be assessed to see what its condition is.
I worked with a company that had a written policy for this, it described the sizes as a percentage of the circumference of the vessel.
But I don't know what standard it was based on.
It may have been based on past analysis that they had done.
They had a cut off that if it was below a certain size and depth, it could be ignored.
Above that they required analysis.
 
The user has the option to avoid any study of the pressure vessel damage and manufacture a new one.
 
As a result, there are four dents located at the spots where the supports for an internal head are welded to the internal shell.
Would you have any further details on how such internal head is supported and welded?

Please disregard @r6155 's comment.
Agree here. Ignore @r6155. He has been posting a lot of replies here without really having any good explanation or justification.
 
Be careful with comments from those who have no experience in manufacturing, welding, NDE, inspection, testing, .........etc.
 
@r6155 - please stop. You are (for reasons that I cannot fathom) trying to defend an indefensible position. Let it go. Move on.
 
r6155 has been providing unprofessional comments without technical basis many times. Be careful by taking his opinion.
 
Thank you for the responses. In any case, I have rejected the equipment since my scope was only to perform a Level 1 and 2 analysis. Still, to broaden my understanding, I would like to better comprehend the definitions of “dent” and “out-of-roundness.” Regardless of whether the equipment is considered scrap or not, I believe we can still gain some insights from this situation.

TGS4: The largest localized deviation has a maximum amplitude of 17 mm inward relative to the design radius (1,000 mm). The shell is made of 1/4" ASTM A-283 Gr.C plate.

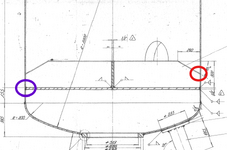
Trestala: I have attached a figure of the design drawing. Basically, the localized dents occurred in the area circled in red, where an angle iron was welded internally to the shell. The circumferential deformations took place just above the area circled in blue, which corresponds to a flat end (mirror). My assumption is that there was excessive suction at the lower nozzle, “pulling” the flat end downward, although I do not have concrete information on how this actually happened.1734529082210.png
 
I would agree that probably the pressure difference across the plate have that downward force causing the deformation. The shell looks very thin as well for that local stress caused by the internal head.

Also, the weld sizes are not indicated same for the shell thickness. It is possible that the deformation (or shrinakge) was caused by the welding itself from the heat applied. But maybe that deformation wasn't present before and most likely caused by the service as you've mentioned.

That internal head acts as a stiffener as well around that deformed area, so that dent or out-of-roundness criteria are not directly applicable for your case.
 

Part and Inventory Search

Sponsor