Eng-Tips is the largest engineering community on the Internet

Intelligent Work Forums for Engineering Professionals

Closure strip of bridge deck

Status
Not open for further replies.

tmalik3156

Structural
Jun 21, 2021
92
0
6
CA
Good day all.
I am trying to understand the benefit of providing a longitudinal closure strip in bridge deck replacement work that is done in two stages. I have two examples in front of me.

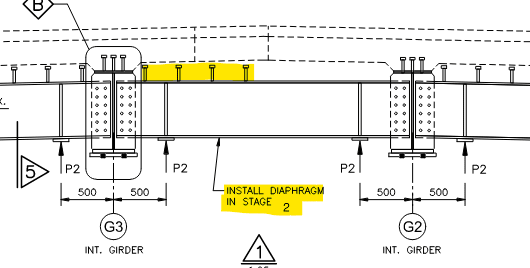
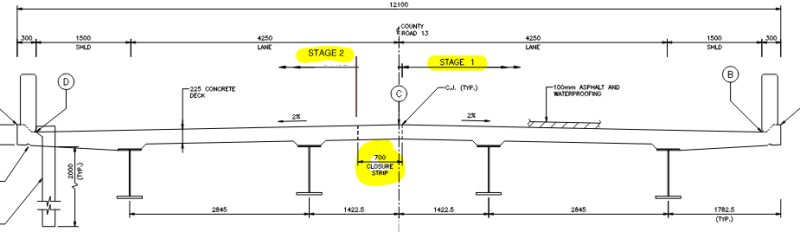
Example 1: New deck on new steel girders. Even number of girders.
About 50% of the existing deck is removed and reconstructed (Stage 1). Then, the other 45% is removed and reconstructed (Stage 2). Finally, a closure strip of about 700 mm is poured.

Tioga_kceja6.png


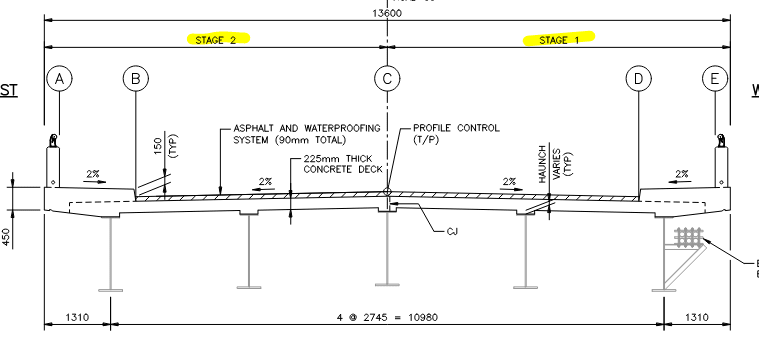
Example 2: New deck on existing girders. Odd number of girders.
No closure pours. Each stage covers 50% of the width.

VanSittart_oa6wlr.png


In both cases, traffic will continue on the opposite side of construction.
Can someone explain why closure pour was chosen in one case, but not in the other?
 
Replies continue below

Recommended for you

From the NYSDOT Bridge Manual:

"A third placement (Closure Placement) between the stages shall be used when possible. This will help to isolate the second stage deck slab during the curing process from undesirable vibrations caused by traffic on the first stage deck slab. In addition, the closure placement permits a smooth transition between the top surfaces of the deck placements should they be misaligned due to variation from the theoretical deflection of one or both groups of girders."

Most engineers prefer to have closure pours.

In the first situation, there's enough to room to maintain one lane, assuming the out to out of existing and proposed decks are the same. The cattle chute would be a little under 4m but not too bad. In NYC, 14 ft is the preferred width for a cattle chute situation.

In the second case maybe the designer was concerned with vibrations because the deck was landing on a stringer or maybe they didn't have much choice. If they had to restore the sidewalk (assuming 1.5 m) in Stage 1, that would only leave about 4 m for a travel lane. Traditional closure pour wouldn't work here, assuming the out to out of existing and proposed decks are the same, and one sidewalk needs to be maintained. One thing that's changed over the years is the construction joint over the stringer. Many years ago, it was taboo because if the joint leaked water would go directly onto the flange. In recent years I've seen it done more often and have done it myself.

I did a mile long deck replacement a couple of years back without closure pours. We had to keep 6 lanes open (3 each way) and if we introduced closure pours the superstructure would have needed over 15 feet of widening, which would create other problems. All of this became a moot point. After construction started, the lane requirements changed and we went from cast in place deck to panels.

On a recent project, 1/2 mile of deck replacement with the same 6 travel lane requirement, we used 7" wide UHPC closure pours. We only needed to do 2" of deck widening over about 1/4 mile.
 
In addition to the vibration from stage 1 when pouring and curing stage 2, there is also the consideration of movement of the stage 2 girders near midspan of one span, when the concrete is placed in the adjacent span. For longer spans, this movement can be significant enough to be considered unacceptable, since there would be rotation of the formwork and partially cured concrete.

I prefer to have concrete cured on both sides, before connecting the stages together. When possible, we try to get the closure pour centered between the adjacent girders to equalize the deflections of the adjacent girders.
 
Yes, bridgebuster. Having the joint on a girder helps some. Depending on the spans and the stiffness of the diaphragms/crossframes, the differential movement of the girders could be small enough to be inconsequential.

We attempted that on a new bridge, but ended up revising it during construction to add the closure pour. There was no way we or they could come up with to get the crossframes bolted in place with the girder that had deflected under the weight of the stage 1 deck to line up with the adjacent girder that had no deck weight on it. Even if we could have, the nearly 3" of movement of the adjacent girder when the weight of the deck was added was too much for us to be confident there wouldn't be adverse effects on the concrete at the joint.
 
Thank you gentlemen for replying and sharing your experience.
As for the cross diaphragms, in example 1 they installed the middle diaphragm in stage 2. To do this, they attached stud shear connectors to only one side of the top flange.
But since the elevation of the Stage 1 girders will be lower (due to the weight of the cured deck) than Stage 2 girders (before the deck pour), I wonder how they installed the middle diaphragm.

diaphragm_agstyi.png
 
I don't recall seeing an intermediate diaphragm in contact with the deck and on the end diaphragms, where we haunch the deck down, we typically omit studs. Regarding your question, the steel would have (or should have) been detailed to allow the diaphragms to fit up. One side is kept loose until the deck is completed.
 
Status
Not open for further replies.
Back
Top