Eng-Tips is the largest engineering community on the Internet

Intelligent Work Forums for Engineering Professionals

  • Congratulations waross on being selected by the Tek-Tips community for having the most helpful posts in the forums last week. Way to Go!

How to change translucency quickly? 2

Status
Not open for further replies.

yy912

Mechanical
Oct 7, 2022
14
0
0
US
Hello all,
I am switching from Solidworks to NX.
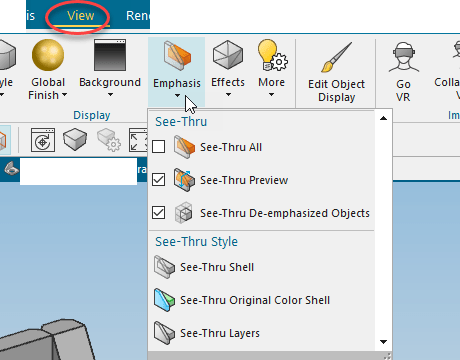
In NX, the way I know to make a part transparent is select the part->right click or go to View->edit display->drag the translucency bar to the number desired->click OK.
There are at least four steps to achieve the goal, and dragging the bar to control the translucency number is painful. You either make the translucency inconsistent for each part, or take a while to drag to the same value for each part.
Is there any way to do it faster? For example, is it possible to save a preset translucency value, and by one click I can switch the selected parts all to this translucency? Or is there any other workaround for it?

Thank you very much!
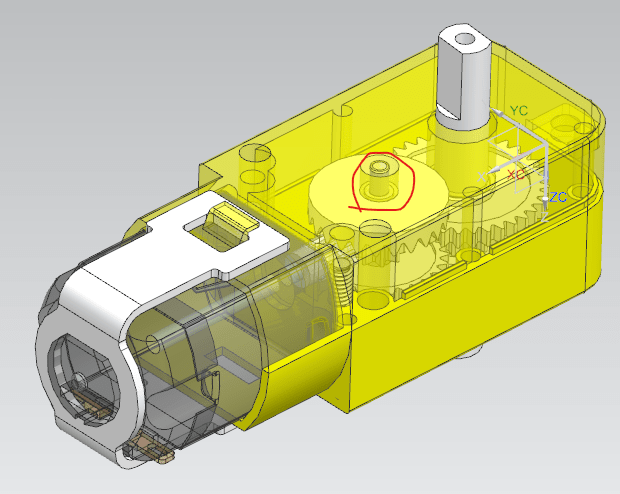
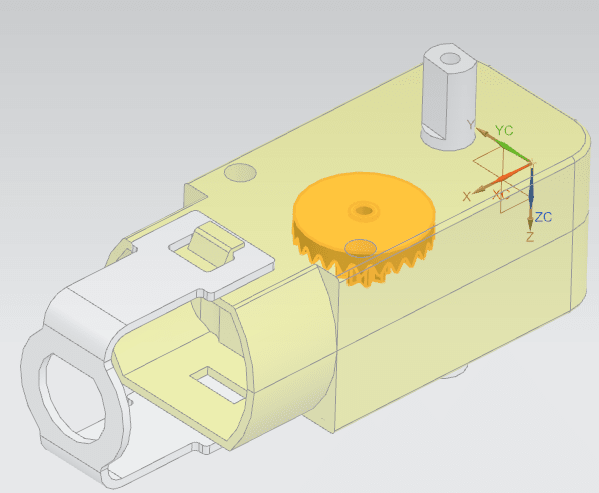
 
Replies continue below

Recommended for you

Clicking on the slider moves the bar in 10% increments. That's how I get everything to my preferred 70%.

You can apply the translucency to select multiple bodies at once.
 
Hi mmauldin, thank you for the reply. It's good to know clicking the bar can reach a precise value. But now it needs to click by 4-7 times to go to the desired translucency...
I know multiple bodies can be selected at the same time, but usually I don't realize additional parts need to be transparent until I set the previous ones as transparent, or more parts will be added to the assembly later and they need to be transparent too. That's why I hope there is an easier way to change translucency to a preset value.
Thanks again.
 
There is a journal posted here that will set all of the currently selected components to 50% translucency (edit the journal to your desired value). You can customize your UI to add this to a button or right click menu as desired.

www.nxjournaling.com
 
A macro is a recorded keystroke file that can be played back. Search for macro in the command finder, for what you want record and play are the only two options needed.

Select record macro, give it a name, then bring up the edit object display, set filter to solids, pick select all from the menu, change the translucency to what you want, then select stop recording.

Right click in a blank area in the menu bar and select customize, pick new items in the left pane then select and hold the left mouse button over new user command in the right pane and drag to where you want it in the menu. Right click over the new user command, give it a new name, then pick edit action on the bottom of the menu. In the top right where it references the action to execute, click the drop down and select the macro option. In the line where it asks to enter an action or use browser, left click on the browse button and navigate to where you saved the macro and select it. Exit the customize function.

From now on you can pick the new user command and it will change the transparency of ALL solids visible.

The above instructions will add a custom command with restrictions. Since it records keystrokes and menu selections it may not work in the next update of NX and may need to be re-recorded.

NX 1899 Windows 10
 
Hi cowski, thank you very much! The journal is very helpful. I've set up a command button for it.

I also find out how to add it to right-click menu (There are so many shortcut menus that I get lost at the beginning). For those who are interested, as the journal needs to select the parts/bodies first, it needs to be added to "All Objects" bar. Open the customize page, go to shortcuts->all objects, drag the new user command to add to "All Objects" bar next to existing commands. Now when select the parts and right click, the command will show in the rightmost of the horizontal bar.

Hi multicaduser, thank you for the alternative solution and detailed instruction about adding new command for the journal! I tried recording a macro, but seems it can only change translucency for the assembly I selected in recording. It doesn't work when I switch to another assembly. I will try to figure out how to use recording properly.
 
In the edit object display menu when the macro is recorded, there is a settings drop down bar, pick on that to open the menu then check the box that says apply changes to owning part, that will change it at the component/part/body level and show up in all assemblies.

The macro you recorded changed the display at the assembly level because I omitted the important step listed above. In order to remove the assembly level display edit, in the assembly, right click on the component that needs to be changed and pick the properties option. In the component properties dialog select the assemblies tab and uncheck the specific translucency option. This will remove any translucency done to the component at the assembly level.

This was an obscure concept for me for a long time and took a while to understand, but display settings can be changed at both the assembly level and the component level, and the assembly level change will override the component level.

Hope this helps.

NX 1899 Windows 10
 
Hi YY912, can you explain the workflow you are trying to achieve here ?
It might be that we ( I am so far innocent :) ) have led you on the wrong track depending on what you are trying now.
Is it to "see through" whilst designing or ?
reason i say this is that there are "display modes" where you see through without any display edits.
What NX version are you running ?
Image is NX1980/ 2000
Try these options , without editing any solid bodies .
2022-11-01_18-11-58_odvru5.png


Regards,
Tomas

The more you know about a subject, the more you know how little you know about that subject.
 
Hi multicaduser, sorry I expressed it confusingly.
I mean I record the macro in assembly 1, and want to run the macro to change the translucency for parts in assembly 2, the code will result in error.
I check the code generated and I guess the reason is it selects object by the exact file name. The name of part in assembly 1 for sure will not show in assembly 2.

sample code at the error line:
ComponentAssembly.RootComponent.FindObject("COMPONENT <Moteur - Maintien> 1"), NXOpen.Assemblies.Component)

NX 1919 Windows 11
 
Hi Tomas, thank you for the reply. I am using NX 1919/Win 11.
I am looking for something similar to "transparent" command in Solidworks. When you select some parts, the pop-up toolbar has an option to turn them into transparent, so that you can see the internal structure of transparent parts, other parts within them, and how they interact with each other.
Usually a section view can do similar things, but sometimes transparent works better.
I like the Translucency command in NX that I can toggle the Translucency on/off by one click, but I need to set up the translucency first, which is a bit tedius and I hope to simiplify.

I've learned a bit about the See-Thru all. In my understanding, the selected/highlighted part will show through all other parts, but I cannot see the internal details of non-highlighted part, nor the interaction between highlighted and non-highlighted parts.
For example, here is a model I find online.
With transparent housing, I can see how the gears interact with each other. With see through all, I can only see the gear, not the shaft connecting to the housing or other details.
00_pzp8jl.png

01_y9syx9.png


NX 1919 Windows 11
 
Status
Not open for further replies.
Back
Top