thread2-197752
This question is directed to "WKTaylor" but anybody who could help would be appreciated. He stated the following in an old, closed, thread:
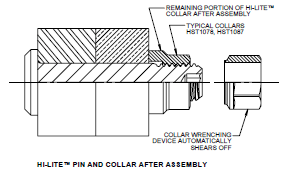
"3.4 WARNING. Shear-rated HL collars 1/2"-and-larger [0.500"D+] and tension-rated HL collars 7/16"D-and-larger [0.437"D+] SHOULD NOT be installed by "hand". The collar-break torques are so high that most technicians will strain really hard to attain the torque; then loose control of the wrench/socket head when it suddenly breaks... which will fly around and damage structure [or hurt someone]. In these cases consider installation of a shear or tension rated nut at similar torque values [HL collar-break ranges]."
The application in question has 1/2" hi-loks in extremely tight quarters (inside the tailcone of a helicopter - tails inside of course). We haven't had any serious injury but we'd like to avoid it. What type of nut would you recommend be substituted for the collar (HST1572)?
I would have DM'd poster directly but I can't seem to locate any functionality of that sort on this board.
Thank you,
SF
This question is directed to "WKTaylor" but anybody who could help would be appreciated. He stated the following in an old, closed, thread:
"3.4 WARNING. Shear-rated HL collars 1/2"-and-larger [0.500"D+] and tension-rated HL collars 7/16"D-and-larger [0.437"D+] SHOULD NOT be installed by "hand". The collar-break torques are so high that most technicians will strain really hard to attain the torque; then loose control of the wrench/socket head when it suddenly breaks... which will fly around and damage structure [or hurt someone]. In these cases consider installation of a shear or tension rated nut at similar torque values [HL collar-break ranges]."
The application in question has 1/2" hi-loks in extremely tight quarters (inside the tailcone of a helicopter - tails inside of course). We haven't had any serious injury but we'd like to avoid it. What type of nut would you recommend be substituted for the collar (HST1572)?
I would have DM'd poster directly but I can't seem to locate any functionality of that sort on this board.
Thank you,
SF
![[smile]](/data/assets/smilies/smile.gif "[smile] [smile]")