Continue to Site

Eng-Tips is the largest engineering community on the Internet

Intelligent Work Forums for Engineering Professionals

  • Congratulations GregLocock on being selected by the Eng-Tips community for having the most helpful posts in the forums last week. Way to Go!

Modified tensile strenght test

Status
Not open for further replies.

Eduardo1982

Mechanical
Oct 31, 2014
65
Hey guys I hope everybody are fine during COVID storm.
Does anybody knows if there are any way to check the next matter?...
My friend and I decided to perform a kind of "modified tensile strenght test" over two fittings as it shows the picture below. We did not find any way to perform the tensile test as it is standarized by ASTM E8. However, we are trying to find out any direct link among the obtained result and the "real tensile strenght" of these two fittings. We think there are many factors that can affect the real tensile strenght (geometry, stress factors, etc.) Does anybody could give us any idea? Thanks.
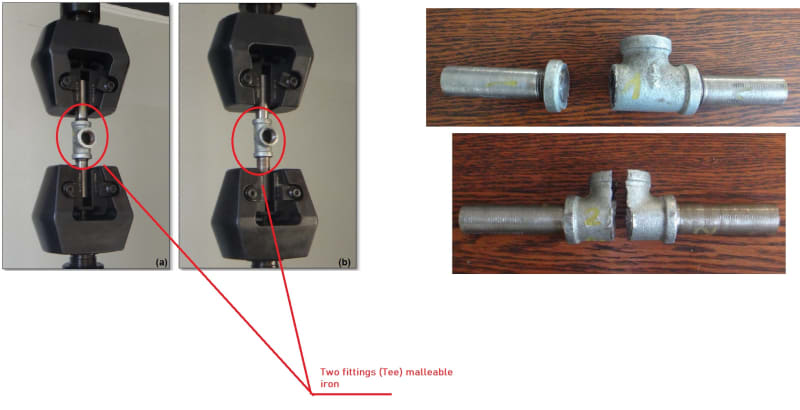
Photo1_adljeq.jpg
 
Replies continue below

Recommended for you

Your idea for a "modified tensile strenght test" is not a bad one; it is something I would try if I suspected faulty material. You will discover the 'weakest link' even though the loads and strains will probably have little meaning.

Standardized tensile testing (E8) represents a simplified and idealized approach. In the real world components never fail at ductile strains anywhere near the % Elongation and Reduction of Area figures reported in test reports.

The practical problem is that in your configuration, significant bending moments could be introduced. This happens when the two pipes are not parallel and perfectly aligned, either in the initial condition (probable) or that develop during the test (certainly). These problems are exacerbated by your malleable iron fitting, which has low ductility and which will be very vulnerable to bending loads, which impart high tensile stress on one side. Having said all that, I think there is useful information to be gained from your test.

"Everyone is entitled to their own opinions, but they are not entitled to their own facts."
 
I presume that your 'pipes' are actually well machined solid pins.
And that when you screw them in you are careful about thread engagement.
And that you check the depth of thread engagement as well as alignment.
As IM said, with such a low ductility fitting any twisting or bending will cause very earl failure.
Over-tightening or under-tightening you pins will also cause deviations in results.
That all said, if you test a bunch of these (at least 12?) then you will see trends.
I expect the hub separation that you see in the top picture. The treads may have been cut wrong on that one.
The lower one that broke through the branch either had a lot of bending or there may be a casting defect.
Knowing where they broke and at what loads will help you sort various issues out.
Just remember that these are the cheapest fittings available, don't expect much.

= = = = = = = = = = = = = = = = = = = =
P.E. Metallurgy, consulting work welcomed
 
Status
Not open for further replies.

Part and Inventory Search

Sponsor