Navigation
Install the app
How to install the app on iOS
Follow along with the video below to see how to install our site as a web app on your home screen.
Note: This feature may not be available in some browsers.
More options
Style variation
-
Congratulations cowski on being selected by the Eng-Tips community for having the most helpful posts in the forums last week. Way to Go!
You are using an out of date browser. It may not display this or other websites correctly.
You should upgrade or use an alternative browser.
You should upgrade or use an alternative browser.
permissible angular deviation 1
- Thread starter 212197
- Start date
- Status
- Not open for further replies.
-
1
- #2
Because ± dimensions are inherently ambiguous the standard recommends to use angularity, but if ± is “preferred” then the origin symbol should be used. (See fig 4-40 and 4-42 / ASME Y14.5-2018)
“The symbolic means of indicating that a tolerance dimension between two features originates from one of these features and not the other”
Fig 5-20 is also good for your question.
“The symbolic means of indicating that a tolerance dimension between two features originates from one of these features and not the other”
Fig 5-20 is also good for your question.
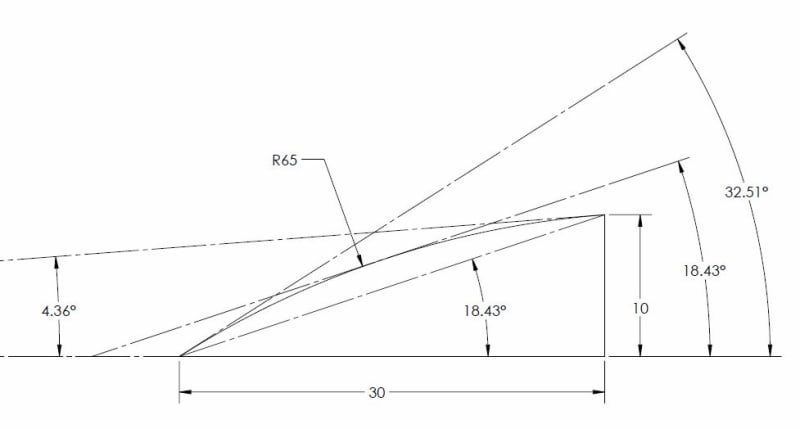
Could you clarify what you mean by "shorter side of angle"? Presumably you mean the "10" dimension in my sketch below.
As greenimi noted use of +/- tolerances are inherently ambiguous. Specification of the side from which the measurement originates helps somewhat, however does not dispel all ambiguity. As you can see, all measurements are taken from the same side and tangent to the top surface (hypotenuse) which has some form deviation and come up with wildly different values, only one of which is the same as if we take the arctan(10/30) = 18.435deg as if the hypotenuse was the straight line connecting the long and "shorter side of angle."
Now of course this is an exaggerated case, one could expect much less deviation in a typical application (the form deviation shown is quite large) so the variance in actual measured values should be much less however the point remains that the specification is ambiguous and the reported measured value can changed depending on how it is measured. I would not recommend specification of a +/- angle on critical features.

After looking back at it, I see that the specification shown in Y14.5-2018 fig 5-20 and use of a +/- distance on the short side may indeed have been what OP meant - good call greenimi. This is mostly unchanged from Y14.5-2009 fig 2-18. This is of course assuming that OP's drawing conforms to ASME.
If the result shown by fig 2-18 (2009) / 5-20 (2018) is simply a tapered tolerance zone then this leads to a mostly unambiguous specification. The only thing which is slightly troubling is the "means this" portion - "the surface controlled by the angular dimension may be anywhere within the tolerance zone with one restriction: its angle must not be less than 29°30' nor more than 30°30'." If the requirement is to also measure the actual resultant angle of the surface then the same issues with ambiguity will arise as I've shown in my figure.
Thoughts?
212197,
I'm guessing you are referring to ISO 2768-1 (Tolerances for linear and angular dimensions without individual tolerance indications) which tabulates "Permissible deviations [of angular dimensions] for ranges of lengths, in millimeters, of the shorter side of the angle concerned".

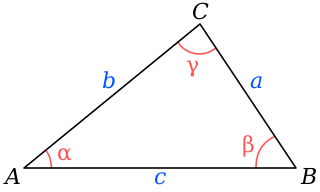
Consider the example above, and imagine the drawing has a dimension (without individual tolerance indication) for angle β. The "sides of the angle concerned" are a and c. The shorter of the two sides is a, so its length will determine the tolerance for the angle dimension.
pylfrm
I'm guessing you are referring to ISO 2768-1 (Tolerances for linear and angular dimensions without individual tolerance indications) which tabulates "Permissible deviations [of angular dimensions] for ranges of lengths, in millimeters, of the shorter side of the angle concerned".

Consider the example above, and imagine the drawing has a dimension (without individual tolerance indication) for angle β. The "sides of the angle concerned" are a and c. The shorter of the two sides is a, so its length will determine the tolerance for the angle dimension.
pylfrm
- Thread starter
- #6
pylfrm (Mechanical)
Thanks a lot. Your guess is correct. I'm referring to ISO 2768-1.
Now kindly see the attached drg. & confirm whether the tolerance mentioned are correct with respect to understanding of shorter side.
Thanks a lot. Your guess is correct. I'm referring to ISO 2768-1.
Now kindly see the attached drg. & confirm whether the tolerance mentioned are correct with respect to understanding of shorter side.
pmarc
Mechanical
- Sep 2, 2008
- 3,247
212197,
If you are referring to ISO 2768-1, then you probably know that it is impossible to answer your question without knowing the tolerance class for the angular dimensions. Based on the tolerance values proposed by you in your sketch, I am guessing that you are considering either class f (fine) or m (medium).
If my guess is correct, then the answer is +/-30' for the scenario on the left and +/-20' for the scenario on the right (see Table 3 in ISO 2768-1:1989).
One thing worth to remember is that in ISO "general tolerances specified in angular units control only the general orientation of lines or line elements of the surfaces, but not their form deviations."
- Thread starter
- #8
pylfrm (Mechanical)
Thanks a lot. Your guess is correct. I'm referring to ISO 2768-1 class f (fine).
but for the scenario on the right, the tolerance should be +/-10' & not +/-20' as length of shorter side of angle is more than 120 mm (141.67).
You may kindly check& revert.
Thanks a lot. Your guess is correct. I'm referring to ISO 2768-1 class f (fine).
but for the scenario on the right, the tolerance should be +/-10' & not +/-20' as length of shorter side of angle is more than 120 mm (141.67).
You may kindly check& revert.
- Thread starter
- #10
pmarc
Mechanical
- Sep 2, 2008
- 3,247
greenimi,
I'm afraid I don't have good answer to that question. Maybe they based the values on the assumption that the longer the shorter side of the angle, the bigger the linear displacement of its end point relative to the nominal for the same angle, and thus the inverse relationship.
I'm afraid I don't have good answer to that question. Maybe they based the values on the assumption that the longer the shorter side of the angle, the bigger the linear displacement of its end point relative to the nominal for the same angle, and thus the inverse relationship.
pmarc said:I'm afraid I don't have good answer to that question. Maybe they based the values on the assumption that the longer the shorter side of the angle, the bigger the linear displacement of its end point relative to the nominal for the same angle, and thus the inverse relationship.
Fair enough. Was just my own curiosity....
Thank you pmarc
- Status
- Not open for further replies.
Similar threads
- Locked
- Question
- Replies
- 3
- Views
- 314
- Locked
- Question
- Replies
- 1
- Views
- 2K
- Locked
- Question
- Replies
- 4
- Views
- 388
- Locked
- Question
- Replies
- 7
- Views
- 424
- Locked
- Question
- Replies
- 5
- Views
- 1K
