Continue to Site

Eng-Tips is the largest engineering community on the Internet

Intelligent Work Forums for Engineering Professionals

  • Congratulations IFRs on being selected by the Eng-Tips community for having the most helpful posts in the forums last week. Way to Go!

Repairing concrete walls and footings 2

Status
Not open for further replies.

milkshakelake

Structural
Jul 15, 2013
1,161
Parts of concrete walls and footings were chipped away to expose and measure two faces of rebar. The walls are 12" thick and footings are 16" thick. The holes are about 2'x1'. All f'c=4000 psi design strength. How would a contractor fill these in? They are all structural walls carrying 4 stories, lateral seismic/wind forces, and lateral pressure from soil. There are also some 8" CMU structural and non-structural walls where holes were made but I'm not too concerned about those.

Capture_nsaghb.png


I was thinking of packing the holes with 6000 psi non-shrink grout. I figured that since the surfaces are rough, the grout will bond well. My online research turned up repairs on driveways and spalling, which is not the case here since the items affected are structural and load bearing.

How does one repair these walls and footings?
 
Replies continue below

Recommended for you

Have them open it up around the rebar a little more to ensure enough concrete gets around and engages those bars. You can coat with a bonding agent - make sure it's applied properly, I think somebody posted something recently about bonding agents actually acting as bond breaks when not done right - and then have them pack in a low slump concrete or, if you have enough and accessibility isn't an issue, shotcrete could be used. Not sure that's economical in this case, though.
 
@phamENG I was thinking of not using a bonding agent because it can cause a cold joint and can be applied improperly. But it's definitely something to consider. I thought about using non-shrink grout instead of low slump concrete because it will fill the gaps completely, is easier to place without formwork, and has high strength. But please let me know if I'm wrong in this.

Shotcrete won't be used; too expensive, and I question if it can fill the gap properly.
 
I'm not a big fan of bonding agents... if concrete is well cleaned and dry... many people make the mistake of wetting the concrete first.

Rather than think climate change and the corona virus as science, think of it as the wrath of God. Feel any better?

-Dik
 
True....that hole is pretty deep....most of the shotcrete repairs I've used were shallow by comparison.

Having not applied them myself, I'm not entirely sure which will be easier to get in place. Enable will probably have some ideas when he comes around.
 
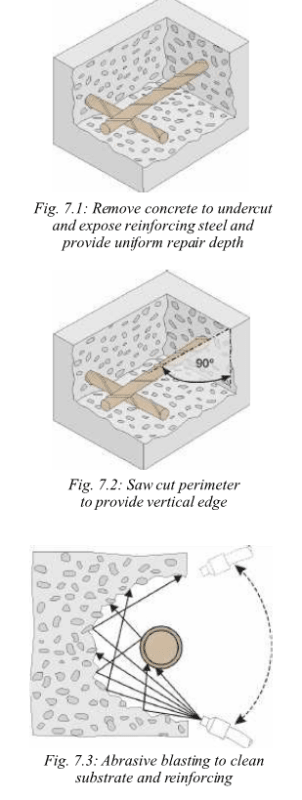
Agreed to chip away a bit more concrete so the new material can get around the existing rebar and bond to them. 1" minimum depending on the aggregate size. Then your options are use a bonding agent or not, your call, then next option is to hand pack a repair mortar or use a form and pour repair material or 3/4" minus concrete mix. The manufacturers of repair materials are BASF, Sika, and Euclid. If you call their tech help center or local rep, they can direct you to a specific product.

 
You absolutely want to make sure the concrete is wetted first NOT dry. This is what we call saturated surface dry (SSD) that means the concrete has been saturated sufficiently ahead of time but has no standing water. This is the most basic way to ensure that you get proper bond. If you want to ensure additional bond values, you could require them to scrub coat the repair mortar or a latex polymer into the surface first. This would improve bond. If done properly and performed within the open window times provided by the manufacturer, you can't beat the bond values of a three component epoxy modified cementitious bonding agent.

Do not patch that with non-shrink grout. Use a proper "Repair Mortar" I can't tell how deep the patches are but if 4" or less you can use a neat repair mortar. Something like Sika Top 123 Plus, or Euclid Duraltop Gel, or Mapei Planitop 23. I like these because they will mix the dry repair mortar with their proprietary latex admixture. This will produce a dense repair mortar with good bond. If the repair is deeper than 4", you will need to extend the repair mortar with some washed pea gravel.

Also, they need to square up those edges. The edges are all shattered from the chipping hammer. They should run an angle grinder with a diamond blade around the perimeter about 1/2" or 3/4" deep (don't cut the rebar) and then chip up to the perimeter of the sawcut line. This will produce a better repair with no feather edging.

This is a standard concrete repair and is very simple to do. There is an accepted industry standard practice when it comes to concrete repairs.
 
phamENG and GC_Hopi are correct, you want 1" clearance behind all the bars for the repair mortar to get proper coverage.
 
I'm getting confused with conflicting comments, especially wet versus dry and bonding agent versus none. I appreciate all the comments though. So this is what I'll do:

1. Chip away to expose the rebar at least 1".

2. Square up the edges.

3. Use an epoxy bonding agent.

4. Use a repair mortar made by Sika, Euclid, Mapei, or BASF. Will contact them about the correct product but will prefer Sika Top 123 Plus, or Euclid Duraltop Gel, or Mapei Planitop 23.

@STrctPono Thanks for the advice. It's about 10" deep, so I'll have to extend the repair mortar. What do you mean that there is an accepted industry practice for this? Is there a guide available or is it learned through experience? I was looking all around but couldn't find anything. I don't really trust manufacturer literature on this kind of thing; I prefer ACI codes.
 
Its learned but you can review ICRI Guide for Surface Preparation for the Repair of Deteriorated Concrete Resulting from Reinforcing Steel Corrosion. There are resources out there.

image_kmax2m.png
 
I would NOT hand patch this - too deep, and takes too long between layers. Best to form-and-place.

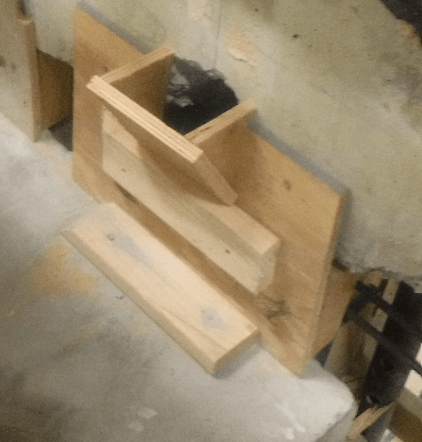
For a smallish and one-off 'structural patch' I would use a birdsmouth form and select your preferred SCC pre-bagged mix (Sika and BASF make such). Use a 1" needle/pencil vibrator and make sure the form's birdsmouth is wide enough for concrete placement.

Chip off the birdsmouth after the patch cures.

Surface prep (square cut perimeter, chip 1" behind rebar, etc) as other have stated above. No bonding agent - SSD, preferred.

BIRDSMOUTH_eeglbw.png


My go-to patch material for such a scope is 'CTS RAPIDSET' (calcium sulfoaluminate cement-based) and with pre-bagged 'FLOW' and 'SET' control admixtures readily available (at Home Depot too!!) you are able to achieve the required workability/consistency without adding additional water. And sets up in 1 hour so the contractor does not have to return the next day to remove forms etc. for such a small scope.
 
If you go to ACI's website (concrete.org) and search 'RAP Bulletins' there is about 15 or so repair application procedure bulletins that go into detail on several repair techniques.

For example: Form-and-Place: Link

And FREE to members and non-members alike!
 
Downloaded the bunch... thanks for the link.

Rather than think climate change and the corona virus as science, think of it as the wrath of God. Feel any better?

-Dik
 
10" is deep. Ingenuity is correct, a pourable material as opposed to a trowelable material would be much better. In that case, something like Mapei Planitop 15 or Sikatop 111 Plus would also work. What Ingenuity is proposing, with CTS rapidset, is a rapid setting material that will harden in a matter of minutes (not hours). It's a good reputable brand (even though it's sold at Home Depot). This material is very helpful if you need to put foot traffic or vehicular traffic on the repair quickly. It will get hot and in my experience is more prone to cracking. I prefer Western Materials FasTrac brand of CSA repair mortars but they are harder to get.

You should definitely read the RAP reports. Their free and discuss all the different techniques for repairing concrete.

ICRI is another good source.

I personally don't think you need to use an epoxy modified bonding agent. Not at least for what you have shown. I would use it in critical joint locations where I know the Contractor can do a good job applying it. SSD will be enough for what you need.

Study the manufacturer's material data sheets. They are very helpful. After you've read enough of them, you start to see patterns and how all the manufacturer's follow the same industry standards. I wouldn't be so quick to dismiss them just because they are selling you a product. They know their material and application of it should be followed to the T.
 
@STrctPono @Ingenuity @GC_Hopi Thank you. I'll probably do a mix of all of these suggestions. All great suggestions and advice, and especially the free ACI resources. I'm glad I asked on this forum; my initial idea would have just caused headaches.
 
STrctPono said:
I prefer Western Materials FasTrac brand of CSA repair mortars but they are harder to get.

Like near impossible to source unless you need bulker bag quantities, and wish to wait a few weeks - especially in Hawaii.

Also, interestingly I have found that with Western Materials CSA I have a tough time replicating in the field their published substrate bond values. Often times - even after near-perfect substrate prep - can only achieve <200 psi. Turns out that Western do a 'modified lab bond test' (not the typical ASTM bond test) using a 2" PVC tube and a threaded anchor rod with a center-hole ram - and such results seem to produce greater values than any field test that I have conducted, resulting in problems with special inspector's/owners when your field values do not 'come up to snuff'.

 
OP-
Where are you located? Repairs products are surprisingly region based on disctibution and contractor preferences. I'd suggest you find the local rep and show him your pics. They will likely give you their details and prodcut specs to folllow.

BTW: 'Extended' mortars mean aggregate is added. You will likely need to as well.

Ingenuity and GC_Hopi are right on, StructPono too for prep and SSD.

BASF / Master Builders MasterEmaco 440 is staple for me. So is the newer 440MC. Both are self consoladating.

good luck.

CB
 
Ingenuity said:
Like near impossible to source unless you need bulker bag quantities, and wish to wait a few weeks - especially in Hawaii.

You're correct. They used to only provide it in super sacks but it is now available in 60-lb prepackaged bags through Whitecap. Of course you would have to order it. It doesn't make sense for most jobs as there are other options that are readily available. WM doesn't have the name repertoire like CTS does.

Ingenuity said:
Also, interestingly I have found that with Western Materials CSA I have a tough time replicating in the field their published substrate bond values. Often times - even after near-perfect substrate prep - can only achieve <200 psi. Turns out that Western do a 'modified lab bond test' (not the typical ASTM bond test) using a 2" PVC tube and a threaded anchor rod with a center-hole ram - and such results seem to produce greater values than any field test that I have conducted, resulting in problems with special inspector's/owners when your field values do not 'come up to snuff'.

It certainly sounds like you've been on the opposing end of some of the overlay projects out here that went south. You are correct. They do use a modified bond test and not the standard ASTM C1583. I personally have issues with ASTM C1583. I had many projects where the Contractor or a 3rd party testing labs has huge issues performing it properly. Especially when the overlay/repair thickness is more than only 1.5". Rocking the core barrel, sloped substrate surfaces, pulling at an angle other than 90 degrees to the finish surface are all issues that seem to arise on every job I've been involved in. Not to mention the issues with epoxy cure time of the dolly/puck to the overlay/repair when the material needs to be tested within 3 hrs of placement.

CTS certainly makes some good products. I have been bred into a culture, however, that does not use them as there has been some biases formed over some specific performance criteria. One thing that is an issue is their latex modified concrete and the use of styrene-butadiene latex. It performs well, but unfortunately, nothing will bond to it... not even itself. Therefore, designing jobs that require construction joints can be painful.

milkshakelake, one thing that I think is important as the term repair concrete, repair mortar, non-shrink grout, etc. can all become mumbled in a discussion is that you are in the end looking for a product that has a positive net expansion after wet cure. The material should contain expansive admixtures such that at the end of 28 days it expands more than it shrinks. This is why pouring a normal weight concrete as a repair is not acceptable. This information is typically apparent on the material data sheet under the ASTM C157 test. If they don't have it, then it probably isn't an appropriate material for repairs. Non-shrink grouts have similar admixtures but are also not appropriate since they lack sufficient aggregate (typically only ground dust at best) to be durable enough to use as a repair material. The term "repair mortar" vs "repair concrete" really only indicates whether or not there is the presence of coarse aggregate. The term "neat" signifies that coarse aggregate is not present and you are using the material "as-is" provided by the manufacturer. "Extended" indicates that you will add a coarse aggregate (typically 3/8" pea gravel) to a neat mix. In addition, there are repair mortars that are either "modified" or not. Modified refers to the presence of a latex additive. Latex significantly improves bond and helps promote low chloride permeability. This additive may either be a separate liquid latex additive or be a dry latex added to the mix. Personally, I prefer the former. Hope this helps clarify some of the terminology.
 
Thanks all for the advice. I was waiting a while to see field results and it turned out great. I specified MasterEmaco S 440 and a whole bunch of instructions taken from these posts, ACI, and the manufacturer's website.

@chessiebear I'm in New York and the 440 was available.

@STrctPono That was very helpful. The main thing I took away is to use something that expands, which makes way more sense than non-shrink. I went with something "neat" because I don't trust the contractor to expand it properly.
 
Perhaps I am wrong, but when exposing rebar due to honeycomb, other issues, we have alwyas chipped behind the rebar to ensure that the rebar is encased in the repair concrete. Tried to embed the attached photo into the response but wouldn't work . . .


Status
Not open for further replies.

Part and Inventory Search

Sponsor