Continue to Site

Eng-Tips is the largest engineering community on the Internet

Intelligent Work Forums for Engineering Professionals

  • Congratulations IDS on being selected by the Eng-Tips community for having the most helpful posts in the forums last week. Way to Go!

The interpretation of ASME commission about QW403.6 of IX volume 1

Status
Not open for further replies.

lslcpfcc

Mechanical
Jul 20, 2016
36
Dear
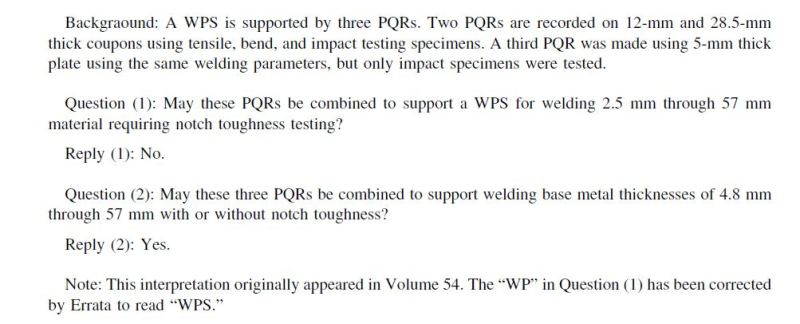
related to the interpretation of ASME IX volum QW403.6 provision answered by ASME commission , I am so confused with this interpretation.

with the same background ,why the question(1) reply is NO, simultaneously question (2)is YES.

which proficient can give me a detailed interpretation about this reply.
 
 http://files.engineering.com/getfile.aspx?folder=0232a723-827a-4d02-b2a4-6934455704e6&file=QW403.6.JPG
Replies continue below

Recommended for you

QW403.6_xmvlxc.jpg
 
To better understand what is being interpreted, use a simple table for yourself and list what is being stated in the background and outcome in Section IX.
 
The minimum basemetal thickness qualified by tensiles and bends is 4.8mm (3/16"). You can't extend it lower with only impacts. If tensiles/bends + impacts were done on the 5mm coupon, answer (1) would be yes.
 
I will analysis the two PQR respectively. only under the impact-toughness requirement condition.

for PQR 1 which base metal thickness is 12mm with tensile, bend, impact test, the base metal range of the PQR covered is 12-24mm;
for PRQ 2 which base metal thickness is 28.5mm with tensile, bend, impact test,the base metal range of the PQR covered is 16-57mm
( when impact test requirements , the provision of QW403.6 is applicable.)

consequently, when use the combination of the two PQR, the base metal thick range should be 12-57mm with notch-toughness test requirements. BUT answer 2 says 4.8-57mm with or without notch toughness.
 
continue-

as per the description of QW401.1 (2015 edition) a additional test coupon can be welded using the identical essential and supplementary variables only tested with notch-toughness test. only the minimum thickness limitation of the range established by former PQR will be modified by the additional notch-toughness test coupon.

So the minimum modified by the PQR3 is 2.5mm. So first answer of the response should be correct.

the reference of Interpretation: IX-89-100 can be referenced,

Interpretation: IX-89-100
Subject:
Date Issued: January 2, 1991
Section IX, QW-202'2 and QW-451
File: BC90-663
Question: A procedure qualification in a test coupon of 1-1/2 in. thickness has been qualified
to the requirements of QW-202.2(a) with the exception of notch toughness. A second Procedure
Qualification with identical essential and siipplementary essential variables, is tested for notch toughness
only, in a test coupon of 3/16 in. thickness. Do the above two Procedure Qualifications support
a WPS to weld a butt joint 3/16 in. to 8 in. in thickness where notch toughness in required?
Reply: Yes.
 
The minimum modified by PQR3 is only 4.8mm (3/16") as I stated above, because you did not do bends/tensiles on PQR3. In your interpretation, it does not lower the limit to 3/32" (t/2) when done on a 3/16" coupon.....it stays at 3/16" because the 1-1/2" coupon only qualifies to 3/16".

So: 1-1/2" coupon with bends + tensiles but no impacts = 3/16" - 8" qualified thickness
Then add impacts on 3/16" coupon: theoretically you could get t/2 (3/32") but that was not qualified by bend/tensiles on the 1-1/2" coupon, so your minimum must be 3/16".
 
@ david339933

I don't agree with you point, because the provision of QW401.1 of AMSE ix described very clearly, WHEN use the same essential and supplementary essential variables, this can be considered an additional PQR of the former PQR, the additional PQR Can be PERFORMED IMPACT TEST ONLY, the resulting of the two PQR is modifying the minimum thickness of the base metal.
 
You don't have to agree with me.....ASME does as evidenced by the interpretations you have put forth. Does it seem logical that both interpretations you listed are wrong?....or you are? The point of QW-403.6 is to constrain the minimum thickness qualified, certainly not to extend it beyond the limits qualified through mechanical testing.

QW-401.1 example:

PQR A - 1/2" plate no impacts - Qualified Base Metal Thickness = 3/16" - 1"
PQR B - 3/8" plate only impacts - Qualified Base Metal Thickness = 3/8" - 1" (only minimum thickness is modified)

To think that you can extend the qualified thickness beyond what you "proved" through mechanical testing is extremely flawed logic and poor engineering judgement.
 
Dear David,

As your example,

PQR A - 1/2" plate no impacts - Qualified Base Metal Thickness = 3/16" - 1"
PQR B - 3/8" plate only impacts - Qualified Base Metal Thickness = 3/8" - 1" (only minimum thickness is modified)

I agree with the result of your example.

BUT, when base metal of PQR B in your example is modified to 3/16,the lowest limitation of PQR A, according to the clause of QW403.6 "where T is less than 1/4 in. (6 mm), the minimum thickness qualified is 1/2T., the base metal is covered by PQRA ,and less than 1/4 in, So the minimum thickness qualified is 1/2 x 3/16(1/2 T).

do you agree with the result? if not, why?
 
Obviously I do not agree. Where have you shown that the mechanical properties of the weldment is adequate for the 3/32" base metal thickness? As you stated, the lowest limitation of PQR A is 3/16". It is only 1/2T if that thickness falls within the limits of that qualified through mechanical testing.
 
the mechanical test for the additional plates is only toughness-test,So,your answer cann't persuade me,Because as above statement,all condition confirmed with the clause of CODE.
 
your answer sounds reasonable, but i don't find the clause or evidence supplied by code or standard or ASME commission interpretation.

can you supply the interpretation?
 
lslcpfcc,
David has given you the correct answer over and over and either you do not understand or you do not want to understand.

If you had a 9 mm PQR (A) with full mechanicals your minimum thickness without impacts is 1.6 mm.
With impacts the minimum is 9 mm.
If you then added a PQR (B) of 5 mm with impact tests only you could then modify your minimum to 2.5 mm with impacts.

You cannot, repeat cannot use an additional PQR with impacts only to take you outside the range of QW 451.1

Regards,
DD
 
lslcpfcc,

david is correct in all his answers, and several others including me agree with him. You should take the advice.
 
Dear DekDee

more thanks for you example, I understand this gradually, I misunderstand the clause of QW403.6, thanks for David.
 
Status
Not open for further replies.

Part and Inventory Search

Sponsor