Continue to Site

Eng-Tips is the largest engineering community on the Internet

Intelligent Work Forums for Engineering Professionals

  • Congratulations waross on being selected by the Eng-Tips community for having the most helpful posts in the forums last week. Way to Go!

Significance of the symbol 1

Status
Not open for further replies.

nik007

Mechanical
Jul 25, 2023
2
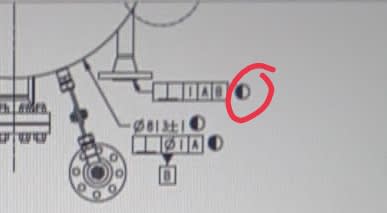
Can someone please clarify the significance of the half filled circle symbol. In the attached image, these symbols are attached to dimensions and also to some gd&t symbols.
IMG_20230725_195253_kotegv.jpg
 
Replies continue below

Recommended for you

It's not a standardized symbol (that I know of). So check the notes or title block on that drawing. There should be a legend that explains what that means -- perhaps a "critical dimension"? Or a dimension that needs to be reported by QA on a check sheet?
 
The part must be machined under the light of a 1/2 moon to the proper size as indicated by the runes. May Mazak have mercy on you. </s>
 
cowski said:
The part must be machined under the light of a 1/2 moon to the proper size as indicated by the runes.

I thought it was indicating that it was acceptable to be machined in either full light or full dark. [ponder]
 
Guys,
"The drawing should define a part without specifying manufacturing methods."
 
Burunduk,

What about surface roughness? You CAN specify exact methods of required machining.
 
Wuzhee, with roughness you can indicate the final specs of the surface (whether material removal is required or prohibited, etc.). But one could say that that still doesn't specify the actual manufacturing method.
 
I disagree with the second sentence. ASME allows for calling out specific manufacturing. If I want it that way, there's no workaround for that in manufacturing imho.
lap_s3zbao.jpg
 
In "should define a part without specifying manufacturing methods", the key word is "should".
However, what advantage is achieved in requiring "Lapping"? If the same surface roughness can be achieved by several processes, why limit your supplier to only one? Also how will adherence to this process requirement be examined and confirmed during the finished part inspection?
 
If I would design a thing similar to a combustion engine with a cylinder, piston, conrod etc, and I want an oil containing surface, I'd put "honing" in surface symbol without second thought. In the auto industry it's common practice but if my contractor is not familiar? Then I have to specify because many other techniques wouldn't provide me that required surface for my engine-like thing. Just one example.
There's the C for concentric texture. Linear grinding can't make circles. Or if mirror polish is a requirement. I can put Ra0.2 there but milling also can make Ra0.2 so I think it has it's place.
 
About lapping, etc.-- true. As Burunduk mentioned, that's where the word "should" is important, rather than "shall."
 
From the same paragraph that Burunduk quoted (4.4.e in Y14.5-2018):

"However, in those instances where manufacturing, processing, quality assurance, or environmental information is essential to the definition of engineering requirements, theinformation shall be specified on the drawing or in a document referenced on the drawing."
 
Status
Not open for further replies.

Part and Inventory Search

Sponsor