Continue to Site

Eng-Tips is the largest engineering community on the Internet

Intelligent Work Forums for Engineering Professionals

  • Congratulations KootK on being selected by the Eng-Tips community for having the most helpful posts in the forums last week. Way to Go!

weld - symbol

Status
Not open for further replies.

dogbural

Aerospace
Jan 25, 2009
74
Hi,

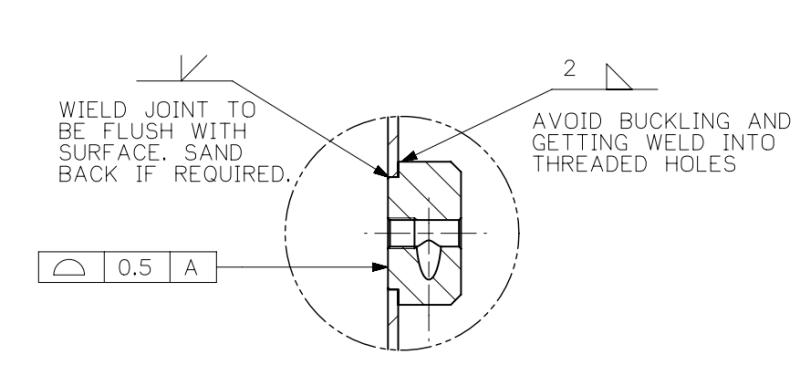
we have drawing, denoting welding requirement as attached.

1. Is it a correct denotation? Without weld size, what is default size to be?
2. Especially on left side where flush surface is required, this is kind of tight fit. At most there is a gap of 0.075mm or zero. What is something practical?
 
 https://files.engineering.com/getfile.aspx?folder=258a25d0-1965-4779-aae2-22a62f9f945d&file=Weld.png
Replies continue below

Recommended for you

The symbol on the left is a single bevel groove. Without any numbers on its side, it is required to be full penetration, on the thinner member.

Also, both symbols are shown on the wrong side of the line. I believe they should be on the bottom.

The devil is in the details; she also wears prada.
 
Please use the Image tool to insert images. You'll get more replies by not forcing people to take extra steps to download a picture.

Weld_vt8seu.png

Agree that the symbols are on the wrong side.

There is a perfectly good "grind flush" symbol (just a straight line below the weld). No need for a misspelled note.

Gap should be defined in the WPS.
 
And people wonder how boats float and planes fly. The answer: sometimes they don't, there's usually there's a welding symbol involved.

Best regards - Al
 
@ GTAW,

When I teach welding drawings/symbols, I have a dedicated slide that mentions the three major systems used in Europe.
EN/ISO, AWS, and the wrong kind.

From what I've seen so far, drawings of the third kind are the majority...
 
I agree. I'm teaching a class on AWS welding symbols this week. It is eye opening.

Best regards - Al
 
Status
Not open for further replies.

Part and Inventory Search

Sponsor