Continue to Site

Eng-Tips is the largest engineering community on the Internet

Intelligent Work Forums for Engineering Professionals

  • Congratulations KootK on being selected by the Eng-Tips community for having the most helpful posts in the forums last week. Way to Go!

Nut face runout / perpendicularity to thread - inspection strategies

Status
Not open for further replies.

M.B.

Automotive
Nov 10, 2023
8
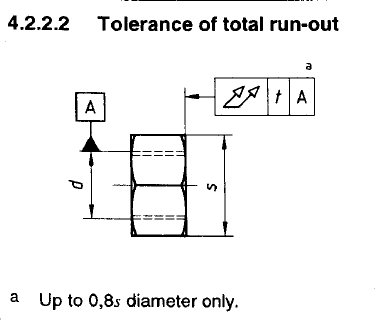
What would you consider the best way (from a practical point of view - manufacturing environment) to inspect the perpendicularity or runout of the faces of a nut to the thread's axis?
 
Replies continue below

Recommended for you

I would make sure its faces are flat and parallel, run it down just barely snug, and check the face runout of the exposed face.

Anything else would require special fixtures.
 
geesaman.d said:
I would make sure its faces are flat and parallel, run it down just barely snug, and check the face runout of the exposed face.
Anything else would require special fixtures.
But that would compound any perpendicularity error on the bolt as well as form errors on the bolt's thread to the overall results, so would still need a special gage with both parameters guaranteed to very low tolerance.
Thread plug gages (which I have used for CMM measurment in previous jobs) were one of my first thoughts, but they are not generally threaded close enough to the flat face, and would still involve a fairly complicated process to then measure the actual value on a shadowgraph or using a dial indicator as there would be the need to rotate it around.

All in all I am surprised by the lack of existing instruments for this kind of check, considering it's a specification in ISO 4759-1 (and likely to a number of other specs for nuts and bolts).
 
Locknut threads seem to have much more runout and perpendicularity error than the threading on the shaft. If it's that big of a concern for you, I agree you may need fixtures.
 
Why would anyone care about nut thread axis orientation? If thousands of nut types aren't enough, one must reinvent the hex nut for a special purpose?

I wouldn't bother with gauges and fixtures, just machine the faces parallel and run the tap through the hole. Machinists don't like GD&T and standards. They like ±0.XY tolerances.
 
Wuzhee said:
Why would anyone care about nut thread axis orientation? If thousands of nut types aren't enough, one must reinvent the hex nut for a special purpose?

I wouldn't bother with gauges and fixtures, just machine the faces parallel and run the tap through the hole. Machinists don't like GD&T and standards. They like ±0.XY tolerances.

Because there are junk locknuts out there and if they don't thread on squarely they fail and/or misalign the part they're holding down.
 
I can only think of this nut of high importance when I hear lock nuts.
This throws away any gd&t and one could wonder about the measurements. Probably CMM. Then 3500 ft/lbs of torque to settle the deviations.
Caterham-CT05-F1-Car-Wheel-Nut-LH_zcpdmc.jpg
 
Sure, an F1 wheel nut is important, ask Valtteri Bottas. It's certainly the most impressive with the retaining tabs and such.

But not as important as the locknut on the driveshaft of a lethal-service high pressure/high temperature pump/agitator/compressor. I'm sure there are countless other critical machines that rely on a basic locknut.
 
To clarify, the items in question are not locknuts, just standard nuts (general tolerances governed by ISO 4759-1), they are forged and then threaded, the faces are not machined but left as forged.
We had a batch in with extremely poor face perpendicularity (the nuts are visibly not flat when tightened making contact only in one point, 90%+ of the batch out of spec) and and we are looking to implement some incoming sample inspection for this characteristic on our end, as well as requesting the supplier to to the same on their end.

runout_Nut_rbc2ia.png


Wuzhee said:
Why would anyone care about nut thread axis orientation
The answer seems quite obvious to me (to prevent the nut making contact with the opposing surface in a single point, which among other things applies a very uneven force to the bolt), but regardless of the answer, we are asked to supply our customer parts that meet their spec, which (as far as I am aware) is a commonly accepted international specification for this kind of item, not some obscure and overspecced request we could argue against.
 
The best solution is to make a thread-face gauge then sample random number of nuts from every box, whichever number you feel represents your amount and run them tight. Inspect visually. If it fits, it passes. If not (like your point contact) reject box/batch/pallett, send a complaint to vendor then go on to next batch. I wouldn't opt for fancy gauge-tech-measure-expert machine for literal bulk cargo.
 
Wuzhee said:
The best solution is to make a thread-face gauge then sample random number of nuts from every box, whichever number you feel represents your amount and run them tight. Inspect visually. If it fits, it passes. If not (like your point contact) reject box/batch/pallett, send a complaint to vendor then go on to next batch. I wouldn't opt for fancy gauge-tech-measure-expert machine for literal bulk cargo.

Not an option, at least post quality incident, you are marked as automotive, so I have to wonder how do you think your proposal would ever pass an MSA.

We need at the very least a form of attribute gauging repeatable enough to pass MSA, but variable gauging would be preferred.
 
Sometimes you have to go by your own methods.

I'm a product develper, not really connected to MSA and stuff. I make car parts, metrology isn't my concern.
 
Wuzhee,
That is not one of the best drawings I've ever seen.....no wonder why the F1 team has failed
 
I'm sure the incompetence of the strategy team, lack of funding and stuff weighs more on their failure scale than a set of nonconforming untoleranced wheel nuts.
 
Wuzhee said:
I'm sure the incompetence of the strategy team, lack of funding and stuff weighs more on their failure scale than a set of nonconforming untoleranced wheel nuts

I agree. And the dimensional engineering team just fit the bill. Has been the same like all the others. If you lie down with dogs, you get up with fleas. The problem with incompetence is its inability to recognize itself.
 
The reason for a lack of gauges for this characteristic is that most makers don't produce crap parts.

The most likely way to screw this up is if the hex faces are also not perpendicular to the mating faces and were used to hold nut blank at an angle to the face when the thread was formed/cut. Set the part on each of the flats and check the perpendicularity of the mating faces to them - a visual inspection should quickly find the worst alignment.

If your supplier wants to fight about these parts and they are clearly out of spec, then find a new supplier. No amount of extra gauging forces them to make the parts properly. If they can't make them properly and their gauge rejects them then you have is a contract they cannot fulfill and you are back to finding a new supplier.

Is there some control for the outer 0.2s part of the face that is not controlled by total runout so it is not irregular lumps of material above the nominal mating face?
 
3DDave said:
The reason for a lack of gauges for this characteristic is that most makers don't produce crap parts.
Agreed, but you get what you pay for and cheap parts is the name of the game for our clients.

3DDave said:
The most likely way to screw this up is if the hex faces are also not perpendicular to the mating faces and were used to hold nut blank at an angle to the face when the thread was formed/cut. Set the part on each of the flats and check the perpendicularity of the mating faces to them - a visual inspection should quickly find the worst alignment.
Nut sides are reasonably perpendicular to the faces.
According to the supplier's 8D the problem lies in a worn tool for threading that had some play, of course the supplier produced another out of spec batch after implementing corrective measures, so their 8D is likely not worth the paper to print it.

3DDave said:
If your supplier wants to fight about these parts and they are clearly out of spec, then find a new supplier.
The concern is not the supplier maintaining the parts are OK, they admitted fault, the problem is that this cascaded in major problems on our client's end (line stoppage, parts needing to be hand carried to resume production and all in all a significant shitstorm).
Due to all of this, a perpendicularity check will likely be explicitly called out in the revised customer's drawing, so we will need to implement it regardless of a possible supplier switch.
 
You skipped:

"If they can't make them properly and their gauge rejects them then you have is a contract they cannot fulfill and you are back to finding a new supplier."

Your supplier lied to you twice that the parts met the requirements. They clearly don't want your business.

Before you fire them, ask for a video of their machine operating. Have them paint the nut blanks they use in the video and ship the painted nuts to you.
 
3DDave said:
If they can't make them properly and their gauge rejects them then you have is a contract they cannot fulfill and you are back to finding a new supplier.

True, but again, even if we end up changing supplier, the perpendicularity/run-out requirement is almost certainly going to be an inspection characteristic in the revised customer's drawing, so that does not save me from having to find and implement a reasonable way to check it at goods-in here and during manufacturing (whomever the supplier may be).
 
M.B. said:
True, but again, even if we end up changing supplier, the perpendicularity/run-out requirement is almost certainly going to be an inspection characteristic in the revised customer's drawing, so that does not save me from having to find and implement a reasonable way to check it at goods-in here and during manufacturing (whomever the supplier may be).

1) A vendor lied to you (or is thoroughly incompetent) and you're choosing to accept that. They cost your customer (and likely your company) a ton of money and even if you have the right fixtures, you won't detect bad parts until they arrive at your door and incur cost and schedule delays. You can and must do better.

2) Moving to a vendor who doesn't lie and/or has competence might open the door to have the necessary quality control handled on their end so that your inspection burden will be minimized. JIT manufacturing doesn't work if the paying parties are reliant on defensive quality control methods.
 
Status
Not open for further replies.

Part and Inventory Search

Sponsor