Continue to Site

Eng-Tips is the largest engineering community on the Internet

Intelligent Work Forums for Engineering Professionals

  • Congratulations waross on being selected by the Eng-Tips community for having the most helpful posts in the forums last week. Way to Go!

Slot as Primary datum for a Blow Molded Part

Status
Not open for further replies.

MPSU

Automotive
Aug 26, 2024
13
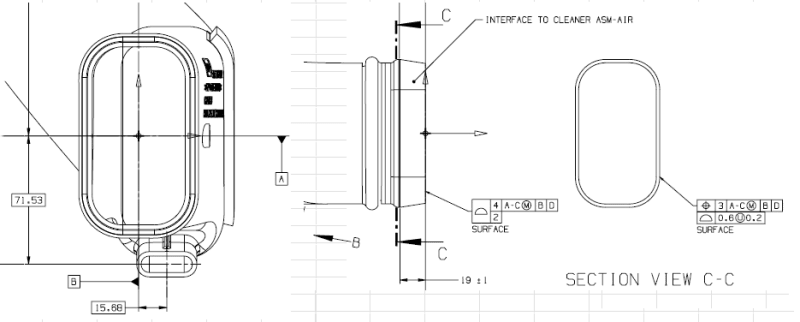
I have a Blow Molded part with A & B datum given as center point of a Slot. This slot opening does not have any inner dimensions but only profile callout on the outside since it is assembled in a housing. Now, I am working with one of our Gauge manufacturers who is asking if this is at RFS or MMC. To my understanding, it is at RFS, but I am not able to think of a way to lock datums A &B. I am attaching a sketch, can you guys help me with how to lock datums A & B in a checking fixture.
 
 https://files.engineering.com/getfile.aspx?folder=79a1e2ce-6d00-4e4a-954c-a9ef58804ee4&file=SLOT.jpg
Replies continue below

Recommended for you

What are you trying to qualify with your gauge? The slot's size? Or the slot location?
 
Your datum features and feature control frames do not make sense.

Best regards,

Alex
 
A few remarks:

1. If datums A and B should be derived from the height and width of the slot, the datum feature symbols need to be attached to the corresponding size dimensions.

2. Profile is always RFS.

3. If the profile tolerance is intended to apply all around, the all around symbol should be shown on the leader.

4. Position, when used with profile on that kind of closed shape defined by basic dimensions (called Irregular Feature of Size) only makes sense when applied MMC, but it is shown at RFS.

5. You are asking how to fixture to A and B but your tolerances reference B and D.
 
A datum must be tied to a feature. The "center" or a centerline doesn't identify which center is the datum feature and the use attached to a centerline is specifically disallowed in every version of ASME Y14.5.

I see in the nominal direction two outer widths and two inner widths. Which portion of the taper is the width to use? Or is it some part of the bulged area? The same applies to the [A] direction.

A good guide to fixturing for inspection is to look at the installation in the next assembly; that installation is what the inspection fixturing should be reproducing so you know if it fits in inspection it will fit on the assembly line or in the field.

SLOT_buh9i9.png
 
The attach Image button is front and center.

SLOT1_qzyku5.jpg
 
SO, how do you think should the datums A & B be mounted in the existing scheme. Maybe use diamond locating pins??
 
If [A] & are the interior slot length/width, would the fixture technically require two sets of expanding jaws to mount [A] & as RFS? (or contracting jaws if outside dims.)
 
What did the engineers who designed the part decide on for mounting the item?

The existing scheme isn't clear on what surfaces are used for A and B so I can't suggest anything for them.

Taking a shot, nothing mounts to the interior of the slot so that's not useful. The section at C-C does look like it controls to planar directions of movement and one rotation when held against that nominally flat surface where C-C appears to be dimensioned from.

An argument could be made that the flat is a primary datum, the long outside surfaces noted in C-C is the secondary, and the narrow outside surfaces would be the tertiary reference.

The primary would have a flatness callout, saving some grief over making it a unilateral tolerance zone.

The profile at section C-C would be given a composite tolerance relative to the flat, though having little depth perpendicular to the primary there's not much need for refinement.

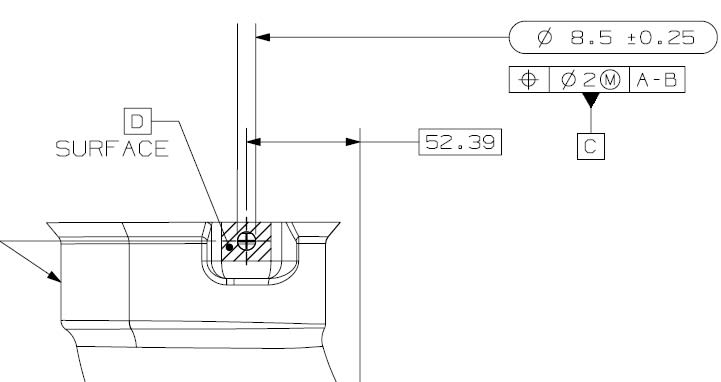
The hole currently used as datum feature C would be positioned relative to the above defined primary-secondary-tertiary features.

Any other features on that end of the part would get a profile tolerance relative to the above defined primary-secondary-tertiary features.
 
Mech1595 said:
If [A] & are the interior slot length/width, would the fixture technically require two sets of expanding jaws to mount [A] & as RFS? (or contracting jaws if outside dims.)


If this is indeed the intent and had it been conveyed correctly on the drawing, then yes. As you probably imagine, that would be difficult to implement in practise, and as 3DDave noted unlikely a functional datum scheme.
 
Thank you guys for the help. I have contacted the Gauge-guys and they are coming up with a concept. If it still didnt work, I will contact the customer to change the datum scheme in the print
 
3DDave: That is a very well explained and detailed view. Thank you. One thing I want to confirm is where are you saying the primary datum should be? I did not follow it, I am sorry, new to this.
 
A fairly good way to select a primary plane is set the part down in a way it won't fall over easily, though that is not always the case. It helps if that is a surface that is also used for mounting the item to another part.

Without knowing how this fits into the next assembly and what the designers/engineers had planned for which end is clamped down and which might get shoved to fit I can't make a firm recommendation.
 
NO, you dont have to make it firm. I was just trying to understand what you mentioned in your last message. Was wondering where the flatness callout would be
 
Can you post a couple of iso views of the part? Instead of attaching them you can just click the image button so it'll show in the post.
 
Status
Not open for further replies.

Part and Inventory Search

Sponsor