Continue to Site

Eng-Tips is the largest engineering community on the Internet

Intelligent Work Forums for Engineering Professionals

  • Congratulations KootK on being selected by the Eng-Tips community for having the most helpful posts in the forums last week. Way to Go!

650cc motorbike dual cam timing - im lost 2

Status
Not open for further replies.

Artens

Automotive
Aug 1, 2017
10
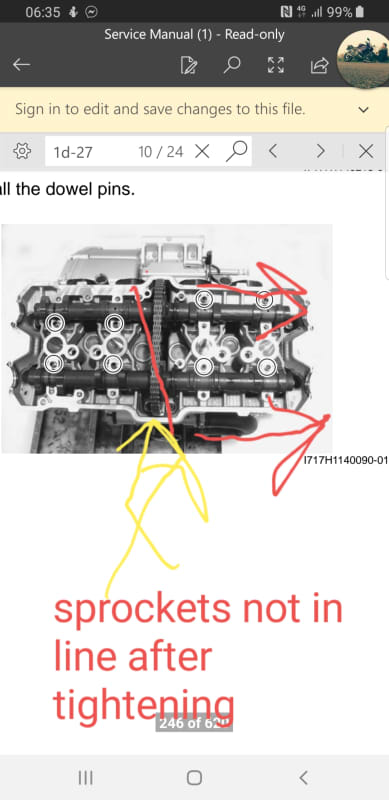
Hi, i had to take the cyl head out to fix a stripped spark plug thread. Now ive put it back on, and i came to the step for timing. I am following EVERY SINGLE step, what it says in the manual,
Screenshot_20190323-215744_Word_qhna60.jpg
and i just cant get it right. Now ive got few questions, and a video with few photos to help you guys to understand what i mean.
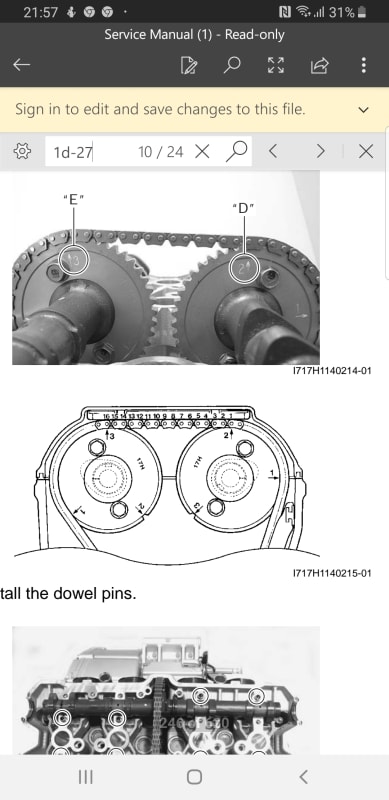
So, my exhaust cam has a mark 1 which has to line up with the head gasket surface. It does.
Then from the exhaust cam 2nd mark, i have to count 16 roller pins and put an intake cam on. Done that - happy days.
received_433893144019680_yrf1cb.jpg

What bugs me that
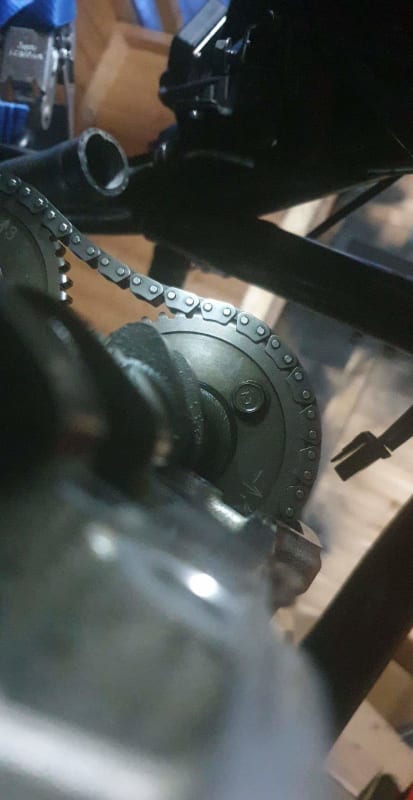
1. I cannot line up the cams (they keep getting dragged to either side when im tightening them up) which makes chain to stretch to the side and fall off.
2. Both camshafts just rotate when im tightening them up, as they are positioned in such a way, that they are opening cyl 3 exhaust valves fully.. now, the main question is, if 1 and 4 pistons are at tdc, should valves be open? I understand that they should be open slightly.
Because in my opinion, cam should go on nicely, without any force, as it surely can cause damage?
CMON SUZUKI, YOU MAKE ME LOOK SOOO STUPID
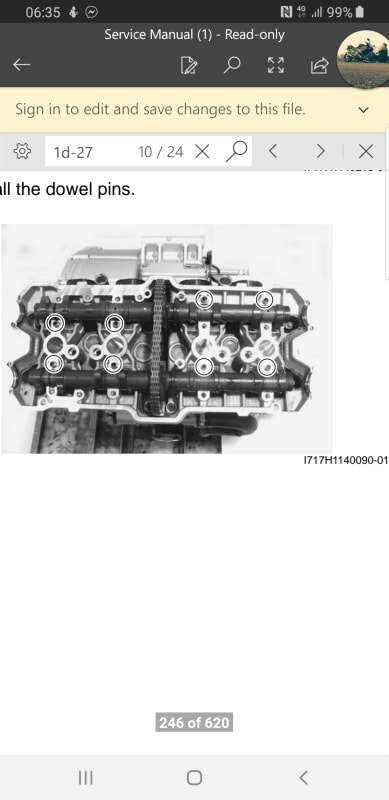
Screenshot_20190323-063501_Word_ogzcx7.jpg

Yt video :

Waiting for replies, thanks
 
Replies continue below

Recommended for you

I've done this job many times.

On a 4 cylinder engine, there is always going to be a valve pushed slightly open by both camshafts ... sometimes more than one simultaneously. They're going to push the camshafts around. It's normal. It also means you will not be able to "seat" the camshafts fully in the lower cam bearings ... the camshaft caps have to push them down (which will make the camshafts try to rotate).

Your video shows a totally normal condition. Just put the camshaft caps on and tighten them as prescribed.

Tighten them evenly ...a couple turns of each bolt at a time.
 
Thank you! I will give it a 475th try when I come back from work. :D
I will tighten down them evenly.
Also, any tips to hold both camshafts in place when tightening them down? They move off slightly which in my opinion causes the sprockets not to be alligned?
20190324_064041_wx0fhp.jpg
 
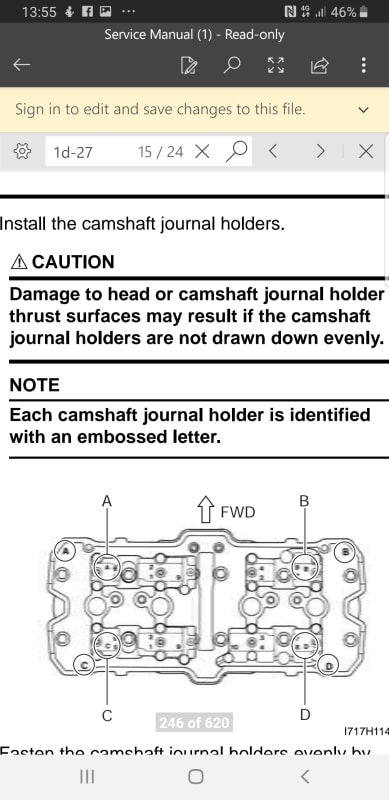
Also it says that drawing them down unevenly may cause damage.
And cams keep slipping out....🤦‍♂️🤦‍♂️🤦‍♂️🤦‍♂️
Screenshot_20190324-135531_Word_jv1ds2.jpg
 
You should not have significant end play in the camshafts after it is assembled. Somewhere, involving either the cylinder head or one of the camshaft caps, is a feature intended to locate the camshafts end to end. There is nothing in that valvetrain which exerts a sideways force on the camshaft once it is properly assembled, so it doesn't take much. Look for a machined face on the end of one of each set of camshaft caps that is supposed to butt up against a machined face somewhere on the camshaft, and there is one such mating machined face in each direction. Make sure you have those parts correctly oriented.

If the chain keeps wanting to jump off the sprocket teeth, one trick is to install the tensioner before tightening the camshaft caps. Don't forget that the tensioner has to be reset (retracted) first. I've never owned a Suzuki so I don't know how their tensioners are, but between Kaw Yam Hon, it either has a bolt on the end of the tensioner that has to be removed in order to remove a spring, at which point you push a pawl down and retract the tensioner then install it and replace the spring and bolt afterward, or it has a bolt on the end that uncovers a screw head inside which you unscrew against its spring-loading to retract the tensioner, and then there is some sort of provision for holding it retracted while you bolt it down - if nothing else, you holding the screwdriver from turning while you bolt it down.

This is not supposed to be a hard job ... it is only a minor nuisance, not a proper one. BUT there are many, many ways to get it wrong and it WILL destroy your engine if you get it wrong. Make sure you aren't doing any of these!

- Not doing the procedure with ALL the timing marks, including the one on the crankshaft/flywheel, in the right spots.
- Flipping the camshafts end for end, results in above-mentioned end-play locating feature not working ... and it will later result in valves hitting pistons because of the cam lobes being in the wrong spots. The tipoff will be that you are looking at the timing marks from the wrong side of the engine.
- Swapping the camshafts intake for exhaust.
- Getting the camshaft caps mixed up and installing them in the wrong positions. (Results in the end-play locating feature not working)
- Missing dowel pins.
- Unevenly tightening the camshaft cap bolts. Remember that you are drawing the camshaft down against the pressure of some of the valve springs. Identify which valve springs you will be compressing ... and draw the camshaft down using the bolts adjacent to those valves first. Evenly, a couple turns of each bolt at a time.
- Overtorquing the camshaft cap bolts. It's really easy to strip them. Use a torque wrench.
- Failing to reset the tensioner before installing it.
- Failing to rotate the engine two complete crankshaft revolutions forward, BY HAND using a socket on the nut on the end of the crankshaft, with sparkplugs removed, to encourage the auto-tensioner to set itself, and then failing to check that all of the timing marks including the one on the crankshaft/flywheel align properly afterward having done this. If you feel abnormal resistance (due to a valve hitting a piston), STOP. Don't force it. Back up a few steps and correct your mistake.

My '04 ZX10R is a fun one. I've had the camshafts degreed, which on that engine involves putting the sprockets in place on a set of slotted holes as opposed to the as-originally-designed round holes. The consequence is that the original-equipment timing marks no longer line up. Gotta know what you are doing for that one. Good thing I'm the only person who ever touches it. I'm pretty sure my friend Craig (who is a race-engine mechanic) would clue in if he saw it apart, but your average dealer mechanic probably won't, and a backyard mechanic certainly won't.
 
One more tip - once the cams are drawn down, keep chain slack on the tensioner side. Use a spanner to turn and hold each cam; there are usually flats on the shafts for this. Do the cam furthest from the tensioner first, set it up so chain is tight between sprocket and crank. Then move to the other cam and set that up so chain is tight between the two cam sprockets. That way, the tensioner can take up the slack ready to hand turn and re-check timing.
Hope that helps!
 
Hi! I have done the timing, took me the whole day of struggling since the cam kept slipping, but got it tightened down when I took my time! Started the engine all 4 cylinders are firing up, and they seem to work fine when i rev it up. Now another stupid thing that happened, bike doesnt idle, and im quite sure it is throtttle position sensor or idle speed sensor! The bike doesnt start with the throttle off, but if i open it up a bit it starts. If i slowly close the throttle to drop the rpm to 1.5k-2krpm the engine works smoothly. So i am fairly sure that it isnt timing fault. I think its one of the sensors. The air bypass one i got in mind.(or actuator whatever you call it)

I had to take the throttle body off to remove the cyl head, but bare in mind that i didint touch or adjust anything in there. Just disconnected all the hoses and sensor plugs. I was about to check the voltage today, of the idling speed sensor, but im at work now. But i dont think its that. Maybe it needs resseting after disconnecting?

Makes me worry. Its possibly a atupid thing somewhere, hopefully nothing too serious. P.s. the injection worked like a dream before
 
Also, i greatly appreciate your help guys!
 
First thing to check is always for a vacuum leak, you'd be surprised how much trouble they can cause!
Second - yes, idle bypass motor or solenoid would be the next culprit. Not familiar with your specific setup, so I'll generalise a bit. Take it off and check for carbon residue which might be blocking the slide or plunger from moving. Spray some carb cleaner and GENTLY move the inside, being careful not to scratch anything. A bit of rag over the screwdriver end is good. Rinse again and spray a light coat of silicone lube or machine oil, then test with power.
Obviously check the electricals.
Probably unlikely to be your airflow meter or manifold pressure sensor, whichever you have. Those *normally* either work or don't, at least in terms of "will it run?" If she runs fine off idle and doesn't cough out clouds of unburnt fuel, it's seeing a decent reading on manifold air.
Hope some of that helps!
 
On the subject of vacuum leaks, the PCV system is an often overlooked source of vacuum leaks. Even a bad valve cover gasket can behave as a vacuum leak through the PCV system.
 
No mass airflow sensor on bike engines. The crankcase vent is just a hose to the air filter housing, there is nothing "positive" about it and there is no connection to the vacuum side of the throttle bodies, so that won't be the problem here.

Vacuum leaks are entirely possible. If you didn't get the throttle bodies properly seated in their rubber adapters, or didn't get the clamps tightened down, those will cause vacuum leaks.

Cam timing a tooth out of position will cause all sorts of starting and driveability troubles.

Valve clearances out of specification will do it, too. Hopefully the original poster checked this in the course of having the top end of the engine exposed. You were in there anyhow.

I presume this is a late model GSX650. GSXRs are notorious for having TPS (throttle position sensor) issues, and this engine is pretty much the same thing but de-tuned a bit. Same sensor. But ... it would be an exceptional coincidence for this to fail coincidentally with doing other maintenance on the bike, so I'd say it's unlikely.

Sensor not plugged in? Hoses connected properly and not mixed up? Is the fault-warning lamp on when it shouldn't be?
 
Congratulations on getting the bike back together and running! I know this is a bit late, but in the past I have made a wood tool that locks the sprockets together.


Method 1. Involves wedging or bolting a piece of wood between the sprockets so they're physically locked together and cannot turn.

Example: place a piece of wood on the camshaft parallel to the timing chain, hold wood against the sprockets with clamps or locking plyers, Mark any holes the camshaft sprocket has onto the wood, remove the wood and drill the holes, reattach wood onto sprocket, insert bolts into drilled holes, Done.


Method 2. Buy a camshaft timing Lock/camshaft holder/Universal camshaft adjuster.
 
Status
Not open for further replies.

Part and Inventory Search

Sponsor