Continue to Site

Eng-Tips is the largest engineering community on the Internet

Intelligent Work Forums for Engineering Professionals

  • Congratulations waross on being selected by the Eng-Tips community for having the most helpful posts in the forums last week. Way to Go!

Alignment - Actual Offset 1

Status
Not open for further replies.

Vikas86

Mechanical
Feb 17, 2019
6
alignemnt_p7quke.jpg


Hello All,

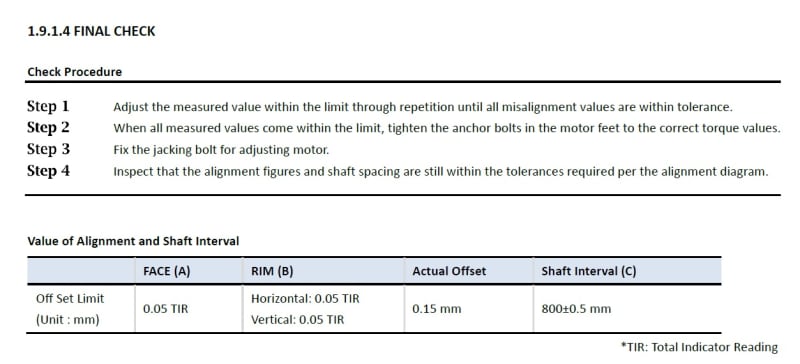
Can you please let me know what dies vendor trying to say with the term actual offset (.15 mm) when he has already given TIR (.05) for both vertical and horizontal.

Thanks
 
Replies continue below

Recommended for you

Must be a typo! It also seams like a poor procedure whether using dial indicators (what about Sag) or a laser-optical system.

Walt
 
Thanks strong for clearing my doubt .
This is the new machine which is getting commissioned with vendor onboard.
Vendor was not able to answer when I asked for it.
Utlimately hes considering 0.15mm as offset(bottom reading).

 
A diagram would have helped but do they mean parallel shaft offset?

i.e. both faces of the coupling are aligned in parallel with each other vertically and horizontally, but the centre point of the shafts are 0.15mm adrift?

Remember - More details = better answers
Also: If you get a response it's polite to respond to it.
 
Thanks LIttle inch.

I raised by query to the manufacturer , after some days he replied with Radial tolerance at the bottom (.2mm to .4mm)
He has simply multiplied .15+-.05 into 2 to get the bottom readings ((.2mm to .4mm).

Even with these readings I have little doubt.
 
Status
Not open for further replies.

Part and Inventory Search

Sponsor