Continue to Site

Eng-Tips is the largest engineering community on the Internet

Intelligent Work Forums for Engineering Professionals

  • Congratulations KootK on being selected by the Eng-Tips community for having the most helpful posts in the forums last week. Way to Go!

aluminum welding 1

Status
Not open for further replies.
Replies continue below

Recommended for you

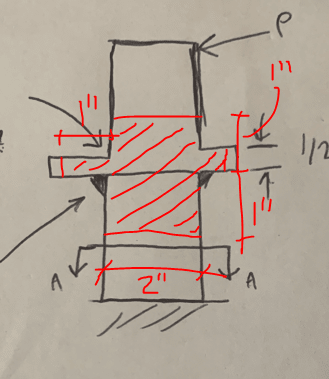
Assuming you're using the ADM, what I've usually done with fillet welds is to just draw a 2"x2" square centered on the heel of the weld and everything within it is part of the HAZ. Something like in the image below. I suppose you could make a case for a 1"-radius circle instead, but in most situations I wouldn't expect it to have much practical difference as there'll usually be a failure plane that's entirely within the HAZ anyways. Maybe if you're putting material properties in an FEA analysis...

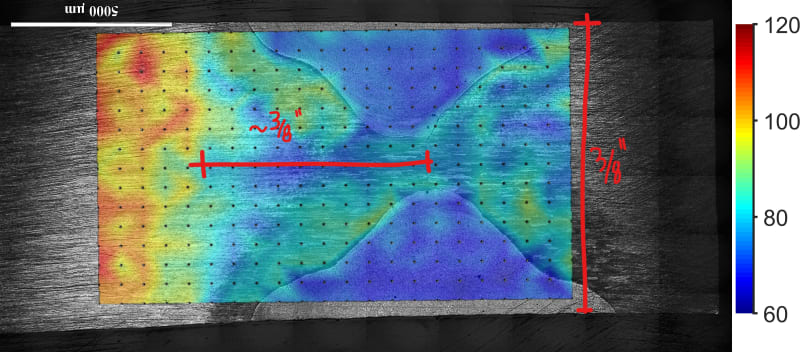
For what it's worth, 1" is generally very conservative for the size of the HAZ. Even with 1/2" plate you'll probably only see 1/2"-3/4" at most, and most of it is still much stronger than the specified HAZ strength. I did some experiments on this during my Masters and you can see an example hardness map below (correlates best with yield strength). That's 6061-T6 & 5356 filler.

-Laurent

image_oczciz.png

Inkedhardnessmap1080B_LI_esjmmn.jpg
 
Status
Not open for further replies.

Part and Inventory Search

Sponsor