Continue to Site

Eng-Tips is the largest engineering community on the Internet

Intelligent Work Forums for Engineering Professionals

  • Congratulations KootK on being selected by the Eng-Tips community for having the most helpful posts in the forums last week. Way to Go!

Angular Position of Grouped Holes 1

Status
Not open for further replies.

random_guy

Mechanical
Jul 16, 2010
72
There are 6 holes in the pattern in question (notice the vertical holes are a different size). The 6 holes are all controlled by the same FCF.

I have applied a 4X 45° callout to the holes. A coworker believes there needs to be a 90° basic dim connecting the two groups. I think it's implied 90°/180° from the centerline. This is a complex part (obviously not the same part shown), and the drawing is already crowded, so I'd like to omit the 90°. I believe this is covered under 1.4(i) and 2.1.1.3 (2009).

I did not find any similar examples in Y14.5. I'm wondering what everyone's 2 cents is on this. It's silly because the intent is clear in both instances, but in the interest of "correctness", I'm genuinely curious.
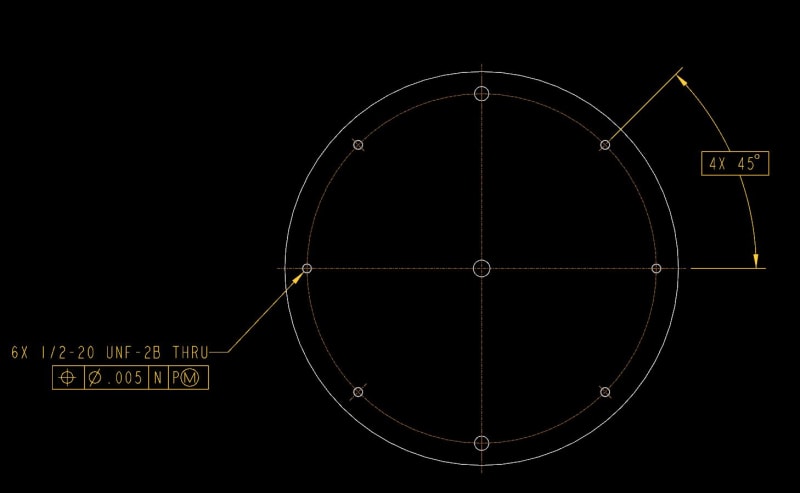
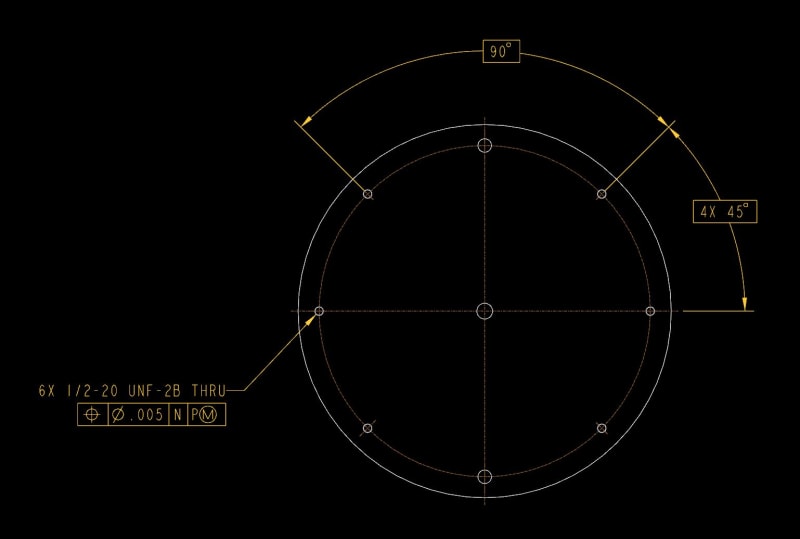
4X_angle_yvj49x.jpg


90_angle_spghzq.jpg


Wise men learn more from fools, than fools do from the wise.
 
Replies continue below

Recommended for you

You're dealing with basic dimensions and a geometric tolerance, so the relevant rule is 1.4 (j) and 2.1.1.4 (2009) and not 1.4(i) and 2.1.1.3 which are about toleranced dimensions and the application of the general tolerance block defaults. Technically, you don't really have "center lines and surfaces are depicted on 2D orthographic engineering drawings intersecting at right angles" as mentioned in the standard, not such that pass through the relevant holes, at least.
 
Thanks, I meant to refer to that section but grabbed the wrong one when typing my post out.

I think you're correct. If the centerlines were to extend to the center, then it would likely fit that definition. As is, however, I'm not sure it does.

I find that too often we get hung up on these subtleties, when in reality a machinist will look at the print and know exactly what the intent is anyway.

Wise men learn more from fools, than fools do from the wise.
 
[1X 45] and [4X 90] makes the most sense. In the case of using an indexing plate, that is how the machinist would index the holes, rather than setting back to zero each time and the 45 4 times.

In a parametric software that is also how the pattern would be created - 45 on the lead hole, then three more at 90 (always the off-by-one problem.)
 
You don't need the 90 deg dimension but yes, please make the lines center lines and not dashed lines.
 
3DDave - it's 6 holes, not 4. Essentially a mirrored pattern of 3 holes 90° apart.

Eric - that's how Creo displays centerlines. Once printed they show properly.

Wise men learn more from fools, than fools do from the wise.
 
I see two of the six not requiring any angular dimension. That leaves 4 90 degree intervals.

 
I see it as 8X 45°

"For every expert there is an equal and opposite expert"
Arthur C. Clarke Profiles of the future

 
Status
Not open for further replies.

Part and Inventory Search

Sponsor