Continue to Site

Eng-Tips is the largest engineering community on the Internet

Intelligent Work Forums for Engineering Professionals

  • Congratulations KootK on being selected by the Eng-Tips community for having the most helpful posts in the forums last week. Way to Go!

Aperture true position

Status
Not open for further replies.

dthom0425

Mechanical
Dec 6, 2018
46
Hi all - I wanted to get your take on how you may go about GD&T of an optic/aperture. Let's assume I have a square optic/lens that is 1" x 1". It is too difficult to achieve a clear aperture over the entire 1x1 face so let's assume that the clear aperture must be centrally located in the 1 x 1 square. The clear aperture will need to be .8 x .8.

So my question is...is it even possible to control the location of the clear aperture via GD&T? Keep in mind the clear aperture is just a surface within the 1 x 1 square, it is not a feature of size.

Curious if anyone has any thoughts.

Thanks
 
Replies continue below

Recommended for you

I suppose you could reference datum feature definitions from a D&T standard like Dimensioning & Tolerancing ASME Y14.5-xxxx, where any of a number of versions that will likely cover the subject. The latest is 2018, but 2009, and 1994 are also possibilities. The ISO has similar standards. After you describe the frame of reference for making the measurement it's going to be up to you to define how the aperture is to be measured/verified.
 
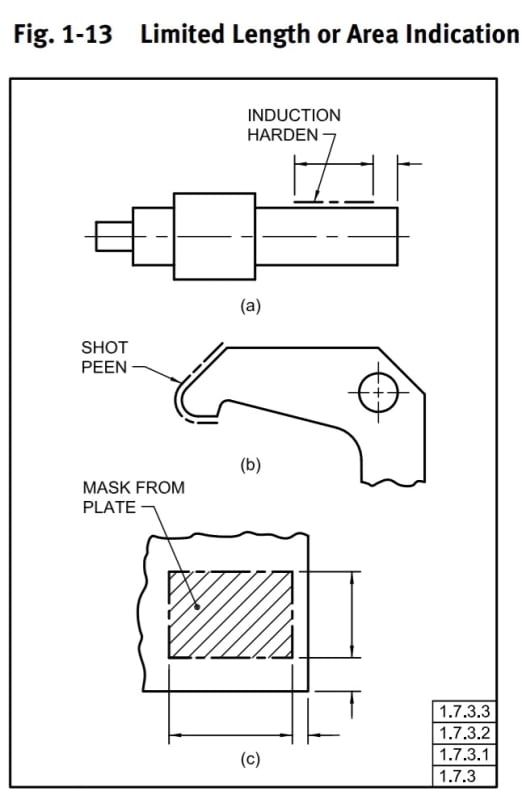
This is outside my field, but to my understanding, you don't control the location of the clear aperture,  you just set it, and it is where the properties you want to control apply. Limited Area Indication per ASME Y14.5 comes to mind.

Screenshot_20220404-053041_Drive_mt6l2q.jpg
 
Thank you both. I was leaning towards the limited area indication that Burunduk shows from section 1 of Y14.5-2009. I guess my follow up question is..do I show the limited area with basic dimensions in size and location (from the edges of the optic)?
 
Yes, the limited area should be fully defined by basic dimensions.
 
dthom0425,

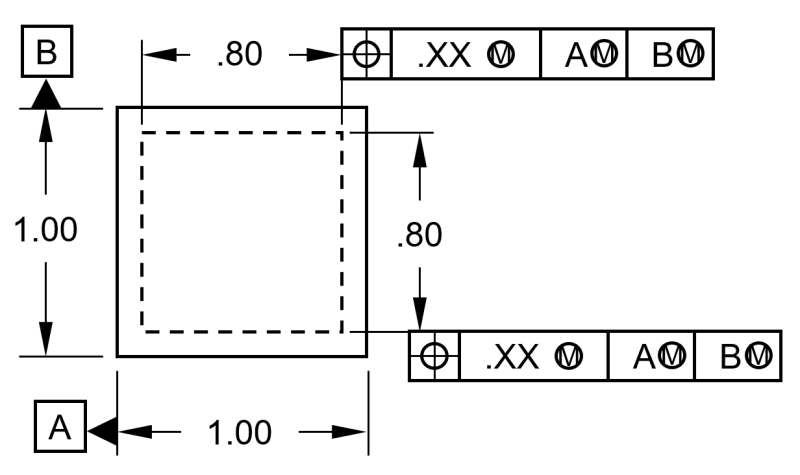
A clear aperture, round or square, is a feature of size, and can be controlled by a positional tolerance. What is wrong with a profile tolerance? Read up on unilateral profile tolerances. You can precisely define your aperture keep-out

--
JHG
 
The optic in my example is square. Yes I agree the optic size dimensions, 1 x 1, are a feature of size. However, the clear aperture is just a zone within the 1 x1 square…much like that “mask from plate” example about from the standard. Guess I’m not sure how a positional tolerance can apply considering this.
 
dthom0425 said:
However, the clear aperture is just a zone within the 1 x1 square…much like that “mask from plate” example about from the standard. Guess I’m not sure how a positional tolerance can apply considering this

I think you are correct about it. And neither limits of size nor position can apply. Not only that it's not a Feature of Size, it's not a "Feature" at all in the ASME Y14.5 sense. Correct me if I'm wrong, but it doesn't have distinguishable geometrical limits. It only has the limits that you prescribe so that certain evaluations need to be done in the area that is inside these limits.
 
Status
Not open for further replies.

Part and Inventory Search

Sponsor