Eng-Tips is the largest engineering community on the Internet

Intelligent Work Forums for Engineering Professionals

ASME Y14.5.1M-1994 Mathmatical definition - was location double worst or min vs max

Status
Not open for further replies.

sendithard

Industrial
Aug 26, 2021
166
0
0
US
Quick question...

I believe ASME Y14.5.1M 2019 changed profile measurement value to be double the worst as 1994 was deviation in min/max.

My question was in 1994 did this same min/max approach apply to location or was this double the worst?

Thanks
 
Replies continue below

Recommended for you

In 1994 it was required to separately report the into-material variation separately from the out-of-material variation for equal bilateral requirements and the only case for reporting a single value was for a unilateral zone. Ref 6.5 (c).

It looks like for 2019(?) the committee said - produce less useful information for equally disposed cases in the cause of purity to make the returned value match the requested limit.

I don't see the benefit to reporting these values in the general case, but it must make someone happy. Most should simply be reported as true/false - either it meets the requirement or it doesn't.

 
OP said:
I believe ASME Y14.5.1M 2019 changed profile measurement value to be double the worst as 1994 was deviation in min/max.

My question was in 1994 did this same min/max approach apply to location or was this double the worst?

Evan,
I am jus curious, was the intent of the math committee to change something related with the profile reporting from math standard 1994 (which supports Y14.5-1994) to math standard 2019 (which supports Y14.5-2009)?


1994: Location "(c) Actual value. The actual value of position deviation is the smallest value of t[sub]o[/sub] to which the feature conforms."

t[sub]o[/sub] is defined as "a specific tolerance given on a drawing or part specification"

Anyone care to decide if it's the smallest value of t[sub]o[/sub] or the given value?

In any case, the latest version seems to duplicate the 1994 version's notion with some word changes.

Notice that there was no doubling for profile tolerance "actual value" there was a change in the way it was reported.
 
greenimi,

The change in the profile actual value in Y14.5.1-2019 wasn't driven by anything that had changed in Y14.5-2009 compared to Y14.5M-1994. It was driven by inherent problems that the Y14.5.1M-1994 actual value definition had. The two intermediate tolerances t[sub]+[/sub] and t[sub]-[/sub] were often misleading and sometimes undefined, depending on what the actual surface variations were. The two-value definition was also inconsistent with the single actual values defined for all other geometric characteristics.

3DDave,

I agree that the actual value of position is essentially the same in Y14.5.1-2019 as it was in Y14.5.1M-1994. The tolerance value t[sub]0[/sub] is treated as a variable - the terminology is a bit confusing. It's essentially like reverse engineering the tolerance value so that the actual feature would just barely conform.

I also agree that Y14.5.1 never defined the profile actual value in terms of doubling the largest deviation from the true profile. This is a convenient approximation that works well in the majority of situations. It does not work well for unequally disposed or unilateral profile tolerances, or true profiles involving sharp corners. The Y14.5.1-2019 definition was designed to work consistently in all situations, at the expense of providing less information in simple equal bilateral cases. There are definitely trade-offs, and this was debated extensively. It was eventually decided that the zone-based single actual value was appropriate for Y14.5.1, and that deviations from the true profile represented supplemental information that was better handled in Y14.45 Measurement Data Reporting standard.

Evan Janeshewski

Axymetrix Quality Engineering Inc.
 
Evan,

I meant position when I referred to it as location.

I'm a little confused by what you all wrote. I had never thought about how you should report a measured value on an unequally disposed profile. For a bi-lateral profile I believe the reported value now is simply double the worst deviation. It seems intuitive that for a unilateral profile you simply report the worst value, but then with unequally disposed(say you get 75% of the tolerance one way and 25% the other) I'm at a loss what you would report now that you mentioned it.


As far as position reported value goes...if a hole tolerance was diametrical at .010" and one end of the axis was .004 off radially, would the reported value have been both .008" according to the older reporting standard as well as the newer reporting standard?

 
sendithard,

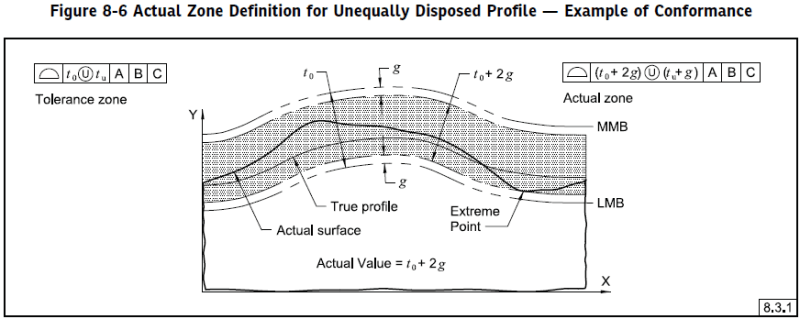
For equal bilateral profile tolerances, the zone-based actual value can be calculated by doubling the largest deviation in most cases (sharp corner oddities notwithstanding). For unilateral profile tolerances, even reporting the worst deviation value is not straightforward if the deviation is purely in the "opposite" direction that has zero tolerance (let's say that the tolerance is SPF|4(U)4|A|B|C| the extreme deviations are -1 and -2). With unequally disposed tolerances the worst deviation can be misleading because there may be points that are close to the true profile but are actually out of tolerance. The single actual value definition defines an "actual zone" by offsetting the tolerance zone boundaries equally until they just barely contain the entire actual surface. Here is one of the figures from Y14.5.1-2019:

51_Fig_8-6_pnlpbn.png


For the position actual value, your example looks correct. If the radial deviation at the worst axis endpoint was .004, the actual value would be .008 in both Y14.5.1M-1994 and Y14.5.1-2019 mathematical definition standards. Y14.45-2021 Measurement Data Reporting would call it a Method B measured value but the value would still be .008.

Evan Janeshewski

Axymetrix Quality Engineering Inc.
 
Just to expand a bit about what Evan said and showed, when a surface is controlled by profile relative to datum features, the actual value or measured value is quantifying how close it got to any of the limits of the tolerance zone. The reason is, that datum-related profile controls location (among other things like orientation and form), so when the measured value is about how close it got to any of the limits, it reflects the location error. The common formula for both the equal bilateral case and for the unequally disposed or unilateral cases is as shown in the figure posted by Evan, and it's t0+2g where t0 is the tolerance specified in the feature control frame and g is the distance from the most extreme point on the actual surface to the limit it got close to, and its value is always negative for a conforming feature, and positive for a non-conforming one.
 
It sounds as if what is in Y14.5.1 for reported values doesn't matter in the slightest because Y14.45 is the controlling document.

Here's a "never going to happen" - all arguments for the standards must be submitted in writing and are published with the document. Think of it like the Federalist Papers.
 
Burunduk,

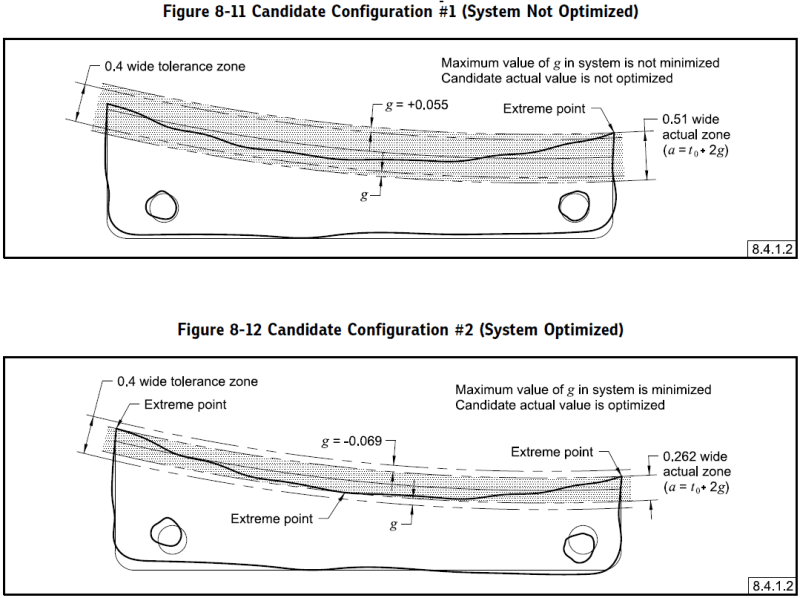
Your description of the actual value sums it up pretty well. One thing I would add is that the a = t[sub]0[/sub] + 2g formula is not just for location - it applies the same way without datum features. Here is another figure example:

51_Fig_8-9_oi1nqi.png


51_Fig_8-11_and_8-12_wdqunl.png


The same general actual value formula is applied, but in this case the alignment is optimized instead of being constrained by datum feature references.

Evan Janeshewski

Axymetrix Quality Engineering Inc.
 
3DDave,

The intended hierarchy that Y14.45 Method B measured value definitions follow Y14.5.1 actual value definitions. Where did you hear that Y14.45 is the controlling document? Hopefully I didn't say that in one of my posts.

I agree that the debates and arguments from the standard development process won't be made available to the public - you have to be there. Speaking of which, the next Y14 and B89 series meetings are coming up in Orlando, FL April 24-28. GD&T all day every day for an entire week!

Evan Janeshewski

Axymetrix Quality Engineering Inc.
 
I calculated that "to be there**" would cost me between $15,000 and $30,000 per revision (not including ASME membership to get reliable notices,) where I would have no influence over those with commercial interests rather than user interests, the commercial interests being the vast majority. Being able to place those expenses as business write-offs is a clear advantage to those commercial interests.

I like the Linux method - continuous submissions in a publicly reviewable system with a focus on the users of the software.

Oh - I thought Y14.45 would default to tell an engineer exactly what the nature of the profile rejection was - for example, is all the error on the +material side so I could authorize rework based on that report? This information isn't per Y14.5.1 and would be superseding it. Is the profile smooth? Does it have reversals? Is the profile error largely due to linear offset or is it from rotation? None of this is in Y14.5.1. Apparently not in Y14.45 either. These would be necessary to track and diagnose process problems.

Looking at the draft version for reporting Unequal Tolerance Zone I see no clear connection that would isolate the only two values that are important to the engineering of the part. Instead there are eight formulae that all involve a multiplication by 2 when there should be no multiplication required to produce engineering support information. If it's not for engineering, who is the target audience? It doesn't tell manufacturing what to change.

Figure 9-3 Profile of a Surface, Unequal Tolerance Zone and Figure 9-4 Example Data Report for Figure 9-3. How odd is it that where the maximum variation is (0.13 - (-0.06)) = 0.19, the reported width is 0.32. Hidden in those numbers is that the part barely conforms to the requirement and is running very close to failing for -material vs a comfortable margin being close to the +material limit. There is no indication of a large process shift.

**Also, what of conversations between committee members between committee meetings? How much does that cost?
 
3DDave,

The Y14.45 standard defines a Method B measured value that is very similar to the Y14.5.1 actual value. This is the first number in the Reported Value column in Figure 9-4. The tolerance was 0.4(U)0.3 and the measured value is 0.32, so we can tell that the feature conforms (because 0.32 is less than 0.4). Then Y14.45 goes further and allows Method C data that is typically deviations from the true profile. That's what you're seeing in the last 7 values in the Reported Value column. To diagnose the process, you can scan through these numbers and see the highs and lows. You're right that the point with the largest deviation (+0.13) from the true profile is not close to a tolerance zone boundary in that example. The point that is closest to a boundary has a deviation of -0.06. This is the nature of unequally disposed and unilateral profile tolerances - conformance to the tolerance does not closely correlate to deviation from the true profile (especially for unilateral).


Evan Janeshewski

Axymetrix Quality Engineering Inc.
 
I know it is similar. It's also not worthwhile over Method A. It doesn't diagnose the process to scan it. This might be page 45 of a 120 page report. I would need to plot all the values and I don't benefit from the zone calculation - it is a waste of the inspector's time and mine to generate those false zone widths.

The -0.06 isn't directly compared to the limit of -0.10. The "g" value just appears without calculation in the comments.

The entire surface could be offset X+.06 and it would report the same zone or it could be X-2.6 and report the same zone.

The problem is the inspection report is saying everything is fine when, in this example, it is close to failing and will be expensive to rework when the process goes just about 10% of the zone more.

I fault the original (U). It should have been [+0.3/0.1] to indicate the unequally disposed zone. This would directly support [+0.4/+0.2] for cases where the true profile is outside the zone, just like +/+ direct tolerances are allowed. No zone width means no zone width inspection calculation.

To be helpful, report the tightest zone that would accept all points, the gap from the high to the low, and what the high and low values are.

I wonder what the design engineers involved with Y14.45 had to say.
 
What is so special about profile tolerance over other geometric tolerances that makes people want to know everything about the actual surface error by just looking at a line or two in the inspection report?

As Evan said, the method B reporting data per Y14.45 allows to quickly assess conformance, or lack thereof, to the drawing specifications following the rules of Y14.5. If one wants to know more about the details of the error, this is what method C data is for and actually the standard leaves the door wide open for the organizations requesting the measurement data to define exactly what they need.
 
It doesn't help quickly assess conformance to have very different outcomes resolve to the same number, a number which has no engineering or manufacturing significance. Generally engineers want - conforms - Yes or No and manufacturing wants to know - is the process heading towards high or low.

Method C is - create your own method; by definition it won't be standard. I don't even have to use Y14.45 to do that.

I'm sure an example where knowing the virtual width of the tolerance zone was presented as affecting a non-geometric performance characteristic; what was it? What did design engineers present to support that reporting?

It's not a question worth between $15,000 and $30,000 to me to find out, or even the typical $1500-$2000 training rate, but considering the total expenditure by all the participants in the committee must be close to $1 Million per revision it seems like answers to questions like that should be available.

Perhaps for size tolerance reporting - if a part requirement is dia 1.0 +/-0.1 and the as-produced part is dia .91 then the variation is reported as 0.18 and if the as-produced part is dia 1.09 the variation is also reported as 0.18? That is what it would be for a basic dia 1.00 and profile of surface of 0.1 (fixed because profile is a radial control). And if the as-produced part was oval with a minor dia of .91 and a major diameter of 1.09, that size would also be reported as a variation of 0.18, size tolerance or profile tolerance.

But size isn't reported that way. It's reported as minimum material and UMME. Two numbers that represent functional performance and manufacturing limit-tracking utility.

When 737 rudder valves were prone to thermal transient interference, had they been defined with a profile tolerance and reported by Method B there would have been no way to separate out those at the high side, which interfered, from those at the low side, which did not. Thankfully they used size instead of profile and only the susceptible units were withdrawn from service and no more planes crashed, rather than having to also take units which would never have a problem out of service. That is an example of a non-geometric functional performance characteristic.

I want a more usable answer than "this is what was adopted after much debate." Maybe the debate was only about reporting and not about utility.
 
There is a bunch of geometric characteristics where the same number is the result of different outcomes. For example, the same total runout indicator reading value may come from the feature form error only, or from the location error only, or from combination of both. Does it mean the inspection report should always capture these types of errors separately for total runout measurement data? Is it even needed to be able to determine if the inspected characteristic conforms to the drawing?

The fact that the standard leaves room for different method C data types is a gain in itself because this indicates that it is the responsibility of the organization ordering the measurement data to clearly define what's needed and for example indicate that for profile tolerances two values are required so that the problem with 737 rudder valves can be handled easier.

Regarding the profile vs. +/- size example, profile by its definition controls variation of a surface but it doesn't require direct reporting of size. So I don't see why these two should be compared. However, if one wants to have this characteristic reported as a part of profile measurement data, it can be requested as method C data.

By the way, hopefully the rudder valves problem wasn't caused by incorrect conversion of +/- size tolerance to profile hence doubling the allowable error in cold condition ;-)
 
What does the Method B for profile of surface tell anyone about the utility of the feature? What engineering calculation would I put that number into or what manufacturing offset would be changed in response to it?

If I care about total runout I don't care about the underlying cause. It's invisible in the application. It's also a one-sided variation. Profile is a two-sided variation as is size. But size gets two values - limit values - in the report. More than that total runout would, except for perpendicularity, require some other control for size and any desired form refinement.

Funny joke about 2 crashes that killed hundreds of people in a horrific manner. Do you think I made a incorrect calculation in that example or is this just a projection based on a common error and nothing to do with the failure to make a meaningful reporting entry?

I'd be more sympathetic to Method C except every single example calculation in the profile section show it being to generate a useless answer. In addition - the standard specifies exactly one process for Method C for profile of surface, not allowing for any other information gathering.

I'll just put this down to no design engineers being on the committees or at least not in enough numbers to produce meaningful report answers for profile variation. What is baffling is that useful values were being reported per the original math standard.
 
Status
Not open for further replies.
Back
Top