Continue to Site

Eng-Tips is the largest engineering community on the Internet

Intelligent Work Forums for Engineering Professionals

  • Congratulations GregLocock on being selected by the Eng-Tips community for having the most helpful posts in the forums last week. Way to Go!

Calibration Uncertainty

Status
Not open for further replies.

TiffyEng

Petroleum
Aug 17, 2020
6
I'm researching uncertainty calculations based on the GUM method. I have a question about estimating the standard uncertainty of an instrument based on it's calibration. In the examples I have seen, a manufacturer will quote a certain reference accuracy and state the statistical significance. Rosemount for example use 3sigma and hence it is fairly trivial to convert that to standard uncertainty given a calibration certificate.

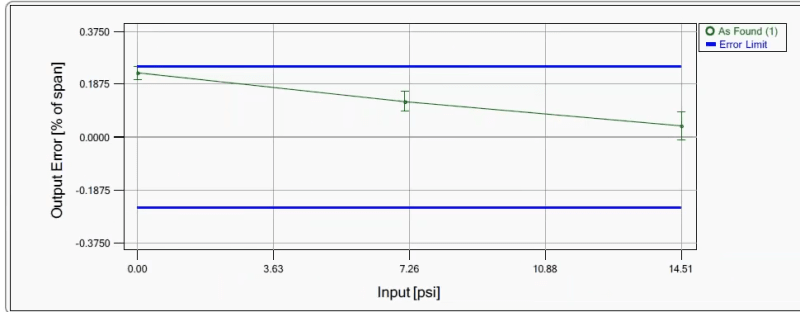
Where I am unsure is for calibrations made on-site or in a workshop for example. Some good calibrators often display the calibration curve as well as the uncertainty associated with the calibration as in the example below for a pressure sensor.
Calibration_Uncertainty_txonaw.png


What would be an acceptable way to quote the standard uncertainty of this device's calibration in an uncertainty estimate for any measurement made by it? Is it correct to assume that since the tolerance is +/-2% of span (and is within this tolerance) that this has a rectangular probability distribution and therefore the standard uncertainty due to this calibation is derived in the usual way (2%/√3)? Is rectangular too conservative and if so, what confidence level should be applied if it were assumed to be distributed normally?

Also, does the uncertainty of the calibration process itself need to be taken into account i.e. the green error bars as shown in the figure?
 
Replies continue below

Recommended for you

Lab calibration is different than lab measurement, since calibration requires some tolerably acceptable test uncertainty ratio (TUR) against the final calibration acceptance limits, i.e., their measurement uncertainty needs to be, say, 25%, or less, of the uncertainty limit of the unit under test (UUT).

TTFN (ta ta for now)
I can do absolutely anything. I'm an expert! faq731-376 forum1529 Entire Forum list
 
Hi thanks for replying. I am familiar with the usual Test Uncertainty Ratio of 4:1. In the example I attached, the error bars representing calibration uncertainty are much smaller in magnitude compared to the calibration tolerance of the UUT. It's not quite clear from the image but I suspect 4:1 is probably acheived here.
 
As for your last question, it depends on how the calibration lab accounts for the uncertainties. In your image, the presumption is that that the calibration house allocates a portion of the calibration uncertainty to the measurement uncertainty, i.e., cal_limit - meas_unc = acceptance_limit. If the data point on the far left had been higher, the lab might return as uncalibratable, if there are no adjustments possible for offsetting the results.

TTFN (ta ta for now)
I can do absolutely anything. I'm an expert! faq731-376 forum1529 Entire Forum list
 
Assuming that the calibration is in tolerance (error bars less than the blue tolerance lines). Would the example method below for determining uncertainty of the device at calibration be appropriate? I assume the calibration tolerance +/-2% is a rectangular probability distribution and therefore derive a standard uncertainty by applying factor √3. The largest calibration uncertainty +/-0.1% is an expanded uncertainty (k = 2) therefore divide by two to obtain standard uncertainty of the calibration. Combine the two using the root sum squares method to obtain a standard uncertainty for the device at calibration.

Calibration Tolerance = +/-2% (of span)
Expanded Uncertainty of Calibration (k = 2) = 0.1% (of span)

Standard Uncertainty of Calibration Tolerance = +/-2%/√3 = +/-1.16%
Standard Uncertainty of Calibration = +/-0.1%/2 = +/-0.05%

Standard Uncertainty of UUT = √(1.15^2) + (0.05)^2 )= +/-1.63% (of span)

Here, the uncertainty of the calibration would have to assume the largest uncertainty throughout the range which happens to be at the higher data point.

Having thought about this some more, I think that using the calibration tolerance is quite conservative. It might be more appropraite to use the largest calibration error and combine that with the calibration uncertainty using the root sum squares method as in the example. In this way, a well calibrated device is reflected in it's uncertainty.
 
Status
Not open for further replies.

Part and Inventory Search

Sponsor