Continue to Site

Eng-Tips is the largest engineering community on the Internet

Intelligent Work Forums for Engineering Professionals

  • Congratulations cowski on being selected by the Eng-Tips community for having the most helpful posts in the forums last week. Way to Go!

Clocked angular dimensions 2

Status
Not open for further replies.

looslib

Mechanical
Jul 9, 2001
4,205
We have a drawing that has a bolt circle with 4 holes on it. The holes are basic angles as is the bolt circle diameter.
The wholes are at the 45 position, so we have 1 dimension of 45 to the first hole off the axis of the part in the drawing.
My questions is, what dimensioning do we use for the other 3 holes with a basic angle: 3X 90 or 4X 90?
I looked in ASME Y14.5-2018, but only shows angular dimensions that are on an axis.


"Wildfires are dangerous, hard to control, and economically catastrophic."

Ben Loosli
 
Replies continue below

Recommended for you

greenimi,
check fig. 4-38 in Y14.5-2009. It uses the "EQLSP" abbreviation to indicate an equally spaced pattern. While not a properly defined term due to being absent from the paragraphs, still far more legitimate than TYP.
 
Burunduk said:
check fig. 4-38 in Y14.5-2009. It uses the "EQLSP" abbreviation to indicate an equally spaced pattern. While not a properly defined term due to being absent from the paragraphs, still far more legitimate than TYP.

That's exactly what I am saying. You just proove my point. In 2018 EQLSP has been removed, hence the intent is again to count the "things" ....and use 5x72
 
3DDave,
I know the cyclical ∞X 45 is tongue in cheek, but I'm not following your logic here or what you are getting at, sorry.
Do you disagree that there are exactly 8 gaps between the holes?
 
greenimi,
Maybe it's in "ASME Y14.38 Abbreviations and Acronyms for Use on Drawings"?
I don't have it.
 
Yes, it is listed in Y14.38-2007, but so is TYP.

"Know the rules well, so you can break them effectively."
-Dalai Lama XIV
 
equally spaced = EQLSP = eqlsp

(Terms, Drawings, text, respectivelly)

But this is just abreviation and no definition.
Still think the committee's intent is to get rid of EQLSP
 
I disagree that 8 dimensions for 7 measurements is appropriate. Now I'll just use 8X 135 degrees in your honor.
 
3DDave, I maybe not as smart as you are, but you should know by now that I am at least as stubborn, for the better or worse.
So once again, how 7 rotary table adjustments for drilling the remaining holes after the first is done is equivalent to "7 measurements" (measurements of what exactly? The basic angle?). And how "7 measurements" relate to eight true position axes with eight angular spaces between succeeding true positions?
 
Let me explain.

There are 360 degrees in a full rotation. If that rotation is divided among 8 holes then, when one has drilled the first hole, the next hole will require at least a 45 degree change** to reach it. This is done 7 times in total. Since the remaining amount would add to 360 and every elementary school student already knows that, there is no need to redundantly repeat the duplicated dimension.

In figure 4-52, one hole has a location angle dimension already. That leaves 7 other holes with 7 other angle dimensions.

I would explain "off by one" errors, sometimes called "fencepost errors", but you hate software answers so it would waste my time. The standard's example is one of those, but they also don't use software development rigor.

**If one uses 135, 225, or 315 one eventually gets the same situation, only across more rotations. I trust you have a calculator.
 
3DDave, this doesn't explain the "7 measurements" while there are 8 tolerance zones. 
Instead, you go back to the redundancy issue, which was already addressed.
The basic geometry that defines 8 equally spaced true position axes includes 8 angular spaces between succeeding true positions. There is no advantage in checking the user's elementary school knowledge over stating this information directly. When the product of multiplication is 360°, such as when the drawing states 8X 45°, it makes sense because it communicates that the equal spacing takes place around the full pitch circle.
 
Maybe you guys could finally agree that it is simply replacement for wording "EQUALLY SPACED"?

Capture_wxc2bo.png


Because I cannot find any meaningful interpretation for this. :)

"For every expert there is an equal and opposite expert"
Arthur C. Clarke Profiles of the future
 
CheckerHater,
I already agreed in this thread that EQSP is the best option, although some pointed out that other than a figure in Y14.5-2009 (and possibly earlier versions) that was later changed in 2018 to exclude the term, and an abbreviation in Y14.38, there is no standardization of this. I think that the term is pretty much self-explanatory, and I use it anyway. Regardless, the argument now is over what makes more sense: nX (360°/n) or (n-1)X (360°/n) and it should be agreed that the former is better and cannot be considered as overdimensioning.
 
There is an approved abbreviation in ASME Y14.38-2019 for Equally Spaced and it is EQLSP.

"Wildfires are dangerous, hard to control, and economically catastrophic."

Ben Loosli
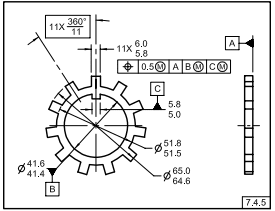
 
"Instead, you go back to the redundancy issue, which was already addressed."

No. You made up your mind that you addressed it. It was not addressed. The dimensions are to features, not to where there aren't features. There are 8 features in the example and 8 dimensions are needed. If the first is implicit or explicit there are only 7 others required.

In the examples of holes along an arc there isn't another dimension from the last hole to the first one, why would you be so insistent in this case?

"It's in writing, it must be the law" is how so much trouble happens in the world. Rules are good until they conflict with truth.
 
To be fair - I'd never use any such abbreviation and look down on those who do. It's no longer useful except to nag people about how they do it wrong - they no longer save time using the Rapidograph and a template.
 
OP said:
The holes are basic angles as is the bolt circle diameter.

If dimensions are basic and features are controlled by GD&T, it doesn't really matter, as long as no dimensions contradict. The dimensions yield the ideal form, regardless of how they are chained, and then the form is checked for deviation from that ideal.

The only problem is the limitations and deficiencies of the reporting software. Most of them do not handle dimension chains well.
 
3DDave,
basic dimensions are not redundant if they precisely define the tolerance zones and make the interpretation of the drawing easier. The authoritative section on this in Y14.5 is the one that covers General Dimensioning and there's a good reason why in  the 2009 standard they show 8X 45° for the pattern of holes in the figure on "Repetitive Features and Dimensions", (1-57). As I mentioned already, when the product of "n" times the angular spacing is 360°, the intent gets communicated immediately - it is clear that all basic angular spaces are identical around the entire circle. But there could also be a case where the space between the last and first holes is different from the others. With your approach, and especially where there are many holes in the pattern, the user may have to look for the number of holes to check if the dimension for only one hole is missing, and calculate the difference between the sum of the explicitly dimensioned angles and 360°, to determine whether the complete circular pattern is equally spaced or not.
And actually on the example of holes along an arc, if the total arc would be more than 180°, and especially in the case it approaches 360°, it wouldn't be wrong to dimension the angle from the last to the first hole. 

By the way, I don't use the "EQLSP" abbreviation either on drawings. On actual drawings, I use the term and spell it out fully.
 
" there's a good reason why "

What is the reason the text of that standard gives? There is no requirement to know if they are evenly spaced. The drawing shows where they are. There will always be one less space than the number of holes - that's consistent, something you've liked in the past.
 
The text of the standard doesn't provide a reason to indicate the full number of spaces along an equally spaced circular pattern, but most of the figures follow this practise because that's the way most people would do it and would prefer it on the drawings they use.
"There will always be one less space than the number of holes"... for a linear pattern. For a circular pattern, the space between the last and first holes is right there. When the pattern is equally spaced, you cannot tell the difference between it and the other spaces. Not including it in the number of places for the basic angle dimension is being a wise guy.
 
The text of the standard doesn't provide a reason. People do it because they are told to do it, even though it conflicts with the requirement not to do it.

On a linear pattern suppose there is a dimension from one side of the part, then a number of holes, then the dimension to the other side. Which you have been excluding. Why is that? Likely you were told not to do it. If the width is given a basic dimension and the hole locations are basic then there is nothing wrong with this, or is there?

If a machinist or inspector cannot tell how many degrees evenly angularly spaced holes should subtend, then perhaps it's time for sending them to some other job.

It is wise to examine assumptions and root out those which are incorrect. Thank you.
 
Status
Not open for further replies.

Part and Inventory Search

Sponsor