Eng-Tips is the largest engineering community on the Internet

Intelligent Work Forums for Engineering Professionals

  • Congratulations waross on being selected by the Eng-Tips community for having the most helpful posts in the forums last week. Way to Go!

Damage by Electrical Contractors 5

Status
Not open for further replies.

medeek

Structural
Mar 16, 2013
1,104
US
The picture below is a recent repair job that I worked on. Single story commercial building in a 155 mph (ult) wind zone. Over 60% of the gable end wall was compromised. The fix was both presciptive and engineered. Any thoughts on what you might do?
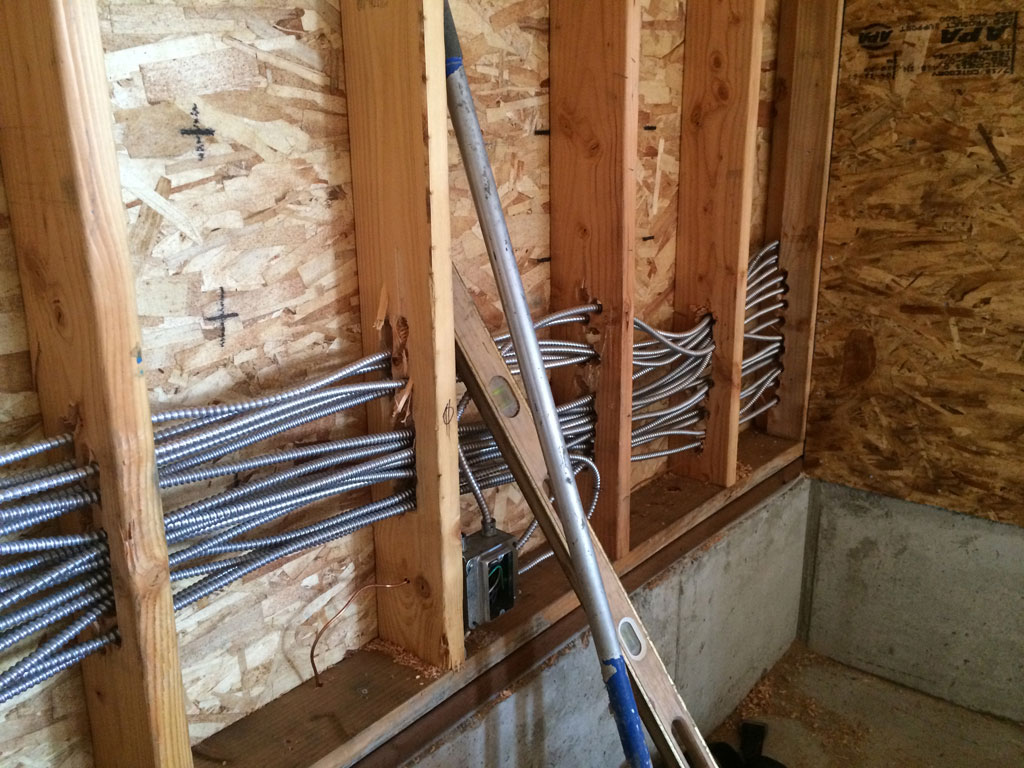
electrical_holes.jpg


I guess this is a good example of "What not to do as an electrician" or any other trades person for that matter.
 
Replies continue below

Recommended for you

Yikes. I assume shear controlled the strength at these swiss cheese studs? I'd probably notch out a 2x6 and sister it to the existing stud and carry it up the wall enough to grab half the shear in the existing stud. Should replace enough of the cross-section for shear and axial loads.

Maine EIT, Civil/Structural.
 
Maybe sister on a small steel angle somehow at each one and delvelop into the stud above.
 
Notice how close the slot is to the sill plate in a couple of studs. A strap fix in my opinion could not develop enough strength below the slot. Also the amount of wood left towards the exterior side on a couple of the studs (not visible) was less than 1". My worry there was that the bending forces on the studs from the wind would put these specific areas in considerable compression. A strap on the outside would be great for nail protection for the wires and tension but do nothing for compression due to bending. Part of the fix was to sister 2x4s (flatwise) onto the 2x6 studs against the ext. walls in these areas.
 
Nail a full height 2X6 to the inside edge of the wall, transverse to each of the studs. Nail off top and bottom with framing clips and 12d @ 6" staggered at the "L" intersection of the studs. Also glue the stud edges together. Should be better than the original.

Mike McCann, PE, SE (WA)


The electrical conduits were always going to take some space. Looks like that space will now be taken by additional studs placed to the inside of the conduits.
 
If it's bending or any type of compression failure, you might make something work by adding extra sheeting. That won't really help you if you have a problem with shear perpendicular to the wall, though.
 
Basically that is what we did but with 2x4s, and then as an added measure we had them sheet the interior wall with OSB. The wall is now stronger than the original.
 
Just schlep on several layers of fiberglass like they're doing to repair concrete garages.
 
One more stud bay to the left and two more stud bays to the right.
 
have the electrician reroute conduits to attic or lower level and feed into wall at DCO and switch locations. Then replace or add on studs.

just a thought.
 
What did the architect have planned for this detail?
What did the PE who signed off think was going to happen?

Not that I'm all that happy with a certain type of get-it-done tradesmen. The ones who no matter what job they have to do create far more damage to the surroundings than justifies anything they were supposed to do.

Take down a tree? Sure. Lawn destroyed with skid-steer for free.
Replace a clutch? Sure. Body destroyed at bad lift location.
Fix some plumbing? Sure. Slop in some concrete to patch the floor.

 
This is fairly typical, architect draws up a 4 pound box, MEP engineer designs 8 pounds of equipment...contractor is supposed to magically make it work.

I can envision the RFIs now....

Electrical Contractor - "wall is not large enough to run all required circuits, please provide chase."
Architect - "Chase is not permitted ,room is at ADA minimums"
Electrical Contractor - "Submitting extra for additional wire needed to go around wall"
Architect - Reject extra..
Electrical Contractor - gets out the drill...
 
Run a vertical 2x4 between the holes (slots) and the face of the existing 2x4, the second 2x4 in each 16 inch interval to be at right angles to the first 9original) 2x4; and the second 2x4 to be nailed to the first so they make an "L" that fits between the floor baseboard and the upper (usually 8 ft) 2x4 header.

That will resist the vertical loads, and the twisting loads as well.
 
Next time, use 2X4 HSS members for the studs. It should prove interesting... [2thumbsup]

Mike McCann, PE, SE (WA)


Have the electrical contractor stand there and hold up the wall for the life of the building.

Problem solved.
 
Status
Not open for further replies.

Part and Inventory Search

Sponsor

Back
Top