Continue to Site

Eng-Tips is the largest engineering community on the Internet

Intelligent Work Forums for Engineering Professionals

  • Congratulations KootK on being selected by the Eng-Tips community for having the most helpful posts in the forums last week. Way to Go!

Flatness in tolerance stack-up 4

Status
Not open for further replies.

alone_dancer

Mechanical
Dec 8, 2020
19
Hi All,

I'm confused about when flatness should be taken into account in tolerance analysis.
Here is an example.
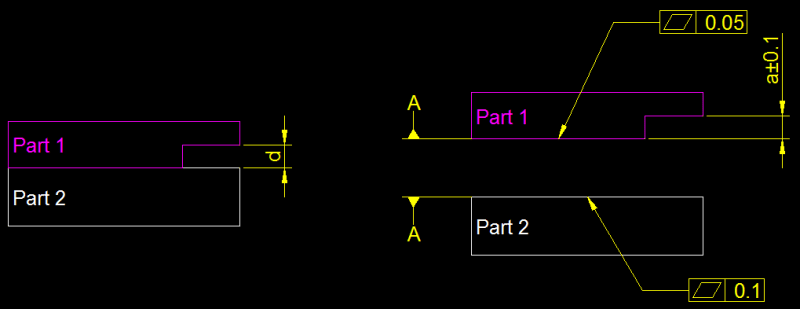
Flatness_vzt5pv.png


I will be grateful for any help.

Frank
 
Replies continue below

Recommended for you

It should be included when it matters. In your example the gap seems to be more critical than expected based on the flatness control applied to the mating surfaces. Typically those flatness tolerance values would be no more than 10%, more preferably 1%, of the desired gap tolerance.
 
@3DDave,

Thanks for your interest.
Here is my stack up. The flatness of the mating surface on part1 should not be taken into account because it does not affect the size 'a'.
TA_y95eto.png

For the worst case, the flatness of the mating surface on part2 should be ±0.1mm.
Then tolerance of this gap will be ±0.2mm.

And I have a question about the flatness of the mating surface on part2.
When should I use ±0.05 (half of the flatness value) instead of ±0.1?
 
I found a rule about flatness in an assembly.
[URL unfurl="true"]https://www.eng-tips.com/viewthread.cfm?qid=391228[/url]

Per ASME:
Flatness comes into play in with the "To or Thru Rule".
1) If the stack goes to a surface, the form of the surface must be accounted for in the stack.
2) If the stack goes thru a surface, the form of the surface is automatically included in the limits of the dimension.
Think of two flat washers held together. If you can fit a feeler gage between them, you are checking surface to surface. Flatness would control the amount of gap.
If you set a micrometer to the outsides of the two washers, the flatness would already be included in the dimensional limits of the two thickness'."


I do not fully understand this rule. Can someone have examples of this?
Does anyone know which section or page of ASME this rule is in?
 
If you have seen a spherical washer pair you have seen an example the ability of flatness to affect the overall stack height.
 
It's not really in the ASME standards, but the "To or Thru" rule is derived from the standard's definition of flatness.
A flatness tolerance on a surface already lives within a size tolerance. Therefore, if your stack in any way includes the size of the part, then you ignore the flatness number in your stack because you travelled "thru" the part (using the size tolerance).
However, if your stack only goes "to" the surface alone, without using the overall size, then you should include the flatness number in your stack.
I myself think that the term "To vs. Thru" is a little hokey, but I guess it's supposed to be easy to remember.

See the attached PDF for examples.


John-Paul Belanger
Certified Sr. GD&T Professional
Geometric Learning Systems
 
 https://files.engineering.com/getfile.aspx?folder=fdc9b6f1-d64d-46c6-9ca4-074f103281bd&file=ToOrThru.pdf
Thanks 3DDave,

Thanks Belanger.
Your statement and examples help me a lot!
 
Status
Not open for further replies.

Part and Inventory Search

Sponsor