Continue to Site

Eng-Tips is the largest engineering community on the Internet

Intelligent Work Forums for Engineering Professionals

  • Congratulations MintJulep on being selected by the Eng-Tips community for having the most helpful posts in the forums last week. Way to Go!

Gasket Leak During Hydro

Status
Not open for further replies.

NM31

Mechanical
Nov 28, 2017
5
Hello all,

I am new to this site, so I apologize if this post is improper in any way. Please correct me if so.

I am interested in getting some input on potential causes of a gasket leak during a hydrotest of a fixed bed reactor.

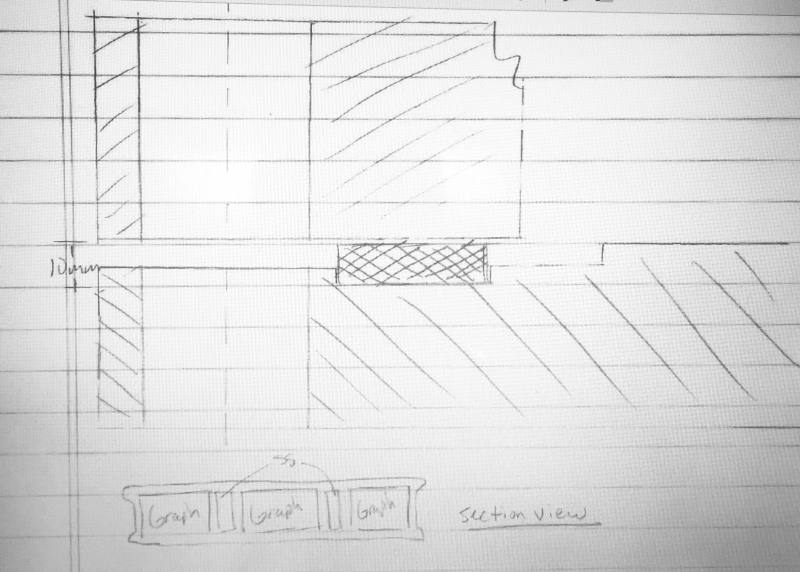
The gasket being utilized in the hydrotest has previously provided sufficient sealing in the past; however, during the most recent catalyst changeout, the gasket failed numerous times during the hydrotest prior to startup. The failure location is the interesting part of the equation - the leak point was always located wherever the gasket seam resided during the test. The gasket is a 10mm thick gasket with an alternating layer system: graphite-ss-graphite-ss-graphite (arranged horizontally). These layers are wrapped in a ss foil and there is a seam where the gasket ends are joined together.

The hydrotest was performed, unsuccessfully, multiple times. The location of this seam was adjusted during each test in an attempt to rule out warping or deformation of the head / tubesheet as a cause. The leak point followed the placement of the seam and did not occur at any other locations.

The vessel manufacturer's suggested bolt torque procedures were followed explicitly. My understanding is that these same procedures were followed during previous successful hydrotests.

Another potential cause that was initially ruled out was a defect in the manufacturing of the custom gasket. However, these same gaskets have been used successfully in previous changeouts / hydrotests. Spares from the last successful hydrotest were implemented first. Upon their failure, new versions of the same gaskets were purchased and used to no avail.

I have struggled to come up with any working theories for this unique (to me at least, due to relative inexperience) gasket failure. The vessel manufacturer (who also specified the gasket) cannot come up with any working theories either.

Any input would be greatly appreciated.

Thanks!
 
Replies continue below

Recommended for you

NM31, I am unsure what the exact configuration of your gasket is, but any seam across the width is an invitation to leak and your testing seems to point to this seam.

Why the gasket worked in the past and now does not is unknown, but: Same vendor? Same manufacturing process? Etc.

Exact causes are often really hard to identify, given that you don't usually have time and resources to conduct a "science project".

Regards,

Mike

The problem with sloppy work is that the supply FAR EXCEEDS the demand
 
Mike,

Thanks for the quick reply. I realize this may not be a situation with a straightforward answer.

My understanding is that the gasket manufacturer and their fabrication techniques are the same as when the test was performed successfully.

I am attaching a detail of the gasket as it was communicated to me (forgive my poor sketching). The groove that the gasket sits in I believe is 2mm deep and I believe the gasket itself is 26mm wide.

Unfortunately, I do not have any actual fabrication drawings that I can share.

Again, any insight is valuable and much-appreciated!

Thanks!
 
NM31 said:
My understanding is that the gasket manufacturer and their fabrication techniques are the same as when the test was performed successfully.

They always say that :)

Better take another crack at the attachment.

The problem with sloppy work is that the supply FAR EXCEEDS the demand
 
Is it a scarf joint or is it physically joined by the manufacturer? For the former, it could be poor installation / assembly, for the latter I would check that the thickness at the join is consistent with the rest of the gasket.

If it worked previously it is most likely the assembly. What was the assembly specification? What is the required gasket stress and what was target gasket stress? I am thinking your achieved gasket stress is less than expected, so better assembly or increased target stress.

Could a different gasket type be used?
 
I have never thought that it was a good idea to reuse gaskets. Gaskets tend to be damaged when removed eventho. the damages may not be apparent.
 
Unfortunately I cannot get the sketch to upload. My apologies.

With regard to the seam, it appears to be physically joined. I believe a small weld was made to join the ends together. I noticed what appeared to be a very minute indentation in the edge of the gasket where the weld was made, so that may be where the leak is introduced.

To be clear, the gasket is not a re-used gasket. I was referring to the use of a spare that had been ordered the last time the vessel was hydrotested. So it’s technically a new gasket, though it has been sitting on the shelf for about two years. Same issues occurred with the brand new gaskets though.

Thanks, all!
 
To up load look at the bottom of the posting box where it says "click here to upload..." click browse to find your file on your computer the upload and finally click the permissive link.

OR there is a little button two buttons to the left of the smiley face where it inserts a picture file (jpg, gif or png) directly into your post.

Give it a go as it will help a lot.

Anyway, you say this is wrapped in "foil"? what are the key dimensions of the foil? (thickness etc)
This a 10mm thick gasket? What does it compress down to?
Size / diameter of gasket? pressure of hydrotest?
What are the flange surface condition? what is this 2mm "groove"
What happened to require removal of this gasket? Is it possible that the two flange faces are now out of alignment?
maybe you need to add a few more steps to the vendors bolt torqueing sequence.

This seam doesn't sound like a good idea, but clearly has worked before, therefore it suggests other causes.

This is where some drawings, sketches or photos come in very useful, even partial drawings if you don't want to share the entire drawing.

Has the temperature changed between previous testing and now (possibly fairly cold wherever you are).


Remember - More details = better answers
Also: If you get a response it's polite to respond to it.
 
I’m attempting to attach the sketch again this morning.

With regard to the gasket diameter, I believe the bolt circle of the vessel is 2780mm (44 bolts) but I do not have access to the actual drawing to confirm the actual gasket diameter. I also do not have M & Y values for the gasket at this point. I can only relay what I have been given thus far.

My main curiosity was if leaks at gasket seams were a common event and if there are certain measures that can be taken in these instances to help alleviate the issue.

Thanks, all, for the valuable input!
C6EE8415-7418-420B-A996-8F58B5077BC1_qgan6r.jpg
 
Have you calculated the assembly bolt load per ASME PCC-1 Appendix O? Forget m and Y, do you have the ROTT gasket constants Gb, Gs, and a? If you don't, ask for them - the gasket manufacturer will have them.

Do you have the gasket contact surface finish in accordance with PCC-1 Appendix C?

Do you have the gasket contact surface flatness in accordance with PCC-1 Appendix D?

Do you have the flanged joint aligned in accordance with PCC-1 Appedix E?

Are you using bolted flange joint assemblers trained and certified to PCC-1 Appendix A?

Have you followed the troubleshooting guide in PCC-1 Appendix P?
 
moltenmetal, maybe to accommodate any flatness issues with the face so the gasket has increased thickness to make it up? Of the top of my head I'm not sure the thickness of the gaskets I've seen used on flanged connections of this size. Tempted to take a look later.

Thanks,
Ehzin
 
As Moltenmetal says - The gasket is too thick.
 
All, the feedback here has been very informative, so thank you all. My understanding is that the plant has now been able to complete a successful hydrotest. They were able to bring back the same manufacturer’s rep (engineer) that presided over previous tests - he was not available during the failed testing.

Apparently the two key issues were surface finish and surface cleanliness. Those procedures must not have been followed 100% as had been done in the past.

Again, thank you all for your insight and I look forward to participating more on this forum in the future!
 
Status
Not open for further replies.

Part and Inventory Search

Sponsor