Continue to Site

Eng-Tips is the largest engineering community on the Internet

Intelligent Work Forums for Engineering Professionals

  • Congratulations KootK on being selected by the Eng-Tips community for having the most helpful posts in the forums last week. Way to Go!

Governing Thickness for Welding a Sockolet on a Blind Flange per ASME B31.8 3

Status
Not open for further replies.

zengx

Mechanical
Apr 8, 2012
27
I am seeking your expert advise on determining the governing thickness for both welding and PWHT when welding a sockolet on a blind flange per ASME B31.8.
I have consulted several welding engineers and got different replies. Also, I did not find this case in any of the standard interpretations.

Attached is a snip of the welded joint in question and I seek your advise on the following:
1- Is PWHT required for this weld? and what is the governing thickness for PWHT inthis case? as per ASME B31.8 para. 825.2, Welds in all carbon steels shall be stress relieved when the nominal wall thickness exceeds 11⁄4 in. (32 mm). In this case, the thickness of the blind is 68mm. Also, I cannot relate this case to any of the exceptions in para. 825.5.
2- Does the WPS have to cover the base metal thickness of both the fitting and the blind? (per my knowledge, it should. However, I got several replies from experienced welding engineers that it needs only to cover the weld or fitting thickness).

Thanks in advance.
MD.
 
 https://files.engineering.com/getfile.aspx?folder=1a24e308-edd5-46cd-ad09-5e496f67fb18&file=Capture.JPG
Replies continue below

Recommended for you

Wledign a sockolet to a blind flange sounds like a very strange solution to me. Also, bear in mind the sockolet may have a curved profile on the bw-side, meaning youll have to machine that end first prior to welding.
 
A sketch of the actual configuration with dimensions would be helpful.


Best regards - Al
 
Hello,
In case anyone ended up here after searching a similar case, here is an update.
After alot of searching in ASME B31.8 before posting this thread, I consulted the designer, client Engineer and client Inspector. Surprisingly, each gave a different opinion. The designer suggested that we conduct PWHT and the governing thickness for welding is that of the fitting (which they changed from a weldolet to a welding boss). The Engineer suggested we conduct PWHT and the governing thickness for welding is that of the blind flange. The Inspector suggested that PWHT is not required and the governing thickness for welding is that of the fitting. Each provided his interpenetration and references, and each of the 3 opinions do not seem wrong. At the end, we decided to proceed with applying PWHT, considering the fitting as the governing thickness.

Thanks & Regards,
MD.
 
001_lszlge.jpg

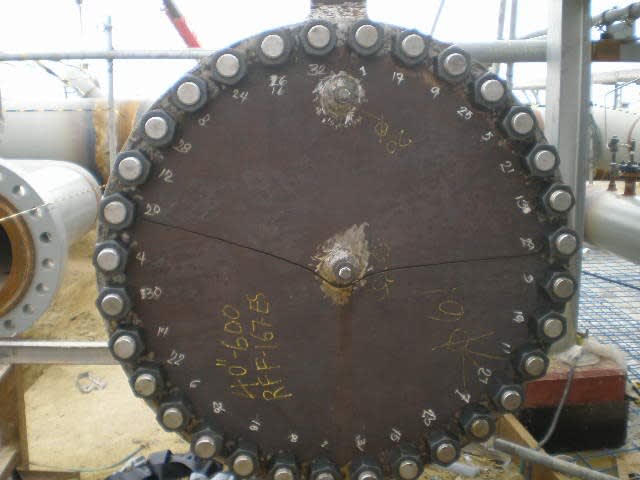
This may not be relevant to your situation but when welding small / thin items to large / thick items extra care is required
 
Interesting photograph DekDee. I could use a photograph like that for my training class to alter people that things can go wrong if we don't pay attention to details.

Best regards - Al
 
Hi Al,
Will send the report with additional photos to your e-mail.
Cheers,
Shane
 
Thank you for sharing this photo DekDee. I have never seen something like this before.
I would appreciate if you can share more info, if possible.

Regards,
MD.
 
To give more details on what I posted regarding the different interpretation, here is the Client Engineer's reply which I agree with.

There are not many direct Code interpretations available that could be of help with shedding some light on this topic and as a consequence, the present reply could only express the understanding, or view, of the Technical Authority of the Company about the requirements for stress relief specified in the ASME B31.8 Code.
The Technical Authority considers that the requirements for stress relief applying to the run pipe, should apply also to any of the permanently installed components of the pipeline system/application designed with the same Code. Despite the fact that in other codes –i.e. ASME B31.3 – the weld thickness is clearly referenced as the factor governing the decision about the necessity or not for post weld heat treatment, in ASME B31.8 a similar approach – yet, not the same – is adopted although with, in some cases, significant differences.
Our understanding of the intent of the Code is developed at of the present, would the reader wish to seek more information about how the below output was reached to.
In conclusion, The thickness of the blind is above 32mm and welding of full penetration connections to it, regardless if either set-in or set-on type, would require stress relieve as per 825.3 unless the exceptions of para. 825.5 could apply.
The bore of the boss is indeed below 2in. but the final weld is consisted of a full penetration groove weld of a size of 14mm and a cover fillet weld of leg size of 8mm on top of it. Would compliance with the requirements of ASME B31.8 be the question, the joint would have to be stress relieved.
Stress relief of the component in a furnace is strongly recommended. Localized heat treatment is not preferred.
The above said, would the blind be intended only for temporary use, such as for instance for hydrotesting purposes, rather than a permanent and integral component of a system designed with ASME B31.8 in its entirety, it could be examined to design and fabricate the component as per ASME BPV Sec VIII D1 (considering water at the hydrostatic pressure as the contained medium). Would this option wished to be considered, you will need to contact CSD Piping and Valves Group for their approval.
Please note that a permanent blind designed as per ASME VIII D1, would still have to comply with the fabrication requirements of the ASME B31.8 following the intent of ASME B31.8 Interpretation 17-6.
 
Impressive picture. I've investigated one or two of these before, but nothing on this scale. They had exactly the same crack direction.

If it is what I think it is, fatigue originating at the weld toe and propagating through the plate, then the size of the weld or porosity had nothing to do with starting the crack. That said, the fillet weld doesn't look too neat.

The only relevant aspect of the failure that is of high significance (other than the applied stresses) is the stress concentration factor at the weld toe. Undercut has a powerful influence but cold cracking cannot be ruled out. However in my 11 years in heavy fabrication shops I never saw a single instance of cold cracking. SCF trumps all else in fatigue fracture.

"Everyone is entitled to their own opinions, but they are not entitled to their own facts."
 
Were these fittings welded on in position with the blind flange bolted up or were these fittings welded onto the blind flange in the shop. Just curious???
 
Status
Not open for further replies.

Part and Inventory Search

Sponsor