Continue to Site

Eng-Tips is the largest engineering community on the Internet

Intelligent Work Forums for Engineering Professionals

  • Congratulations KootK on being selected by the Eng-Tips community for having the most helpful posts in the forums last week. Way to Go!

How to execute the mechanical test of multi process PRQ

Status
Not open for further replies.

lslcpfcc

Mechanical
Jul 20, 2016
36
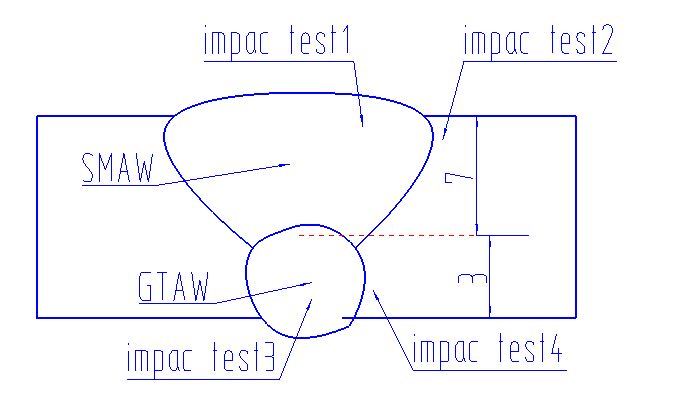
Background: A PQR test coupon with 10mm thick, welded by multi-process GTAW +SMAW ,the deposit metal thickness is 3mm and 7mm respectively.

QUESTION: (1)for cold band test, TWO FACE and TWO back bend specimen will be tested to represent GTAW and SMAW deposit metal.

(2)for impact test, as illustrated following
4_hpfzqs.jpg


Does two sets of impact test specimen shall be test from GTAW and SMAW deposit metal it's HAZ respectively?

If yes,why? who can provide the reference code interpretation.
 
Replies continue below

Recommended for you

It depends. What does the code of construction require for impact qualification? Section IX is a service code and not a design code.
 
Your full size (or close to it) Charpy specimens will represent both processes. You do not have to do sub-size specimens to isolate the different processes.
 
The ASME VIII-1 code is the construction code.

a full size can represents the boss process,this point don't conform with the principle of ASME code, I considered.
 
lslcpfcc,

Not sure if I understand your last statement, but CWEng is correct, full size represents both processes at this thickness. See Table UG-84.6.
 
Again per CWEng, a full size Charpy will cover both processes.
 
It is time to read the code. ASME VIII-1 is the construction code as mentioned above:
UG-84(c)(2)
"The impact test specimens shall be of the Charpy V‐notch type and shall conform in all respects to Figure UG-84. The standard (10 mm × 10 mm) specimens, when obtainable, shall be used for nominal thicknesses of 7/16 in. (11 mm) or greater, except as otherwise permitted in (-a) below."

That means you have to used standard specimen. And if so both filler metals are included in this specimen for the above mentioned case. Therefor the requirement of QW-462 is met:
".....All welding processes and filler material to be qualified must be included in the test specimen."

In addition the following supporting Interpretation
Interpretation: IX-92-42
Subject: Section IX, QW-200.4(a), Combination of Welding Processes
Date Issued: September 10, 1992
File: BC92-011
Question: May a single set of weld metal impact test specimens be used to qualify two or more processes or procedures?
Reply: Yes, provided weld metal from each process or procedure is included in each specimen.


Regards - Juergen
 
We can read this lecture


assure that the test coupon thickness of multi-process welding is 26mm or thicker, how can we cutting the impact test specimen,from SMAW deposited metal? or from GTAW deposited metal? or a single set specimen contains two deposited metals? the HAZ is similar.


we can read this paragraph carefully,
When tested the deposited weld metal of each process must be included in the tension and bend test specimens and impacts where applicable. [highlight #F57900] Note it is acceptable for the impact test for the GTAW to contain some SMAW in the test specimen.[/highlight]

I consider the last sentence of this paragraph specifies that we should cutting two impact test specimens from SMAW and GTAW respectively,
because of the low thickness of the GTAW, so the impact test for GTAW can contain some SMAW deposited metal.
 
Your "lecture" is nothing new to us. What is new is your failure to accept the advice given you. Your attachment has no bearing on where impact specimens shall be taken or how many.....for this you must see Sec. VIII Div. 1. Please read UG-84 in its entirety.
 
Status
Not open for further replies.

Part and Inventory Search

Sponsor