Continue to Site

Eng-Tips is the largest engineering community on the Internet

Intelligent Work Forums for Engineering Professionals

  • Congratulations IDS on being selected by the Eng-Tips community for having the most helpful posts in the forums last week. Way to Go!

how to specify honing (on a print) for a hydraulic cylinder??

Status
Not open for further replies.

svt1234

Automotive
Jan 23, 2014
7
I am reverse engineering a hydraulic cylinder, I believe there is more to just slapping on a number for a surface finish, does anyone have any experience in this area? I believe there must be a standard out there that covers this.
 
Replies continue below

Recommended for you

You -technically- are not supposed to specify a process on engineering drawings. If it's a shop drawing, then that's different, I believe.

Anyways, if it's a general design drawing, some machine building companies will still put processes on there, such as hone, but if you want to abstain from this, I believe the surface /roughness/ callout and a cylindricity tolerance applied to a tight-tolerance diameter would be your ASME 'legal' method.

The machinist/fabricator/manufacturer will decide the method. They may get a cylinder hone or maybe their wire EDM guy is bored and wants a challenge or something. Or maybe your actual requirement means they can get away with a boring bar on a bar mill / horizontal mill and a little polishing after the fact. That's the theory behind establishing geometry rather than processes.

_________________________________________
NX8.0, Solidworks 2014, AutoCAD, Enovia V5
 
JNieman is correct...
Y14.5-2009 states in fundamental rule (e) that "The drawing should define a part without specifying manufacturing methods... However, in those instances where manufacturing, processing, quality assurance, or environmental information is essential to the definition of engineering requirements, it shall be specified on the drawing or in a document referenced on the drawing." (emphasis mine)

"Know the rules well, so you can break them effectively."
-Dalai Lama XIV
 
I understand not calling out procedures, however, in today's world some people don't always have the knowledge to know this isn't just a regular hole in a block of aluminum.

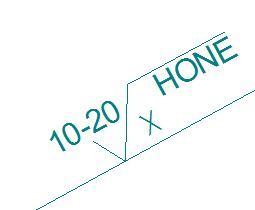
What I am wondering is there a surface finish symbol that will tell someone "hone this"
 
So I could just place "hone" under the surface finish symbol, but I still think there is more to it. For example radial and transverse surface finish requirements or what is the angle of the cross hatch in relation to the face.

Capture_oc5apn.jpg
 
Call out the surface roughness needed. Calling out "hone" makes it specific to honing. You may get the roughness needed with other processes.
As others wrote, leave processes off drawings. It will save you time and $$.

Chris, CSWA
SolidWorks '15
SolidWorks Legion
 
Yes. If you get a 10-20 suface finish, why does it matter if you hone it or not?

John Acosta, GDTP Senior Level
Manufacturing Engineering Tech
SSG, U.S. Army
Taji, Iraq OIF II
 
If they try to sell you a part with 32 roughness on a print that requires 10-20, you should remind them they are not mere suggestions.

By specifying hone, you also cut out processes other than hone which would create a fine surface for your part.

_________________________________________
NX8.0, Solidworks 2014, AutoCAD, Enovia V5
 
Honing creates a cross hatch pattern that helps retain oil. It also minimizes the formation of "sharp peaks" on the surface caused by other machining processes. Right???
 
If you call out a surface roughness, there should not be any "sharp peaks", or burrs, regardless which process is used.
If there is, it's not to print.

Chris, CSWA
SolidWorks '15
SolidWorks Legion
 
I'm not saying honing wouldn't work and suit the purpose. I'm saying you should call out the physical requirements and know that they are met. If you look into the various controls and symbols of surface roughness, I think you'll find there are ways to communicate your desire.

Of course you also have to "know your audience" - how many would see the rarely-seen symbols, decide to no-quote it (who may have otherwise given you a good part for a good price) and how many would quote it, not know what the symbols mean, and give you an unsuitable part?

I think it was covered; what's "legal" and what's not - compliance is your own decision. Personally, we work with a few machine builders to make parts for them and their prints often have processes called out. They claim the prints are ASME Y14.5-2009 yadda yadda... but we still deliver good parts and get paid. I also wonder if the prints aren't meant for their own shop, and this was "unplanned outsourcing".

Then there are people who will call out pilot drill size, jig drill size, reamer size, and then a required 'fit' tolerance... which, if a shop chooses to ignore, use a vertical mill to helically interpolate the hole from nothing, and then ream it (or not, depending on tolerance) and meet the appropriate fit desired in the end. You can't very well prove or verify that the part wasn't pilot drilled, jig drilled, and/or reamed, before the bushings were pressed in with .0000-.000x interference... so it can be a requirement with no 'teeth' as it were. But I'm rambling so...

_________________________________________
NX8.0, Solidworks 2014, AutoCAD, Enovia V5
 
The angular lay you need can be specified in the surface texture symbol. See ASME Y14.36-1996 FIG. 4.

"Know the rules well, so you can break them effectively."
-Dalai Lama XIV
 
I was hoping that there was some standard that governed this. I prefer to place "hone" on the print because some of the people downstream from me have in the past for example had a part with a +-.010 tolerance flame cut when I had wanted it lasercut, now all my prints designate laser cut or flame cut (as JNieman says "know your audience"

I have an old print of a similar part from the 1950's that has some rather interesting notation on honing and was really wondering if it was derived from some standard.
 
They do that cross hatch pattern on engine cylinders to capture oil thus ensuring lube at the piston/cylinder wall. I haven't seen that in hydraulic cylinders though since it's a sliding fit with rubber seals. Maybe this design is different. I'd check one of the automotive fora on this site. They may have some better answers as to how to specify what you're after.

John Acosta, GDTP Senior Level
Manufacturing Engineering Tech
SSG, U.S. Army
Taji, Iraq OIF II
 
Didn't read all replies but we fall into similar issues sometimes.

We have parts that get held down by vacuum, no option for O-rings or similar so basically both mating parts need to be flat and have good surface finish. Additionally the parts sometimes slide (rotate) over each over.

We had problems where although parts met the roughness average value, small peaks in the electroless nickel plating would cause scratches/wear when the parts occasionally slid over each other and/or cause vacuum leaks.

So, we ended up adding a specific lapping spec specifying a simple process on the faces of interest.

In this case, I justify it by saying the process materially impacts performance.

It might be that if we really refined our roughness call out and plating and heat treatment and.... we could get away without the lap step but doesn't seem worth the effort to find out.

It's not clear in your case if the honing is actually required or if combination of roughness & lay symbols will do the trick.

Posting guidelines faq731-376 (probably not aimed specifically at you)
What is Engineering anyway: faq1088-1484
 
Angular lay symbol is what you need, or at least where you start.

It will specify required geometry of the surface without specifying the process.

Also it was never forbidden to specify process in the first place.

Specifying angle will be overkill, because honing is random process, which is exactly why it is used to "minimize the formation of sharp peaks"

"For every expert there is an equal and opposite expert"
Arthur C. Clarke Profiles of the future

 
 http://files.engineering.com/getfile.aspx?folder=83c3c6c7-8f89-400c-89b5-44a2b39e4f4d&file=Surface_Texture_Lay_Symbols_Definitions.pdf
We have traditionally used off the shelf honed steel tubing from several suppliers over the years that sell the tubing for hydraulic cylinders. Additionally, all the cylinders I have reverse engineered have the crosshatch like an automotive engine.
However, I now have a cylinder made from a custom aluminum extrusion,with a custom size ID, this is what caused me to question what to place for honing callout. In the past it was easy, just by off the shelf tubing, now I need to source an extrusion, and someone to hone this extrusion.
 
While not forbidden, it is advised against specifying processes in Y14.5 ("...without specifying manufacturing methods").
Per Merriam-Webster, the first definition of method is "a procedure or process for attaining an object".
That said, if you are not tied to strictly following ASME standards, there should be no problem including "hone" on the drawing.

"Know the rules well, so you can break them effectively."
-Dalai Lama XIV
 
I'd give Sunnen a call; they are a major manufacturer of honing machines for hydraulic cylinders and the like and they may have some insight into suitable engineering requirements.

The ASME standards are for typical uses; finishing of hydraulic cylinder bores is not typical. For example, ASME tried to take over optical surface requirements (covers details as 'scratch' and 'dig') but I think were unsuccessful and leave terminology and special concepts to specs from the optical industry.

As an example of what honing is capable of, Sunnen provided an engineer with a desk toy - a pin and a cylinder that had been finished to have a millionth of an inch of clearance and were very round. The parts slipped together easily, but put a rubber plug in one end of the cylinder and the seal with the pin was rather air-tight. Even compressed, it wasn't apparent any air leaked out. Most impressive was to set the plugged stack on the rod end and give the cylinder a spin - it had less friction than any roller bearing of any size. Cox industries must have used a similar technique in making their TD .010 cu.in model airplane engines.
 
The surface finish symbol DOES allow one to specify process in the symbol, however, just saying HONE really does not go nearly far enough to restrict the process as there are many different honing techniques.

There is far more to surface texture than specifying an average roughness value and direction of lay. Modern plateau honing techniques can achieve the "no peaks" while still having the micro scratches for oil retention. You probably need to use one of the hybrid surface roughness parameters like Rpq. See page 16 of the attachment.

----------------------------------------

The Help for this program was created in Windows Help format, which depends on a feature that isn't included in this version of Windows.
 
 http://files.engineering.com/getfile.aspx?folder=5e0e1b89-140a-476c-927d-29ee7eb8593f&file=SurfText.pdf
Status
Not open for further replies.

Part and Inventory Search

Sponsor