Continue to Site

Eng-Tips is the largest engineering community on the Internet

Intelligent Work Forums for Engineering Professionals

  • Congratulations KootK on being selected by the Eng-Tips community for having the most helpful posts in the forums last week. Way to Go!

Location of notch as per UG-84(g) for impact test specimen

Status
Not open for further replies.

Genetix

Petroleum
Jan 14, 2016
23
Dear respected experts of this forum.

I would like to get some insight regarding UG-84(g) of ASME Section VIII Division 1.
The words "normal to the surface" for the location of the notch confuses me. Could you please advice which is the correct location of the notch as per uploaded image?
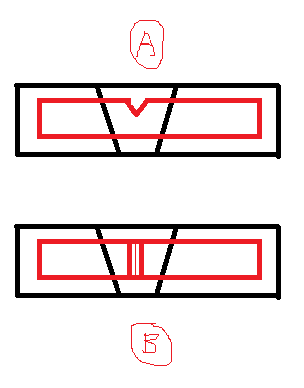
NOTCH_LOCATION_adcukj.png


Thanks in advance.
 
Replies continue below

Recommended for you

A is corrected.

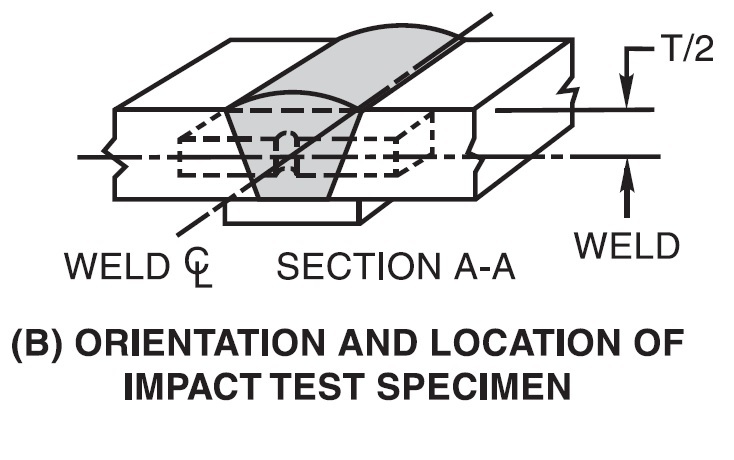
please study the attached illustration

impact_test_specimen_iwwo3m.jpg
 
The word normal referenced above means perpendicular to the weld surface.
 
I read the OP sketch to be cross sections with the weld made from the top surface and extending out of the page.
The Charpy samples in the figure posted by lslcpfcc are in orientation B in the OPs sketch.
The 'width' of the sample is to be the thickness of the weld.


= = = = = = = = = = = = = = = = = = = =
P.E. Metallurgy, Plymouth Tube
 
The original post was in reference to specimen orienation stated in UG-84g in Section VIII Div 1. Normal means perpendicular to a surface of the weld.
 
Hi guys,

I have found a picture on ASME Section II Part C as shown, I guess this should be the correct orientation.

Impact_Test_Specimen_paizkd.jpg


As per UG-84(g)
"Each set of weld metal impact specimens shall be
taken across the weld with the notch in the weld metal.
Each specimen shall be oriented so that the notch is normal
to the surface of the material
and one face of the specimen
shall be within 1/16 in. (1.5 mm) of the surface of the
material"

My understanding is that "normal to the surface of material" means perpendicular to the outside surface of the material. The posted picture tells otherwise.
 
Be careful with using diagrams from other code book sections. You follow the words as stated so the notch is 90 degrees to the surface of the sample which means it extends across the thickness and not parallel to the outer surface. It would be sketch B.
 
OP sketch B and both of the later ones show the same orientation.
Notch is in the weld, and the direction of the notch is at a right angel to the surface of the original material.

= = = = = = = = = = = = = = = = = = = =
P.E. Metallurgy, Plymouth Tube
 
Section II Part C is not applicable to UG-84(g). It applies to the manufacturer performing all weld metal impact tests when required for the weld filler metal class.
 
Thank you very much for all inputs.
I appreciate it.
 
Status
Not open for further replies.

Part and Inventory Search

Sponsor