Eng-Tips is the largest engineering community on the Internet

Intelligent Work Forums for Engineering Professionals

  • Congratulations waross on being selected by the Tek-Tips community for having the most helpful posts in the forums last week. Way to Go!

Mold Locked Design..Multiple Side Action/Collapsible Core? 2

Status
Not open for further replies.

CPosner

Mechanical
Jan 26, 2007
139
0
0
US
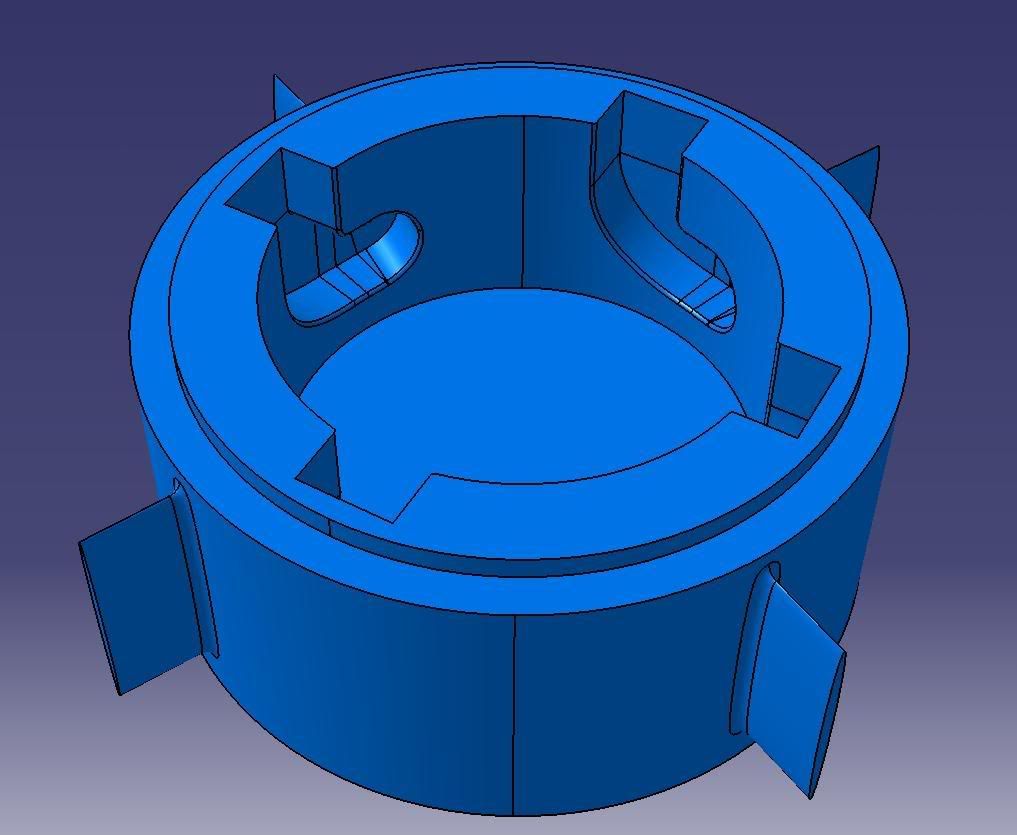
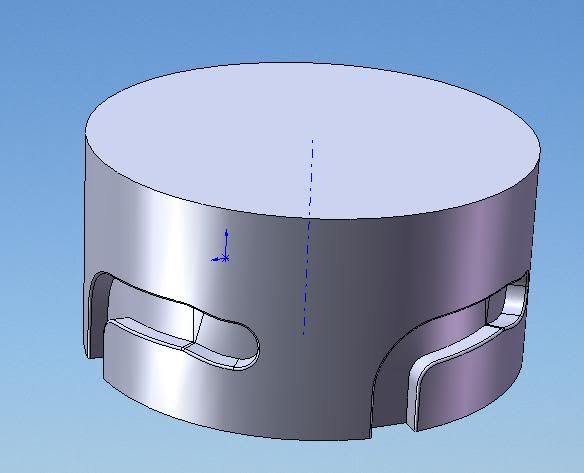
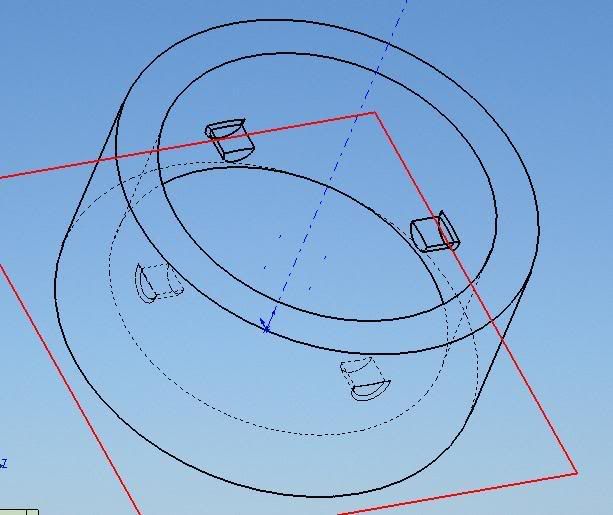
I've got a design that is currently Mold locked. It consists of two mating parts. The issue is with the Female part. I know by opening the bottom, it can be made and by eliminating that undercut.

I'm looking for some suggestions on how to make this design work. The design can change, but the intent is a "twist-fit" connection that must be removable, multiple times. Must be a Robust connection.

cam.jpg

followers.jpg


Thanks in advance.
Chad
 
Replies continue below

Recommended for you

The answers to your questions are very dependant on material selection and final design details. There are many factors that inter react.

The rapid prototype will not reliably predict the feel or force required to jump over undercuts when assembling or disassembling.

Regards

eng-tips, by professional engineers for professional engineers
Please see FAQ731-376 for tips on how to make the best use of Eng-Tips Fora.
 
Right now, nylon, ABS, or acetal are my options.

Unfortunately, I am looking for a rapid prototype that will give me the same mechanical feel.

 
Not gonna happen; the microstructure is too different, even if you RP with the same material. You can get closer to the real feel with an aluminum mold, for about the same amount of machining time it would take to make one prototype from billet.

BUT, and I don't mean to put too sharp a point on it, you shouldn't be designing by 'feel' here. You should instead be evaluating the 'feel' of objects that seem about right, and reverse engineering them. Simple beam models in Excel are good enough for this. The idea is to find out what friction forces and spring rates and such produce the 'feel' that you think is right, and then use that information to _engineer_ the feel into your product.


Mike Halloran
Pembroke Pines, FL, USA
 
Mike,

Point taken and on that note, I don't know many..or any products with similar material and effect to analyze. I'm having trouble finding that "MS twist-lock round shell multipin connectors"

Thanks
 
Most MS connectors, and BNC connectors, work the same way, and it's _not_ how you first think.

If you did have an MS connector there, and you engaged the shell with no insert, you'd find that it twisted easily, but it wouldn't 'lock', unless you were trying to separate it. That's because the bumps on the thread don't 'spring' against the form in the mating thread, they spring against axial compression of either the insert (that holds the electrical pins), or a rubber gasket somewhere.

Similarly, topologically speaking, if you look _real_ close at a BNC connector, you'll find a wave spring concealed deep in the grooved half, that tries to separate the connector. That's what you feel when the pins go over-center as you lock the connector.


Mike Halloran
Pembroke Pines, FL, USA
 
Mike/All:

The name for the connector is a "Bayonet" stumbled on that in my research. I've taken your advice and I feel that the wave spring is the best approach.

This leads me back to a plastic design question..I'd like to seat the spring in the female bore, which would lead me to put the engagement dogs on the male part and the grooves on the female part, for a clear insertion of the spring. (I prefer this for other reasons as well) So it's really a manufacturability question for injection molding the blind grooves in the female part.

Any opinions?

Thanks,
Chad
 
I once rang my barber for a haircut, but he said I would have to come to his shop.

You need to post more details.

Most things are possible if you are willing to experiment and pay the price re tooling cost and cycle times.

Regards

eng-tips, by professional engineers for professional engineers
Please see FAQ731-376 for tips on how to make the best use of Eng-Tips Fora.
 
Here is what I am talking about... The internal blind Undercuts grooves. Do-able for a decent price? How would it be done? Collapsible core or something?

fmale1.jpg


One thing I have been thinking about is possibly breaking the part into 2 or 4 pieces, but I would really hate to do that. Or cutting the grooves through the whole wall and exposing them to you can have a side action to create the grooves. But Then I need to add a wall back to it. I don't like that solution either.
 
You could mould with the groves all the way through, but the OD to small, then shrink fit or weld a sleeve over it to cover the groves and get the correct OD.

You could have collapsing internal cores, but I think by the time you finished talking to a good Swiss toolmaker, you might need some resuscitation.

Regards

eng-tips, by professional engineers for professional engineers
Please see FAQ731-376 for tips on how to make the best use of Eng-Tips Fora.
 
If I use two parts, I think the sleeve would need to be a cup so the grooved part can seat and it would need an anti rotation feature in both parts. I'm concerned about the parts coming apart. Can welding be automated or easily done keeping quality in mind?? I've only done manual plastic welding...
 
Some feature, e.g. a flange, prevents the male part from pushing all the way through the female part even if you remove the radial pins from the male part.

For that reason also, the grooves in the female part don't need a 'bottom'. I.e., they can be formed by axial fins from the far/bottom end.


Mike Halloran
Pembroke Pines, FL, USA
 
Mike,

That's correct about the flange. I can relieve the bottom of the grooves, but I cannot punch a hole all the way through(if that's what you're saying). I need the blind bore, as a wave spring is seated at the bottom of the bore and the inner wall creates a pilot for the spring. Unless somehow, the part is punched through and a second part is molded to cap the bottom..? the key is that the two parts are well fixed and the joint between the two is waterproof.

Not Sure what axial fins are?
 
That definitely simplifies the mold, but that leaves me with 4 holes in the bottom to fill.

Maybe a small plate to glue to the bottom? Some other part with an o-ring to insert on the bottom? Or two-shot molded with soft seal/ring? And I can put and cylindrical/circumferential groove on the bottom? hmmm
 
You can get quite good results by ultrasonic welding thermoplastics. It is a widely used process and can reliably produce strong waterproof joints. For instance, the old in line fuel filters for cars with carburettors were made that way.

Regards

eng-tips, by professional engineers for professional engineers
Please see FAQ731-376 for tips on how to make the best use of Eng-Tips Fora.
 
Is there any technique to designing for ultrasonic welding? Do most injection molders have ultrasonic welding equipment?

Is it a costly process? I'm assuming it is cheaper than the over complicated mold for the original design.

 
Maybe I'm a little late to the party here, and I have not read thru all the posts, but something just struck me looking at the image at the top of this thread - the image of the 'cup' with the external female bayonet mount undercuts. My idea might get in the way of any aeshtetic you need for the part, but I'll leave that judgement up to you.

In this thread here has been talk about multiple slides and/or moving cores to relieve the undercuts of the 'L' shaped bayonet feature. It looks like (upon quickly glancing thru the posts) that it has been assumed thus far that the orientation of your original part as shown at the beginning of this thread wants to be molded such that the parting line of the mold is parallel to the top or bottom of the part, and then to add additional tooling to achieve the (4) necessary undercuts on the outside of the part as shown in your original sketch.

One alternative that will affect how the part looks on the outside of the 'cup' yet still retain bayonet funtionality might be to lay the 'cup' down in the mold such that ONLY ONE SIDE ACTION would be required to produce the inner round core of your part. As for the four 'bayonet' 'L' shaped features, two of them could be moulded without side actions as they could be located such that the natural draw of the mold would produce their geometry, and then the geometry of the other two female bayonet features that lie across the parting line could be modified so as to releive their undercuts. Even though material is releived from the two features that lie across the parting line, they could quite possibly still retain the functionality of the bayonet mount at those two locations. (Another words, the locking feature that is molded across the parting line would no longer be 'L' shaped as you originally depicted, but would end up sort of as a nearly flat surface in the area that receives the pin, and as a nearly flat radial groove in the area in which the pin is allowed to traverse.

Examining the concept a little deeper...If you've followed me thus far, and if I'm seeing your original sketch correctly, the two 'L' shaped bayonet pin tracks that are molded away from the parting line could retain what appears to be a pin-detent feature. The two detent features that would be molded at the parting line of the mold might be lost, but maybe once you up-end the 'cup' 90 degrees, you might find a way to include a detent at the parting line (by making one half of each groove smaller and offset slightly from the groove that is molded in the plate opposite the grooves parting line) if you truly needed four detent features.

I currently don't have any modeling program at hand, otherwise I'd produce the concept for you.

As a side note, on the blue model that appears above this post, you show four external wings...they would not mold well as skinny as you have them shown...I would recommend that you fatten them up to about 2/3 the thickness of your general wall thickness of the part.
 
In my opinion there will be little or no problem with the external wings other than maybe they will shrink a bit less and therefore warp a little, depending on material selection and moulding conditions. It certainly won't be a problem filling them if the gates are in the correct place.

The one side core design cannot be applied to the current design as the undercuts are on the core, not the cavity.

On the original design, it is possible with 2 side cores if done right. They will be short stroke and not require a lot of force to move them.

By laying the main axis of the moulding 90 deg to line of draw, being accross the parting line, a big core requiring a long stroke with a high force to open would be required. I expect it would cost more than 2 smaller side cores.

Regards

eng-tips, by professional engineers for professional engineers
Please see FAQ731-376 for tips on how to make the best use of Eng-Tips Fora.
 
Mousetrap,

you've got me slightly lost in your post. Currently the blue design is the direction I am going. The radial fins are there to prevent the part from spinning after installation..geometry is open to change for those..possibly unnecessary. Drawing would be helpful I think in this case.


I think the two part sonically welded assembly is looking more viable at this point, unless the blue one above can be made easily/responsibly. This discussion has been very informative to this point and I thank everyone for their input. I'll work up some more drawings and post them soon.

Thanks,
Chad
 
Status
Not open for further replies.
Back
Top