Continue to Site

Eng-Tips is the largest engineering community on the Internet

Intelligent Work Forums for Engineering Professionals

  • Congratulations IDS on being selected by the Eng-Tips community for having the most helpful posts in the forums last week. Way to Go!

NX11 - Create assembly labels for components 2

Status
Not open for further replies.

Kenja824

Automotive
Nov 5, 2014
949
We have a program from one customer that will label all of the components on an iso view.

We click the button, select a component, select the location we want the note to be placed, then attach the leader to the component. That note will automatically read the TOOL_ID attribute of the selected component, copy it and paste it into the note. This will only be a note and not associated to the attribute.

I know how to attach a note to a component's attribute, but it will always keep it associated.

The problem is we cannot use this button for other customers. So I need to find a way to do the same thing. Currently all of the employees have to attach notes and manually type the TOOL_ID into the note for each component.

It would be awesome if we can just select a component inside the view window, attach the note to the edge of the component in the view and place a note and that note will only be a note but will have the TOOL_ID attribute in the note. (Not associated).

IS there a way to do this
 
Replies continue below

Recommended for you

Have you tried using the parts list ?
set the "balloon" to present the Tool_id instead of the callout.

I imagine that Tool_id is an attribute that your company sets on all components. ( ? )
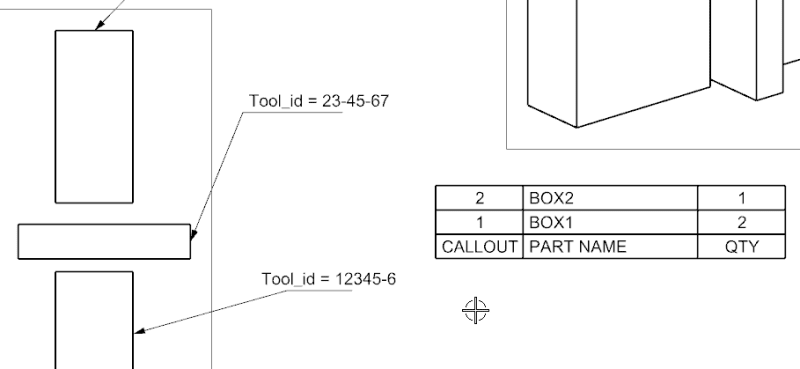
I have attached an example, NX10, where the callout is "underline" instead of the regular balloon. ( The tool_id does not fit inside a balloon)
If you add "balloon" and select the type to be "underline" ( do not type anything) , place the leader on the edge of the lower box that's missing a note , then update the partslist, it will / should update that new underline-balloon.

I have set the callout for this partslist to "Tool_id = <W$=@tool_id>"

Regards,
Tomas
2019-09-13_15-36-10_at4jdy.png


Hi Toost

Thanks for the help.

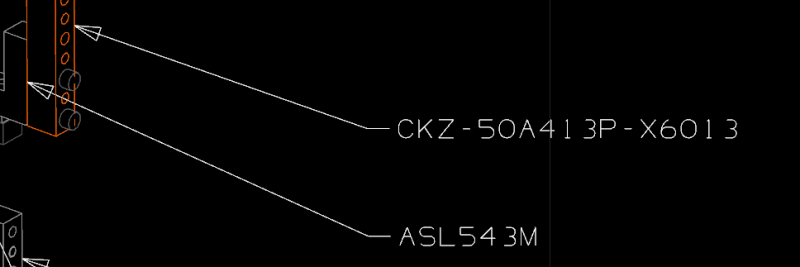
I was playing around with the parts list. The problem is I cannot get it to match our standards. Shown in the image.

Yes "Tool_ID" is an attribute we give all of our parts. It is basically the order string for purchased components and the detail number for make details.

1) The leader ends up underlining the note and everything we do has the leader extend from the end of the note.

2) It adds "Tool_id" to the note. I cant seem to figure out how to keep that from coming in.

3) Another problem is that the Parts List seems to keep things associated. If I delete the actual Parts List, which we dont need as we create BOMs for that information, all of the notes disappear.

Granted I have never messed around with the parts list before as we have always used another program for that. So all of this stuff may be easy to adjust. I just have figured out how yet. lol

image_uc5gz2.png
 
1, i do not know a way to avoid this, i assume that it's a European customer who has required the underline- balloon type.
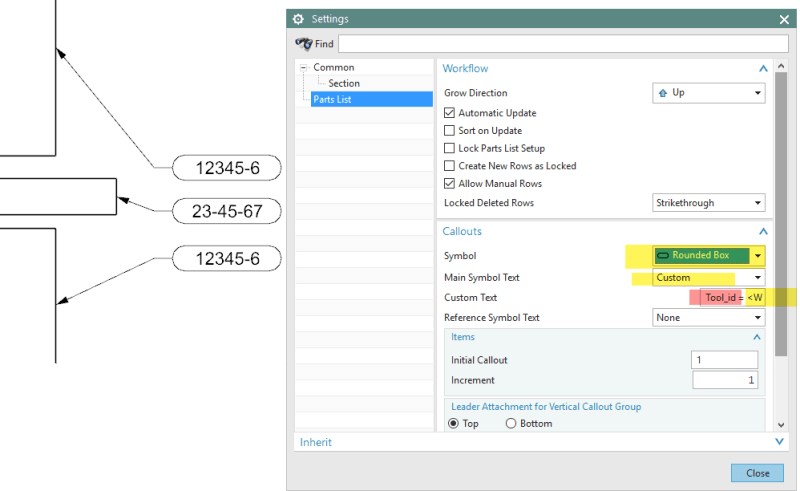
Try the other balloon types such as "Rounded Box" and see if any other balloon shape works for you . ( for the rounded box , set the size to maybe 2" or 25 mm ?)

2, my example adds "Tool Id=" because the callout for the balloon is set to "Tool_id = <W$=@tool_id>" ... ;-)
RMB the partslist, -settings - see the image below

3, these balloons are 100% dependent on the partslist and will disappear if the partslist goes.
Move the partslist to an invisible layer .( or hide it)
It is oddly a little more difficult to move it to a different sheet ( and keep auto-balloons) but i think manual balloons does stay.
-one has to fiddle with view dependent edit to move the parts list and keep the balloons.

-I think many companies has their BOM's in other systems, but also quite few who export the NX parts list into text or excel and use that to feed that other system.

2019-09-17_20-19-18_o7voij.png


Regards,
Tomas
 
Kenja824 said:
I know how to attach a note to a component's attribute, but it will always keep it associated.

The problem is we cannot use this button for other customers. So I need to find a way to do the same thing. Currently all of the employees have to attach notes and manually type the TOOL_ID into the note for each component.

It would be awesome if we can just select a component inside the view window, attach the note to the edge of the component in the view and place a note and that note will only be a note but will have the TOOL_ID attribute in the note. (Not associated).

I'm curious why you want these notes to be unassociated to the attribute; wouldn't it be better to keep them associative?

www.nxjournaling.com


Funny, I was in the middle of replying about that same thing when I got an email showing you replied again. lol

TBH, I think this is just a boss thing. I am going to try to push doing it that way and leaving it associated. Then the only hassle will be to make a journal that allows us to just keep selecting components and adding the notes instead of placing them one note at a time. We have plenty of tools that have upward of 50+ components and details that need to be labelled. Some with plenty more. So the process of adding each of these notes even associated is a bit slow doing them one at a time.

I think the first step is to get the associated notes accepted. lol
 
Well I got the okay to leave them associated. So now the only problem is speeding up the process when there is a lot of components and details.
 
... if you use the partslist you can use the autoballoon option....
it will not place these balloon beautifully, but it will add balloons to all visible components in the selected view-s. ( note the -s.)
else you add the partslist without autoballoons, then you manually place empty balloons ( of the correct type) where you want them. and finally you update the partslist. all these empty balloons will then get the tool_id printed.

( Note: and "Autoballoon" can not move the leader from component to component and then update the ID, the ID will stay despite the leader attached to a different component
, a manually placed balloon will update when the leader has moved.)

Regards,
Tomas

 
I was pulled onto other more pressing issues and am just now returning to this problem.

Tomas....

Currently we do not create a parts list. We have a B.O.N. that we make with another program. The ISO view is just so someone can see the components in the assembly and where they go in the assembly to aid with.... the assembly of the assembly... (Wow that sounds funny)

So we basically just need to label all of the components with a note that is associated with their "TOOL_ID" attribute.

ALL....

I have been trying to figure out how to write code to let me just select a component in the window view or the navigator, then add the note to the view and it would automatically be associated with the attribute. Unfortunately I cant seem to figure out how to even allow the user to select a component much less the rest of it.

Adding the notes manually with the note program wouldnt be bad if it had a button on it to "select new objects". But it doesnt seem to have that and we have to close the note program and then open it again then click the "insert object attribute" then select which attribute, etc... over and over. Where if it let us select new objects and kept everything the same it would really speed up the process.
 
You still haven't caught the option i was trying to serve you... :)

Create a Parts list AND Make it Invisible.
You can place the PL on a invisible layer, you can place the PL outside the drawing border ( still visible if you zoom out but it will not print/plot) , you can simply select + hide , You can move it to a different sheet.
use any method you prefer to hide it.*
but,
The parts list can still add auto balloons and /or update manual ballons. All the parts list does is automate the text on these balloons. nothing more. It's not the "BOM".
-it will be visible in the Part Navigator and you can right click there to autoballoon.

Without the P-list, automating these labels will be more difficult.
( and , if you like to have these associative.)

Btw,
One company i work with has their BOM in a separate system, but since that requires so much typing to "Get going", they use the NX Parts List (using a pre set template which includes the data they require)
then they copy all this data from the NX PL to that separate system.
When updating, they copy separate lines from the NX PL to that BOM system. This way they avoid typing mistakes and such.


* Moving a PL to a different sheet whilst keeping existing balloons requires the use of View dependent editing. first make it model dependent, then make it view dependent on that other sheet.

Regards,
Tomas


I was just playing with the parts list and auto ballooning. The auto ballooning feature would be cool to use.

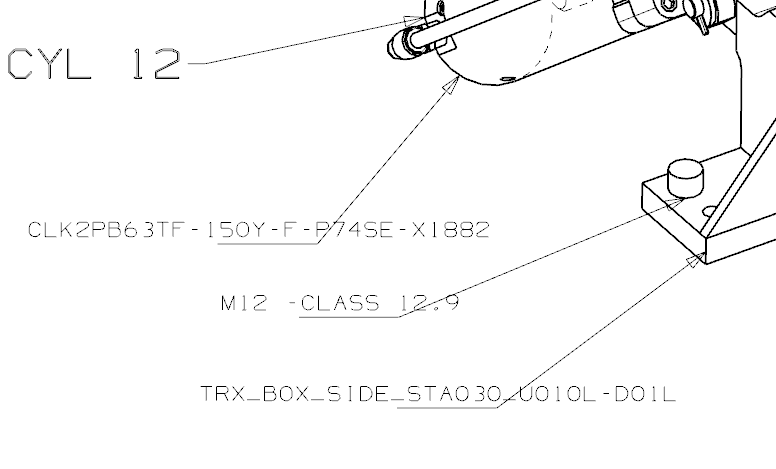
The problem is that in conjunction with the fact we use the Tool_ID attribute, which is basically the order string for purchased components and names of the details, it really looks bad on the sheet. The labels will vary greatly on their length. If there is a way of making the underline length automatically adjust to underline the entire label, I might be able to get the bosses to buy off on it. If I can adjust the underline to start at the beginning or end of the label, depending on which direction the leader is coming from, there would be an outside chance of getting them to accept that. But currently I cant see a way to adjust this. The underline is in the center of the label with the label extending out both directions from it. I tried using the round box but that wont surround the entire label. I cant adjust its size according to each label. I just cant find a setting that makes it look a little better than outright bad.

This what I am coming up with so far. The CYL-12 note is just a regular note. That is how we like our leaders if possible. If we can at least make them look decent we could change up but I know they wont buy into these leaders.

image_bp3aty.png


Whatever the outcome, I want to say thanks for the help. There is a guy my company has been paying to create certain programs for us. A hole chart, a stocklist program etc... I have a feeling this will just come down to the company paying him to create this as well. lol
 
So in playing with it some, I learned that once the labels are in position, if you double click a single label, you dont have to click on anything else and can just type a number in and hit enter and the length of the underline will adjust. In ours the starting length is set at 14. So depending on how long the label is I can quickly get used to about how long to make it. If I adjust it and it still needs more length, I dont need to do anything but type another number and hit enter. Keep doing that until the underline looks good.

Seems like a lot of work in explaining it, but even if you have 50 labels, once you get used to it, it wont take long. Its better than having to create each note one by one.

The end result isnt too bad. I might be able to get the bosses to buy into it. At least temporarily until they get a program written up for it.

image_glnlv5.png
 
So I was looking for something else and just happened to come across this code. It has you select a component, then select an edge of the component, and then wants you to pick a placement for the balloon.

As far as I can tell, this might do what I am looking for, but it isnt quite working right.
It seems to be working right up until you place the note/balloon. Nothing appears on the drafting sheet.

Line 50 allows me to place the attribute it looks for in that component. I set that to Tool_ID, which is the attribute we use for order strings.

I am hoping if it doesnt do exactly as I need, that I can adjust it to do what I need. I am guessing it only adds one note. If so, if you know how to make it so it lets you keep adding new labels until you are done, that would be awesome.

Can someone see what is wrong that it doesnt actually place a note, label or whatever?

Code:
' NX Add Associative callout by manual mode
' Journal created by Alto on 10-06-2015
 
Option Strict Off
Imports System
Imports NXOpen
Imports NXOpen.Annotations
Imports System.Windows.Forms
Imports NXOpen.UF
Imports NXOpen.Annotations.Annotation
Imports NXOpen.Assemblies
Module NXJournal
 
    Dim theUI As UI = UI.GetUI
    Dim theSession As Session = Session.GetSession()
    Dim ufs As UFSession = UFSession.GetUFSession
 
    Sub Main()
        Call Mysub1()
        Call Mysub2()
    End Sub
 
    Sub Mysub1()
 
 
        If IsNothing(theSession.Parts.Work) Then
            'active part required
            Return
        End If
 
        Dim workPart As Part = theSession.Parts.Work
        Dim lw As ListingWindow = theSession.ListingWindow
        lw.Open()
 
        Const undoMarkName As String = "NXJ journal"
        Dim markId1 As Session.UndoMarkId
        markId1 = theSession.SetUndoMark(Session.MarkVisibility.Invisible, undoMarkName)
 
        Dim myComponent As Assemblies.Component = Nothing
        If SelectComponent("Select component", myComponent) = Selection.Response.Cancel Then
            Return
        End If


        '$$$ specify attribute title to get from component
        Const myAttrTitle As String = "Tool_ID"
 
        Dim myAttrValue As String
        Dim output As String
 
 
        Try
            myAttrValue = myComponent.GetStringAttribute(myAttrTitle)
            output = "<W!" & myComponent.Tag.ToString & "@" & myAttrTitle & ">"
            Clipboard.SetText(output)
 
        Catch ex As NXException
            If ex.ErrorCode = 512008 Then
                'attribute not found
                MessageBox.Show("Attribute '" & myAttrTitle & "' not found, journal exiting", "Attribute not found", MessageBoxButtons.OK, MessageBoxIcon.Error)
                Return
            Else
                theSession.UndoToMark(markId1, undoMarkName)
                MessageBox.Show(ex.Message, "Error: " & ex.ErrorCode, MessageBoxButtons.OK, MessageBoxIcon.Error)
            End If
 
        Finally
 
        End Try
 
        lw.Close()
 
    End Sub
 
 
    Sub Mysub2()
 
        'Dim myEdge As Object
        Dim myPoint As Point3d
        Dim myPointBalloon As Point3d
 
        Dim theSession As Session = Session.GetSession()
        Dim workPart As Part = theSession.Parts.Work
        Dim displayPart As Part = theSession.Parts.Display
        Dim theUI As UI = UI.GetUI()
        ' Dim response As Selection.DialogResponse
 
 
        Dim nullAnnotations_IdSymbol As Annotations.IdSymbol = Nothing
 
        Dim idSymbolBuilder1 As Annotations.IdSymbolBuilder
        Dim leaderData1 As Annotations.LeaderData
        idSymbolBuilder1 = workPart.Annotations.IdSymbols.CreateIdSymbolBuilder(nullAnnotations_IdSymbol)
        idSymbolBuilder1.Type = Annotations.IdSymbolBuilder.SymbolTypes.Circle
        idSymbolBuilder1.Origin.Plane.PlaneMethod = Annotations.PlaneBuilder.PlaneMethodType.XyPlane
        idSymbolBuilder1.UpperText = Clipboard.GetText
        idSymbolBuilder1.Size = 0.35
        leaderData1 = workPart.Annotations.CreateLeaderData()
        leaderData1.StubSize = 0.25
        leaderData1.Arrowhead = Annotations.LeaderData.ArrowheadType.FilledArrow
        idSymbolBuilder1.Leader.Leaders.Append(leaderData1)
        leaderData1.StubSide = Annotations.LeaderSide.Inferred
        idSymbolBuilder1.Origin.SetInferRelativeToGeometry(True)
 
        Dim myedge As object = Nothing
        If UserSelectEdge("Select edge to attach balloon", myedge, myPoint) = Selection.Response.Cancel Then
            Return
        End If
        'MsgBox(myPoint.ToString())
 
 
        Dim nullview As NXOpen.View = Nothing
        Dim point1_1 As Point3d = New Point3d(myPoint.X, myPoint.Y, 0)
        Dim point2_1 As Point = workPart.Points.CreatePoint(point1_1)
        Dim point3_1 As Point3d = New Point3d(myPoint.X, myPoint.Y, 0.0)
        leaderData1.Leader.SetValue(point2_1, workPart.Views.WorkView, point3_1)
 
 
        Dim assocOrigin1 As Annotations.Annotation.AssociativeOriginData = Nothing
        assocOrigin1.View = nullview
        assocOrigin1.ViewOfGeometry = nullview
        assocOrigin1.XOffsetFactor = 0.0
        assocOrigin1.YOffsetFactor = 0.0
        idSymbolBuilder1.Origin.SetAssociativeOrigin(assocOrigin1)
 
        Dim response2 As Selection.DialogResponse = UserSelectScreenPos("Place balloon", myPointBalloon)
        If response2 <> Selection.DialogResponse.Pick Then
            Return
        End If
 
        Dim point4_1 As Point3d = New Point3d(myPointBalloon.X, myPointBalloon.Y, 0.0)
        idSymbolBuilder1.Origin.Origin.SetValue(Nothing, nullview, point4_1)
 
        Dim nXObject1 As NXObject
        nXObject1 = idSymbolBuilder1.Commit()
        idSymbolBuilder1.Destroy()
 
    End Sub
 
    Function UserSelectEdge(ByVal prompt As String, ByRef selObj As TaggedObject, ByRef selPoint As Point3d) As Selection.Response
 
        'Allow user to interactively select an edge
 
        Dim title As String = "Select an edge"
        Dim includeFeatures As Boolean = False
        Dim keepHighlighted As Boolean = False
        Dim selAction As Selection.SelectionAction = Selection.SelectionAction.ClearAndEnableSpecific
        Dim scope As Selection.SelectionScope = Selection.SelectionScope.AnyInAssembly
        Dim selectionMask_array(6) As Selection.MaskTriple
 
        'Set the selection criteria to any edge
        'TODO: Add point on surface
        selectionMask_array(0).Type = UFConstants.UF_solid_type
        selectionMask_array(0).Subtype = UFConstants.UF_UI_SEL_FEATURE_ANY_EDGE
        selectionMask_array(0).SolidBodySubtype = UFConstants.UF_UI_SEL_FEATURE_ANY_EDGE
 
        selectionMask_array(1).Type = UFConstants.UF_line_type
        selectionMask_array(1).Subtype = UFConstants.UF_all_subtype
 
        selectionMask_array(2).Type = UFConstants.UF_circle_type
        selectionMask_array(2).Subtype = UFConstants.UF_all_subtype
 
        selectionMask_array(3).Type = UFConstants.UF_conic_type
        selectionMask_array(3).Subtype = UFConstants.UF_all_subtype
 
        selectionMask_array(4).Type = UFConstants.UF_spline_type
        selectionMask_array(4).Subtype = UFConstants.UF_all_subtype
 
        selectionMask_array(5).Type = UFConstants.UF_solid_silhouette_type
        selectionMask_array(5).Subtype = UFConstants.UF_all_subtype
 
        selectionMask_array(6).Type = UFConstants.UF_section_edge_type
        selectionMask_array(6).Subtype = UFConstants.UF_all_subtype
 
        'This line allows the user to select from any view:
        ufs.Ui.SetCursorView(0)
 
        Dim resp As Selection.Response = theUI.SelectionManager.SelectTaggedObject(prompt, _
         title, scope, selAction, _
         includeFeatures, keepHighlighted, selectionMask_array, _
         selObj, selPoint)
        If resp = Selection.Response.ObjectSelected OrElse resp = Selection.Response.ObjectSelectedByName Then
            Return Selection.Response.Ok
        Else
            Return Selection.Response.Cancel
        End If
 
    End Function
 
    Function UserSelectScreenPos(ByVal prompt As String, ByRef selPoint As Point3d) As Selection.DialogResponse
        'Allow user to interactively select a screen position
        Dim view As NXOpen.View = Nothing
        Return theUI.SelectionManager.SelectScreenPosition(prompt, view, selPoint)
    End Function
 
 
    Function SelectComponent(ByVal prompt As String, ByRef selObj As NXObject) As Selection.Response
 
 
        Dim title As String = "Select a component"
        Dim includeFeatures As Boolean = False
        Dim keepHighlighted As Boolean = False
        Dim selAction As Selection.SelectionAction = Selection.SelectionAction.ClearAndEnableSpecific
        Dim cursor As Point3d
        Dim scope As Selection.SelectionScope = Selection.SelectionScope.AnyInAssembly
        Dim selectionMask_array(0) As Selection.MaskTriple
 
        With selectionMask_array(0)
            .Type = UFConstants.UF_component_type
            .Subtype = UFConstants.UF_all_subtype
        End With
 
        Dim resp As Selection.Response = theUI.SelectionManager.SelectObject(prompt, _
         title, scope, selAction, _
         includeFeatures, keepHighlighted, selectionMask_array, _
         selObj, cursor)
        If resp = Selection.Response.ObjectSelected OrElse resp = Selection.Response.ObjectSelectedByName Then
            Return Selection.Response.Ok
        Else
            Return Selection.Response.Cancel
        End If
 
    End Function
 
    Public Function GetUnloadOption(ByVal dummy As String) As Integer
 
        'Unloads the image when the NX session terminates
        GetUnloadOption = NXOpen.Session.LibraryUnloadOption.AtTermination
 
        '----Other unload options-------
        'Unloads the image immediately after execution within NX
        'GetUnloadOption = NXOpen.Session.LibraryUnloadOption.Immediately
 
        'Unloads the image explicitly, via an unload dialog
        'GetUnloadOption = NXOpen.Session.LibraryUnloadOption.Explicitly
        '-------------------------------
 
    End Function
End Module
 
If it helps, I find if I use this in modeling, it creates a balloon. In drafting nothing seems to happen.
 
I give up. I have come to the understanding this code I found wont work even if I had the ability to make it work. I know that doesnt make sense. lol

I have spent two full days almost trying to get this code to work. The only way it works is if the Drafting Sheet Display is turned off and you orient the model to be flat to X and Y. It will then give you a note that is associated with the attribute you set in the code.

That lets the code work, but I looked closer and found it is not adding a note but it is adding a symbol with a tiny balloon and the leader goes to the center of the text. So even if I figured out how to make this code work on a drafting sheet, it still wont work for what I need.

Im just going to go with the underlined Parts list labels. I got the OK on that and I was just hoping to find something better.

I appreciate all the help you guys gave me on this above.
 
I anticipate having some down time today, so let's do this. Here's my understanding of the issue thus far (please correct or add as necessary):
You are working in the drafting application with the drawing sheet shown. You have a view of your assembly and want to select a component on screen to create a label (note with a leader) calling out the component's TOOL_ID attribute (a string attribute). There will be 2 selections: the first will select the component, the leader should be created on the component at or near this selection point; the second selection will determine the note placement on the sheet. Repeat selecting and placing notes until the user cancels the operation.

Some questions:
What version of NX are you currently using? NX 11, I see it in the title now [dazed]
What drawing view representation option do you use? Exact, Exact (pre-NX 8.5), lightweight, other?

www.nxjournaling.com
 
Thanks cowski I really appreciate it, but please dont hurry it. Just as you have time if you wouldnt mind.

Looks like we use EXACT

The process is not so important. Just so the end result we have a note we attach to the edge of a component that is associated to the TOOL_ID attribute. Yes it is a string attribute.

1) Select the component in the view
2) If its easier to attach the leader near where the component is selected that is fine, or add a process to select an edge. Either way works for me.
3) Place the note.
4) yes, repeat the process until we click ok.

Unfortunately, I just got back from talking to someone and learned there is a little twist in it I was not aware of. I want to clarify, if this is difficult or time consuming to add, please do not even think of it as I am certain it is an easy button for me to make to adjust the notes after.

I learned that all commercial components need a second line in the note that is associated with the DB_PART_NAME attribute.
All commercial components can be recognized by having an attribute TOOL_CLASS with the value of "COMM".

I think it might be simple enough to create a button that would have the user select all the notes they need adjusted and click OK and the notes will automatically get that second line added. I wouldnt even bring it up if it didnt just make sense to add it to this code if it is not a big difference. If it is, please dont add it. Just getting what was already talked about would be amazing.
 
I got time to revisit this today. The link below has some (mostly) working code. There's a few details that I'm not happy with (the biggest being the leader location may not be near the pick point); I'll work on some improvements as I have time. I wanted to get this to you so you could try it out.

Test code

www.nxjournaling.com
 
This is awesome cowski

If you get the leader attaching to the same place we pick on the edge, that would definitely be optimal but if this ends up being it, it is still awesome. At worst case it looks like they will just have to do a handful of labels then get out and adjust the labels. Double click the leader to re-attach them to where they want, and then add more labels. That only to help them make sure not to lose track of where they should be attached and accidentally attach them to the wrong detail. lol And that will only be on the bigger tools. On smaller units that wont even be a problem.

Im in the middle of things right now, but I cant wait to make a copy and dig into the code and see how it works. lol

Consider yourself thanked a thousand times for this. [thanks2]
 
Hello,

could I have one litte quesion?
Is it possible to change ballon type?
In this journal You used DraftingNote.
For IdSymbol we can use idSymbolBuilder1.BalloonType = NXOpen.Annotations.BalloonTypes.Circle.
DraftingNote is better then IdSymbol.
But for DraftingNoteBuilder I can't find corresponding command.

Maybe somebody know?

Best regards
MANok
NX12 & TC10
 
Status
Not open for further replies.

Part and Inventory Search

Sponsor