Continue to Site

Eng-Tips is the largest engineering community on the Internet

Intelligent Work Forums for Engineering Professionals

  • Congratulations IDS on being selected by the Eng-Tips community for having the most helpful posts in the forums last week. Way to Go!

NX11 - Deviation Checker?

Status
Not open for further replies.

Kenja824

Automotive
Nov 5, 2014
949
Trying to understand the Deviation checker. We have two faces we will select. We will tell it to check 100 points. The result only checks 5 points. CHoose two different faces and it will check 80 points. Choose two other faces and it will check 18 points.

Why does it ask us to state how many points to check if it will choose how many it actually checks for itself? How does this work?

I tried looking it up in the help but the information from there was useless.
 
Replies continue below

Recommended for you

It seems to be different with every file we use. So if you dont have a problem with it, it is likely our understanding of it or something set up wrong on our end.

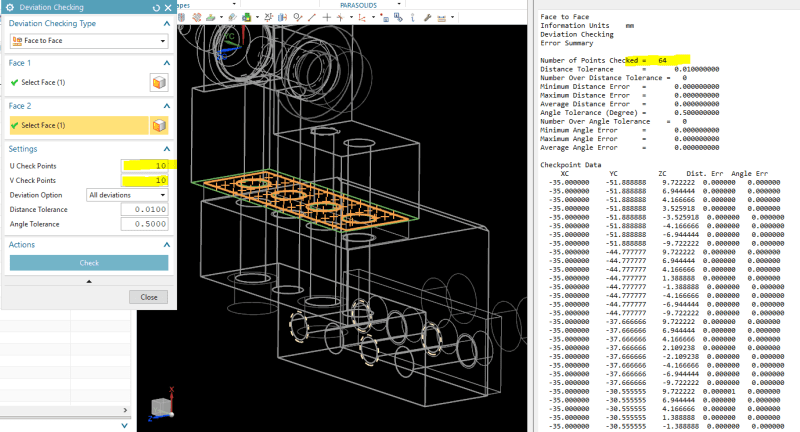
Here is an image to give you an idea. Notice we have 10 in both places for points to check and the result was it checked 64 points. If I do two different surfaces I get a totally different number of points checked. Sometimes the checker will have 100 listed in both places and have only 8 points checked in the result.

They dont like us posting any actual files, but I could make a simple file with two blocks for an example if you think it would help. Personally I think we just dont fully understand how it works.

image_s0xb8o.png
 
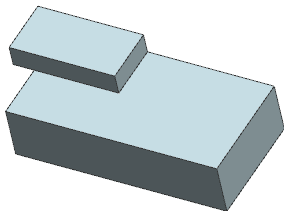
Ok, I see what you are describing now. I guess I never noticed it before. It looks like the UV points are generated based on the first surface picked and check points are thrown out if there is no overlap with the 2nd surface. In the pic below (using the default 10 U and 10 V points), you end up with 80 check points if you pick the small block's face first. If you pick the large block first, you end up with 20 check points.

deviation_check_blocks_jmp0ok.png


I'd suggest picking the smaller surface first and increasing the number of check points if you feel that you need more accuracy.

www.nxjournaling.com
 
What you gave me led me to figure out exactly how it works. Thanks cowski.


For anyone who wants to better understand it for themselves....

If you have it set to 10 U Check Points and 10 V Check Points, it will create a pattern of points on the first surface you select that is 10 x 10 points across. A total of 100 points. This pattern of 100 points will always be the overall size of the surface. If the surface is a perfect square, all 100 points will fall on the surface. If the surface is "L" shaped for instance, then some of the spots will miss the surface and only the spots that touch the surface will be counted. So different shaped surfaces will have different quantities of spots that will land on them.

Then it will project those points to the second surface you select. Any points that miss the second surface will not be counted. So by selecting the smaller surface first you will allow more points to connect between the two surface to be checked.


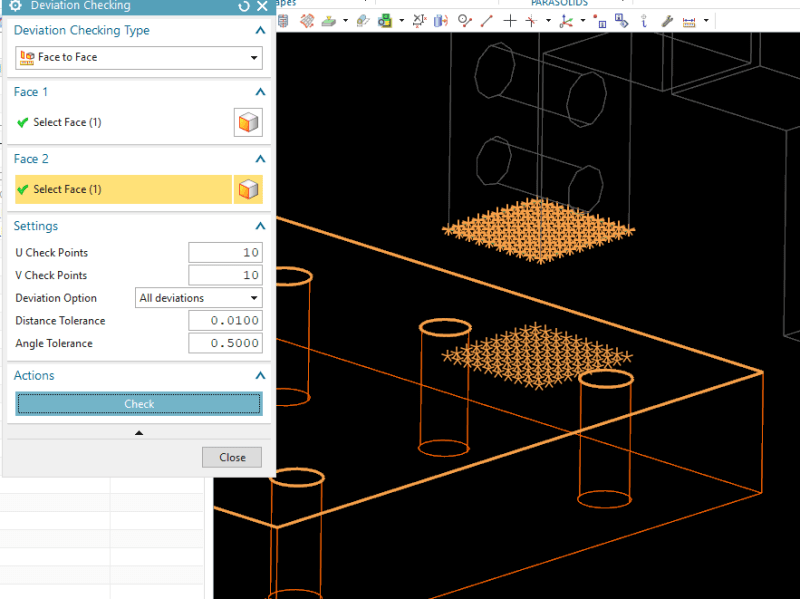
Example 1 : First surface is small square shaped. You can see the full 100 spots are projected to the larger (second) surface.

image_b9rw6d.png


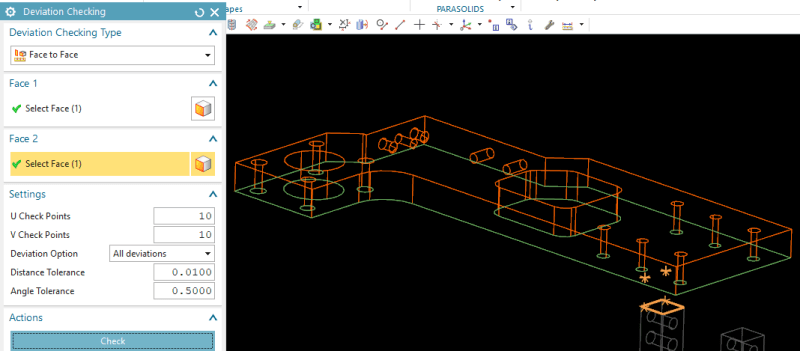
Example 2 : The larger surface was selected first and the points are so spread out over that surface, only two are projected to the smaller (second) surface.

image_lszr4a.png


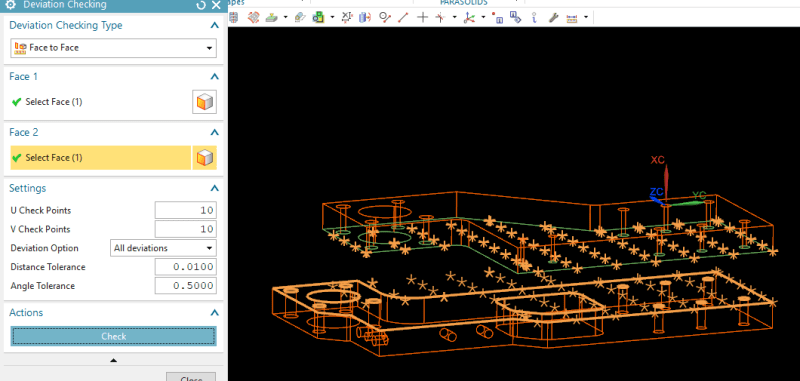
Example 3 : You can see here how the points all cover the upper surface (first surface) and project to the second surface. They do not cover the entire second surface and extend off the edge of it as well. This gave it a total of 73 check points.

image_srib68.png
 
Actually I think I may be wrong on the second surface. Points that miss that surface do seem to still be counted now that I look at it again.
 
Status
Not open for further replies.

Part and Inventory Search

Sponsor