Continue to Site

Eng-Tips is the largest engineering community on the Internet

Intelligent Work Forums for Engineering Professionals

  • Congratulations KootK on being selected by the Eng-Tips community for having the most helpful posts in the forums last week. Way to Go!

Please have a look at my application of GD & T 7

Status
Not open for further replies.

sammcc

Aerospace
Jan 21, 2013
103
Hi all,

I am a novice with regards to the proper application of GD & T.
I have attached a drawing of a simple part I have added it to- where previouly it was dimensioned without it.
Can you give me some feedback with regards to the application of the symbols I have used.
I am working to ASME Y14.5 and in units are inches.

Thanks
 
 https://files.engineering.com/getfile.aspx?folder=7afbf985-15e0-468d-9f79-a64375ca10d4&file=doc08946320181012083616.pdf
Replies continue below

Recommended for you

1) If you are working in inches and using the ASME standard then you should remove the leading zeros (section 1.6.2 a).

2) Your surface profile FCF is from S to T but you also have the "all around symbol". This is a conflict.

3) Your tapped holes may benefit from using a projected tolerance zone (with bonus tolerance, mmc) or from positioning the minor diameter of the threads. As it currently stands your are putting the position requirement on the axis derived from the pitch cylinder (section 2.9) with no bonus tolerance. Some would say this will be difficult to measure.

4) You have multiple patterns of features (holes) on this part. You may benefit from using compound position or multiple single segment position for these features (see chapter 7).
 
sammcc,

Based on a quick one-minute examination, the GD&T symbols appear to be applied correctly.

From a functional standpoint, there may be issues. The cross holes in Section X-X are located tightly relative to A|B|C. But I would think that you need them positioned tightly relative to the 10.50 mm holes, and the position of these holes is not toleranced.

Evan Janeshewski

Axymetrix Quality Engineering Inc.
 
All features under GDT control have same datum sequence A|B|C, so Simultaneous Requirement is in effect - they are all one pattern of "holes"

M12 holes are not shown in ISO view. Is this 3rd of 1st angle projection?

Part has symmetrical features. This will add confusion as to which feature is which datum. Might want to label datums on the part.

Certified Sr. GD&T Professional
 
This is unrelated to actual application of GDnT (sorry) the but I know of no better way to ask - OP or anyone else, what the font is that is utilized for this drawing? I find it extremely pleasing to the eye and readable.

Apologies for the off topic question.
 
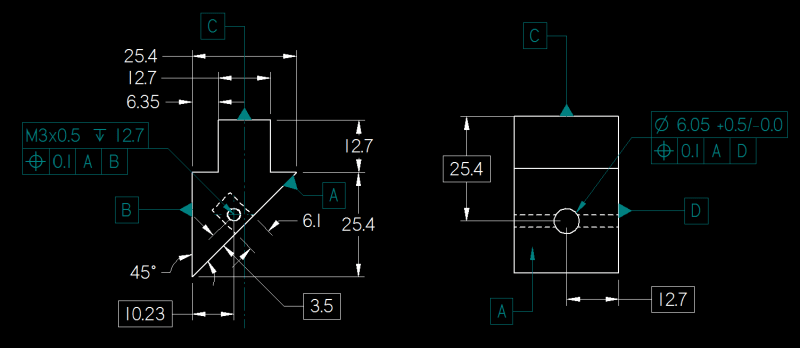
Hello all, I just wanted to piggyback off this post. I was never taught GD&T in school and now I'm working on some drawings that will be submitted to a big deal auto manufacturer. I'm trying to wrap my head around it and I think I'm getting the idea bit by bit. I'd really appreciate if someone who knows what they're doing could take a look at this and give me a little guidance. I know I need to take a class or something to hammer it down.

This part has an angled surface with a ~6mm hole centered on it that a part goes into and then some M3 set screws hold the part in place. I can post a picture of the real part if that makes it easier to understand.

Thank you!
I_have_no_idea_whats_happening_khkqvw.png
 
Immediately noticed a mistake on the right view. I meant to reference C and D in the frame, not A and D
 
Your projected view doesn't look right. The hole should appear oval in that view. This make it unclear the vector that the 25.4 is from datum feature C. You need one more datum reference to completely constrain all the degrees of freedom. A|D|C| would do it.

John Acosta, GDTP Senior Level
Manufacturing Engineering Tech
 
Thank you! I really wasn't sure if I should make it an oval or if that would be confusing. Should I do the math and make a literal projection of the round hole at 45deg? I only have access to 2D.

I understand that referencing D|C| would constrain the hole's position with reference to those planes, but what exactly does referencing A do? Does that specify "yes, this hole is on surface A," thereby constraining it in the DOF perpendicular to the page?
 
You need the diameter symbol in front of the geometric tolerances in both position FCFs.

Incorrect call out of Datum Feature A in the right view. The arrowhead should be a dot.
 
Let's start a new thread so we don't completely hijack this one.

John Acosta, GDTP Senior Level
Manufacturing Engineering Tech
 
sammcc,

The view in zone D7 does not appear to be a proper projection from any other view on the drawing. I'd suggest eliminating it after transferring the note and dimensions to the view in zone B4 (which I'll call the front view).

It appears you're relying on the laser engraving to eliminate ambiguity as to which surfaces are datum features A and C, so you might want to add a back view to make it more obvious that the engraving is only on one surface.

Presumably there's a general note somewhere that assigns a tolerance to the non-basic dimensions where tolerances are not shown. I doubt the same tolerance is appropriate for all these dimensions, especially the ones related to the laser engraving.

The specification that defines the M12 X 1.5 thread should have a tolerance for the minor diameter, so I'd suggest removing the 10.50mm diameter dimension. If you actually want to override the standard tolerance, that should probably be done as part of the thread callout.

What does "BS3642Pt. 2" refer to? BS 3642:1963 - Specification for aluminium baking dishes (other than dishes based on the 530 mm x 325 mm basic module) seems unlikely to be relevant.


pylfrm
 
Hi All,
Many thanks for your responses.
I think I should have explained what this part actually does and what the critical features on it are.
So its a block, the real critical features are the 2x dia .201/.197 holes in section x-x. Two photodetectors are fitted into these and their alignment to each other is pretty critical.
The M6 holes in this view are for a plastic grub screw to block off the hole left by drilling the holes mentioned previously.
The M12 holes are for a cable glad to fit into and the 10.5mm hole x 2.3 deep is for a piece of 2 core cable to go into this is soldered onto the photodetectors before they are fitted.
The .205/.197 holes in the top centre view are mounting holes so their position is not overly critical either.

AndrewTT:
I have incorporated your points 1 & 2- basic mistakes on my part.
Sorry I should have explained the function of my part- Do you think your points 3 & 4 are required based on this.

AXYM:
I have added centre lines and changed the note to 2x tapping drill .
Because they are only for a cable to go through the position relative to the cross holes is not overly critical.
Sorry I should have explained the function of my part up front

mkcski:
Projection is 3rd angle. The reason the M12 holes arent in the ISO view is because they are on the bottom face.
I agree reference the problem establishing which face is the datum. How do I get around this? Do you mean physically engrave the datum on the part or change the design in such a way that it is not symmetrical?

chez311:
This is the standard font in NX. I believe it is unique to it.

pylfrm:
-I have added a note to the view in D7 stating that it is an auxillary view to show the position of the laser engraving only. This part is anodised and is laser engraved after this.
-With regards to the ambiguity of the datum surfaces- I see this is a problem but I can't rely on the laser engraving to indentify these, this problem was also addressed by mkcski. Do you have any ideas how I get around this- make the part non symmetric or marking the surface to denote them
-There is a general note in the drawing border to cover non basic dimensions
-I have removed the 10.50mm dimension and replaced it with the words tapping drill

-BS3642 should have been BS3643- sloppy mistake on my part.
I have removed the specification and changed the call out as to how Y14.5 calls threads out.

Latest version of the drawing attached- thanks guys, I appreciate everyone taking the time to help me out here.
 
 https://files.engineering.com/getfile.aspx?folder=aa8dbc5d-28de-4e7e-84a6-7be13bec3f9b&file=pdfv2.pdf
sammcc:

Regarding the symmetrical issue...we used semi-permanent marker in our plant to identify datums. But we mfg VERY large parts (20ft dia +), so the customer does source inspection in our plant. If your customers or other down stream users are doing mfg or inspection that would require the identification of datums you might want to consider: vibro-tool, acid etching, steel stamps or a non-functional feature to "defeat" the symmetry.

Certified Sr. GD&T Professional
 
The thing with this part is that it is in full view when in use and aesthetics are important so a non functional deature is probably best to ensure consistency. I guess I could add a rad or chamfer onto one of the top internal corners of the "u" shape profile, this would remove the symmetry.
 
If you want the holes for the photo detectors to be coaxial to a tight tolerance your current method is fine. However, if the location of these holes does not need to be precise, as long as they are coaxial, then you could use compound position or multiple single segment position to achieve this. This could lower the manufacturing cost while not affecting function.

If the two .205/.197 holes (still have leading zeros...[wink]) are for mounting then you should be looking at the floating faster formula or fixed faster formula (appendix B), as appropriate, to select the required position tolerance. Also, you may need to use compound position to refine the orientation error of these holes for proper function.

How do you measure the position of threaded holes at your work?
 
Hi Andrew & all,

For manually measuring threads we in the case of these would use a pin with the same diameter as the minor diameter of the thread and check the position that way or if not manually then CMM

I have updated the drawing as follows:
-Removed the last of the leading zeros from the drawing!

-added an additional rad on the top of the "u" section. This will remove the symmetry issue and allow the datums to be identified correctly.

-used composite frames to increase the positional tolerance of the mounting holes and photodetector holes while maintaining the coaxiality / orientation requirement


 https://files.engineering.com/getfile.aspx?folder=d5b63089-de79-4d20-98ca-8847ef54332f&file=PDFV3.pdf
That new radius should be described with a basic dimension. Maybe you already did that in the notes section.

I am guessing that you will want the lower segment of the 2X Ø.205/.200 compound position FCF to have datum A called out. This will keep both holes perpendicular to datum A within Ø.002 while also holding the feature-to-feature relationship (.750 - .250 = .500) tightly.
 
sammcc:

I notice you have "DRL" on the cross holes. I would not recommend specifying processing information to define feature characteristics. See Fundamental rules 1.4 (e)

Certified Sr. GD&T Professional
 
Status
Not open for further replies.

Part and Inventory Search

Sponsor