Continue to Site

Eng-Tips is the largest engineering community on the Internet

Intelligent Work Forums for Engineering Professionals

  • Congratulations KootK on being selected by the Eng-Tips community for having the most helpful posts in the forums last week. Way to Go!

Profile Tolerance applied to a feature of size.

Status
Not open for further replies.

Rwelch9

Mechanical
Apr 22, 2020
116
Hi guys,

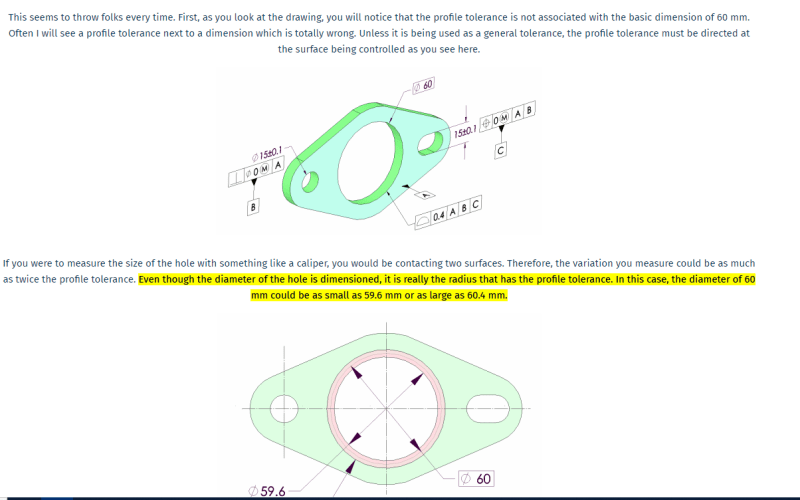
See attached picture.

I am looking for how profile tolerance application differs from a feature of size to a single surface ?

If i looked at the attached sketch I always assumed, whilst the part was constrained with datum features A + B + C we would have a theoretical Ø60 cylinder.

The tolerance band would be 0.4 total . 0.2mm per side

Could anyone give me some guidance on this.


Thanks

Ross
Profile_lnumtc.png
 
Replies continue below

Recommended for you

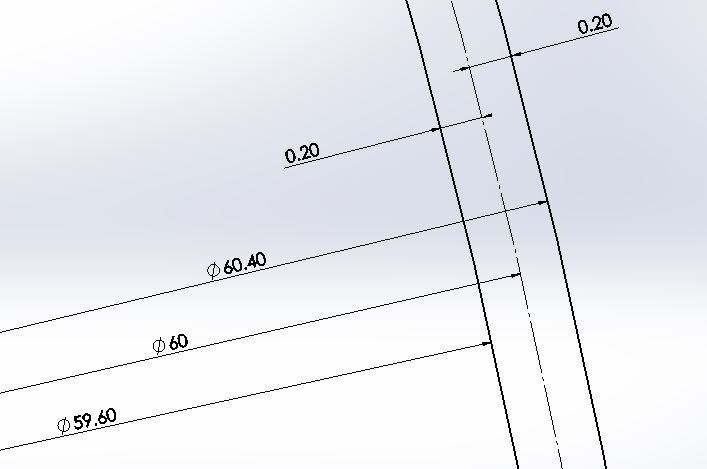
Ø60 with 0.4 profile is:
60+0.2+0.2 = 60.4(2 sides of 0.2) for the outer boundary
60-0.2-0.2 = 59.6(2 sides of 0.2) for the inner boundary

OP said:
I am looking for how profile tolerance application differs from a feature of size to a single surface

The difference between feature of size (at least regular feature of size) is that in the case of the profile perfect form at MMC and perfect form at LMC are applicable, but in the case of regular feature of size only perfect form at MMC is enforced.


The profile tolerance in the given example controls all geometric characteristics of the hole: size, form, orientation and location.

If this was changed to directly toleranced diameter dimension and position tolerance, size and form would be controlled by the diameter callout, but orientation and location would be controlled by the position tolerance.
 
I get what the document is trying to say, but they probably could have said it a little better than just "it is really the radius which has the profile tolerance" or shown a better picture.

Determination of the tolerance zone for a profile tolerance applied to a feature whose true profile is fully defined with basic geometry is no different if it is planar or otherwise. Its a 0.4 wide tolerance zone equally disposed on either side of the true profile - 0.2 on either side. Its just that when you evaluate it diametrically you get the calculations that greenimi shows. Just a quick snapshot to put this as a picture.

true_profile_60_pnmcm7.jpg
 
Rwelch9,

Ask yourself why you would apply the tolerance.

Dowel pin hole: Ø6.03/6.01 |[POS]|Ø0.2|A|B|C|

Screw clearance: Ø6.8/6.2 |[POS]|Ø0(M)|A|B|C|

Large access hole: |Ø30| |[PROF]|2|A|B|C|

My dowel pin hole has a very accurate diameter which allow a repeatable assembly. The location of the hole is based on easy machining tolerances. The diameter probably will have to be reamed. My screw clearance hole provides a keep-out for a 6mm screw with a Ø0.2 position tolerance. I have called up a sloppy diameter tolerance because it provides the location allowance as well as the diametral allowance. A large access hole needs its outline controlled. In this application, the profile tolerance will be sloppy.

--
JHG
 
And just to clarify the terminology in the original picture, the profile tolerance is not applied to a feature of size.
It does happen to be applied to a hole, but a hole is only a FOS if it "is associated with a directly toleranced dimension" (to use 2009's wording).
 
J-P,

That's a good point, but unfortunately we have to go further into Y14.5's web of definitions. The directly toleranced dimension reference is part of the definition of a regular feature of size. So the feature in this example is not a regular feature of size.

Does this mean that it is an irregular feature of size? I believe it does, which is quite unfortunate from an understandability point of view. The geometry itself is cylindrical, but it's the presence of a directly toleranced dimension that makes it regular. Yeesh.

Evan Janeshewski

Axymetrix Quality Engineering Inc.
 
I suppose that's true, Evan. The hole is certainly "directly toleranced" (because of profile) although there's no "directly toleranced dimension." However, I'd be willing to bet that the intent of creating the irregular FOS back in 2009 was to capture weird, interrupted shapes such as a sprocket with an odd number of teeth. Krulikowski's books that you and I know so well have some great examples of that.

One more thing, while I'm looking at that first image above: I find it strange that the comment in the graphic states that a caliper measurement of the hole would NOT be touching one surface, but two. They are trying to explain how the profile tolerance creates a "double" effect as it wraps around the entire hole, but it's somewhat misleading to phrase it that way. A hole is not two surfaces but one continuous surface. So I'll add my "yeesh" there. [smile2]
 
Until they created an "irregular feature of size" out of thin air, there was no need for a "regular feature of size" which should probably have been "conventional feature of size" because the origin for "feature of size" was simply defined according to the conventional notion of what size meant.

<rant>
But then everyone wanted to glom on all other unconventional shapes into that same classification - because why not take a special case and say that, in effect, every case is somehow identical and there is no special case anymore; all cases are of identical topology and just need some transformation, like how a doughnut is identical to a coffee mug.

However, angularity, parallelism, and perpendicularity all co-exist. Why? Doesn't angularity encompass the other two? More than that, doesn't profile of a surface encompass angularity when applied to surfaces? Could profile be extended to apply as a constraint to midlines and midplanes, eliminating flatness and other axial controls simply by modifying the understood syntax?

It all seems to me to just be a quest to add more training material and justify the outrageous cost of the GDTP exam and the related standard.

<more_rant>
</more_rant>

</rant>
 
J-P,

I would say that creating the irregular FOS classification was partly intended for interrupted shapes, and partly intended for "non-regular" shapes that are not cylinders, apheres, or widths (as in the Combined Controls example. Unfortunately, the way it played out was that a "regular" shape like a cylinder became an irregular FOS if toleranced with profile instead of a directly toleranced dimension.

3DDave,

I would say that the definition of "feature of size" should have been left alone, and the concept of "irregular feature of size" could have been handled differently.

Evan Janeshewski

Axymetrix Quality Engineering Inc.
 
3DDave said:
Doesn't angularity encompass the other two? More than that, doesn't profile of a surface encompass angularity when applied to surfaces?

Parallelism is one of the two encompassed by angularity, but profile is unable to encompass the angularity embodiment of parallelism because it will add a location requirement (except when as part of a composite profile), so it will not be the same.

axym said:
I would say that the definition of "feature of size" should have been left alone, and the concept of "irregular feature of size" could have been handled differently.

That would probably require changing the definition of position tolerance with a material condition modifier which is like any position tolerance only applicable to a FOS. I believe that the purpose was to allow features of other shapes than tab or cylinder to be controlled by the surface interpretation of position at MMC/LMC (boundary), combined with profile.
 
BD, "by modifying the understood syntax" was the important part.

In fact - the syntax currently would allow the DRF to be relaxed so that it would exactly equal parallelism. You of all people should know better.
 
3DDave said:
In fact - the syntax currently would allow the DRF to be relaxed so that it would exactly equal parallelism. You of all people should know better.

Customized DRF.
I guess the entire standard could be reduced to only include the profile geometrical characteristic symbol and the customized DRF tool.
 
Status
Not open for further replies.

Part and Inventory Search

Sponsor