Eng-Tips is the largest engineering community on the Internet

Intelligent Work Forums for Engineering Professionals

  • Congratulations waross on being selected by the Tek-Tips community for having the most helpful posts in the forums last week. Way to Go!

Replacing subfloor and blocking composite I-joists

Status
Not open for further replies.

BigRy

Structural
Jul 9, 2010
33
0
6
US
I'm a bridge engineer by profession, but I'm having a bit of an issue at my personal residence at the moment and I'm hoping to get a few questions answered.

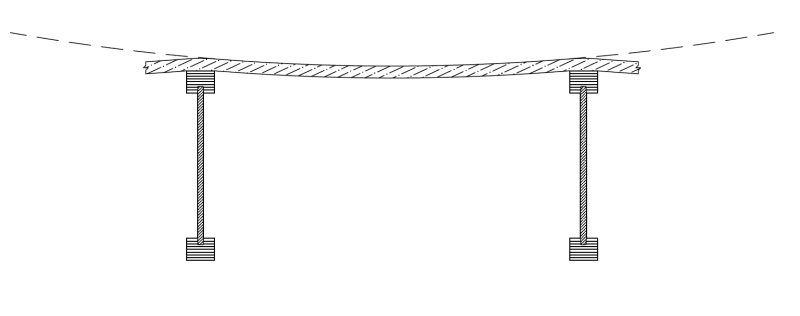
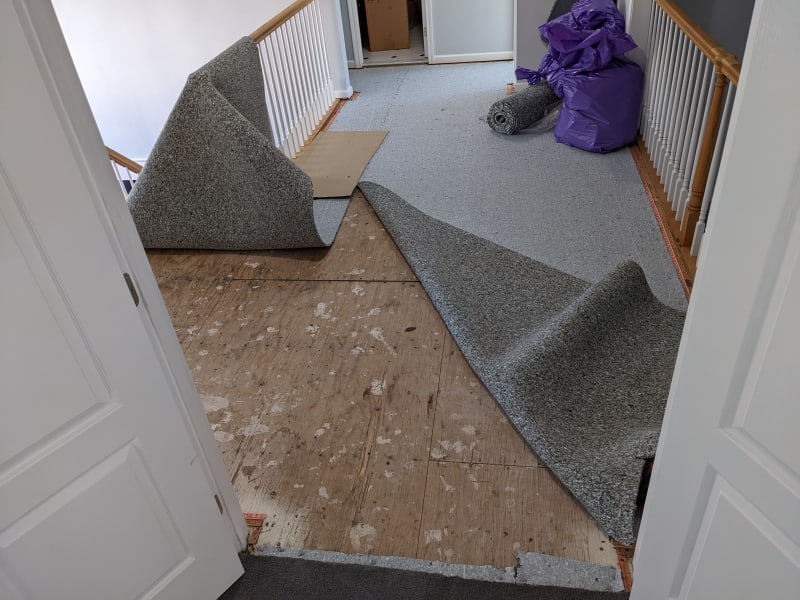
We are having carpet replaced on our second floor, and in the process the installers are screwing down the 3/4" t&g ply subfloor to silence squeaks. For the most part, there weren't any squeaks to begin with, except in the landing/hallway area. I was able to get copies of the builders plans from my township (house was built in 1994), and in this one particular problem area the composite I-joists are 24" o-c. Everywhere else in the house the joists are 16" o-c. The joists in this area mostly only span about 8-10ft, with 1-2 spanning closer to 13ft. But obviously that's of little importance when it comes to subfloor strength.

It appears that current code allows 24" span for 3/4“ subfloor sheathing, if species group 1 ply or high performance OSB are used. God knows what was used to build this house, and it's pretty rough looking now. I'm not having luck finding a contractor on short notice, so it's looking like I'm going to need to tackle this myself. I'm thinking I'm going to need to replace some sheets and add blocking.

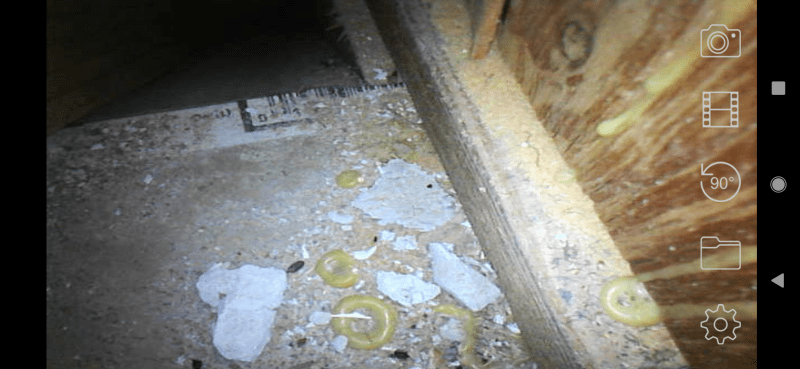
The framing plan calls out construction adhesive on the joist flange, though i haven't confirmed if it was actually used yet. Assuming it was, how difficult of a job can I expect to be dealing with here getting everything cleaned up without damaging the flange? I got a sawsall, cir saw, prybars, chisels, plus numerous other tools.

Does it make more sense to try to shorten the span of the sheathing by adding 2x12 joists at 24" o-c in the middle of each bay? There are LVLs on either side.
 
Replies continue below

Recommended for you

I would not be adding additional 2x12's. If the joist spans are short, then I'd be fine with them at 24" o/c. It's fairly common with engineered joists and trusses to have them at that spacing.

Why do you think you need to replace sheets?

If you are having squeaky floors, and they used the construction adhesive, then the squeaking is actually probably the walls below rubbing up and down the nails holding it to the floor framing.

If they used construction adhesive between the floor joists and the sheathing, good luck removing the old sheets.
 
Perhaps adding more joists isn't the best solution, but the joist span is irrelevant here. I'm not concerned about joist capacity or joist deflection. I'm concerned about subfloor deflection between joists. It deflects quite a bit when i step on it. I'm 315lbs, granted, but still it's clearly a problem just by looking at it.

The squeaking is coming from the top side. There is no load bearing wall beneath. There's a hallway beneath. The structure is two LVL beams supported on steel columns with composite I-joists spanning between the beams. So the noise must come from the subfloor or the joist. If it were only at the edges, i might possibly suspect the LVLs, but it's not. The sound is in the middle of the floor in several areas. There's no wall of any kind anywhere near the locations of the squeaks.

Given the condition of the plywood subfloor and the fact that it's now loaded with screws, it seems to me that the source of the squeaking is highly unlikely to still be the nails. The tongue and groove joints? Perhaps. But not the nails. I'll even pull the nails first to make absolutely certain. I don't know how often the glue between the flanges and webs of these I-joists fail, but i suppose that's also a possibility, especially if there was... say a roof leak at some point. OSB doesn't like water, and neither does glue.

I may not necessarily need to replace sheets, but I figured if I'm tearing them out i might as well replace them while I'm at it. What other alternative do I have to fix this issue that doesn't involve removing the sheathing? I could possibly tear out all the sheetrock beneath and access the underside, but that's also a monster job and we just had the entire house painted 2 months ago. That's really not a route I'd like to go.

I guess the only way to know for sure if adhesive was used is to try to pull up a corner/edge. It sounds like you're saying I'm in for a nightmare if I try to remove glued down sheets. This would still be a nightmare even with the assistance of a jigsaw, circ saw, and/or planar to remove the remnants of the old sheet that is stuck to the flange? Probably. I always think projects are easier than they end up being ha ha.

But then what's the remedy here?
 
Jayrod, he is referring to the radius of curvature developed between the floor joists:

Radius_of_curvature_xtplyf.png


BigRy, first step is going to be to determine the nominal panel thickness that was used. I assume the panel meets PS2 quality standard (it's hard to find a structural panel anywhere that doesn't), and as such, the panels nominal thickness will be printed on one side of the panel (if the panels were installed oriented correctly, this should be on the bottom side of the panel). Keep in mind that nominal thickness differs from actual thickness. A manufacturer can make a panel however thick/thin they want, and still achieve the nominal panel thickness rating for PS2 performance and nail lateral/withdrawal performance, so a caliper measurement will not be sufficient to determine panel performance.

Once you get the nominal thickness, you can check against APA documentation that indicates the allowable loads and deflection performance based upon loading at various joist on center spacing.

If panels are glued and nailed, I would not recommend pulling the sheets. Best case is you only pull the top veneer off, which makes the joist pretty much toast as you can't properly seat a new panel onto the damaged flange. Worst case is you pull the entire flange off, which makes the joist obviously non-structural. If you add new panels, you also have to contend with height differences of the floor elevations due to panel thickness if you go with a stronger panel.

You can always try using a sawzall to separate the panel from the joist, but if you were to ask me, that's considerably more work than its worth. I would rather install blocking if I found the panels to be deficient.
 
The squeaking could well be coming from the nails, even with the screws installed. If there's a 'near miss' - the nail hit the joist just on the edge, either splitting it or just running by it and touching it, the smallest of movements can cause that annoying sound. Wood on wood doesn't usually make that sound.

Yes, if adhesive was used you could easily destroy your floor system taking the floor sheathing off. Once the flanges of those things are damaged, there's really no good way to repair them. Webs can be repaired to a point, but the flanges are too small and too critical in most cases. Make sure you do your test near bearing where your moment demand is low just in case.

Another thing to consider - that sheathing is your floor diaphragm and it runs all the way under the walls. So while removing the sheet rock may seem like the harder job, do you really want to run the risk of compromising the lateral force resisting system of your house to avoid it? Not saying you will, and lots of houses are built without particular attention being paid to diaphragms, but they are important nonetheless. The ceiling below, on the other hand, is just there for looks. Unless you have a mural or some fancy plaster work...I'd rip that down and repair from below.

I think I'd either a)install new sheathing over the existing and deal with the 3/4" difference in the floor somehow or b) install the new joists to reinforce the existing sheathing from below. Note that neither of these are likely to solve the squeak.


Pham, double sheathing is going to cause it's own set off issues. Unless you offset the panels and nailing, you're putting multiple rows of nails into the top flange of the joist (4 rows at abutting panel edges). That's going to completely blow out the top flange of the joist. If you want to go that route, consider staggering the panel spacing to prevent over nailing the flanges.

I still say pulling shiners and installing blocking is going to be the easiest fix, but I'm curious what panel is actually installed if the OP is noticing panel movement when walking around the house.
 
Ok so i think the first order of business is simply to pull the nails in the problem areas to see if it has any impact on the squeaking whatsoever. If I happen to get lucky and that be the case, then maybe I can just leave it as is despite pretty significant deflections when I walk on it? Is there anything more than could be done to prevent squeaks from starting again? Reinforce the tongue & groove with a penetrating glue? Anything like a stiffening compound similar to a leveler that I could pour over the surface to really seal up and stiffen the entire subfloor diaphragm? I should note, the floor has gotten squeakier since we bought the house in September. I don't know if this is due to use or weather/humidity. We're in a suburb of Philly by the way. Previous homeowner who bought the house new was a small elderly Chinese lady who probably practically floated on the floor...

If nails aren't the culprit, then the next order or business would be to try to determine if adhesive was in fact used, because it sounds like I'd need to be a magician to properly replace sheathing that's glued to composite I-joists (I'm far from a magician). If they are glued and clearly still bonded, I won't attempt to replace the sheathing based on what you all are saying. I don't know where that leaves me though. I really REALLY do not want to tear out a bunch of sheetrock to access the underside. Maybe i could make that part of our kitchen remodel we will be doing in the next couple years (this area is adjacent to the kitchen).

I seriously hate these new houses. I kept saying i didn't want a house with these stupid matchstick I-joists...solid sawn lumber ONLY, but virtually everything on the market in our range uses these things. I eventually just caved and here we are...
 
Shiners. That's the term I was looking for. Thanks, ChorasDen. And good call on the overlapping nail patterns. Though in this case you could probably just glue the second layer of sheathing down. Shear capacity is handled through the original nails. I certainly don't love it, but it could get the job done. Prep work would be key or you'll end up with your subfloor pealing off after a while.

Probably best to install blocking or infill joists from below.
 
Forgot to mention... No easy access to panel underside, though there's a small gap at the top stair. I pulled a tape on it and it measured 5/8“ or 11/16". It's 5 plys. I'm assuming this has to be 3/4" sheets, because 5/8" nominal would measure less. I could probably grab my bore scope and try to stick it down in that crack to get a look at the underside and a look at the joist and joist interface with subfloor.
 
BigRy - don't blame the material, blame the design and implementation. Granted, some of the earlier iterations left a bit to be desired, and there some real fire resistance concerns, but that's been resolved and the products on the market today are quite good. Without them the open concept floor plan wouldn't exist, and the lumber shortages would probably be even worse. But they do require more thought in design than they are usually given, and framers have to spend a little more time to put them in right.

Good luck.

 
As designers, it's easy for us to overlook the real world problems that are encountered with the materials we spec, and I think these I-joists are a prime example of that. They may have made them more fire resistant and made other improvements such as pre-punched holes for utilities, but there's still a ton of other issues with these things:

They are susceptible to water damage that can completely compromise their strength.

They have little lateral stiffness, so handling during installation is vital

Most builders only care about the bottom line, not proper installation methods. So strict installation methods is problematic.

Due to their often skimpy flanges, they can only handle so many fasteners before it compromises strength or integrity. This makes repairs (e.g., replacing a subfloor) a challenge.

Repairs to the joists themselves are very difficult if not impossible

Blocking them is much more of a pain than solid sawn lumber

They are not readily available for purchase at stores

That's just off the top of my head. I've seen the flanges of these things delaminate from the web too, first hand. I'm not sure how often that problem occurs, but that's not a thing with solid sawn lumber. On rare occurrences you might get a split, but sistering a 2x12 is easy.

I really loath these things to be completely honest.
 
I'm not going to be able to look more into the subfloor until after work, but it just occurred to me that the first floor is almost definitely the same subfloor plywood and my basement is unfinished. Sure enough, the 1st floor basement sheathing is stamped APA Rated Sturd-I-Floor, 24" o-c, 23/32". There's also a gigantic "4" stamped on it, which is an independent stamp.

I tried looking around real quick with a light to see if I could find any locations where a bead of adhesive had ran over the edge/end of the flange, but I had no luck. I did however find a spot in 1 joist near the edge of my living room that has about a 1'-0" length of joist flange that is split off from the rest of the joist and bonded to the underside of the subfloor. So I'm guessing that means there is adhesive there. Looks like the subfloor bowed up a little in that location and took part of the flange with it. Not sure what to do about that now ugh. At least the joist is accessible.
 
Ok, so i got up there and tried to pull some nails. A got about a half dozen out in the worst area. The nails are ring shank, with one oddball smooth shank 16c nail. Most of the nails wouldn't budge. I was just bending them at the shank when trying to pry them out. So clearly they weren't loose at all. Didn't want to damage the sheathing anymore than i already was, so i didn't try to hard.

Instead of trying to pry up a corner or edge, i opted to try my bore scope first. There was a small spot near the railing post that i dropped into and was able to confirm the adhesive was used, because a ton had leaked down the side of one joist. I couldn't maneuver in this location, but I was able to slip it in a wide gap at the top stair and look into the first bay and at blocking near the railing post. I saw no missed nails and didn't see any significant differential movement on the video when i walked on it. The entire system seemed to deflect a lot though. And although the video is grainy, i think one of the joist hangers on the blocking was installed upside down. The framing in this area doesn't appear to match the plans, and i can see the end of a joist in a gap in the t&g above. This joist is supposed to span full length to the LVL. I'm trying to make sense of what they did here, but it seems like they got joists framing into joists. I wonder if there's any possible way to cut out like a 12"x12" section of subfloor in the middle of the bay just to get eyes on this. Thoughts?
 
Is it a head out that you are seeing? Maybe a joist was damaged and they installed a header to reframe? Is there an HVAC vent in that area that may have required a larger opening than the joist spacing, so a head out was used? Also, check and make sure it's actual subfloor adhesive you are seeing, and not the adhesive the joist manufacturer used to attach the joist web to the flanges. Subfloor adhesive is often a light tan color, but it's usually thick and tacky enough that I would not expect it to run down the side of the joist.

To you points earlier, I would argue a bit. All untreated wood is susceptible to water damage, not just i-joists. They do have lower lateral stiffness than a solid sawn piece of wood, but in that regard, I don't see too many framers laying a 2x10 on it's side for a 12ft span and trying to walk across it. Solid sawn can only handle so many fasteners as well, refer to chapter 12 of the AWC's NDS for guidance on connector spacing. Sawn lumber likes to split just like engineered lumber, the biggest advantage you have when installing connections to sawn lumber is the lumber is usually 'green' with a higher moisture content around 16%, which allows more lenience in nailing. However, now you have to deal with framing shrinkage as the interior of the home dries. I-joists have a considerably higher EI when compared to solid sawn, so they can span further and perform better than compared sawn lumber. They can also be purchased at any lumber supplier, not sure if every home depot or lowe's carries them, but any actual lumber yard has them on the ground ready to sell.

Both framing materials are good, they are just good at different things, and should be detailed and used in situations where they fit best.
 
I don't want to get on too much of a tangent about composite joists vs solid sawn, but my point was that with these built up joists all your strength is in the flanges. If you compromise a flange, you're screwed, whereas with solid sawn you got tons of meat to work with and the fix is simply to sister a new one in. It's much easier to split a 2x3 or smaller flange than it is to split a 2x10. No lumber yards by me carry these things; I've already called them. Closest ones are at 84 lumber about 50 miles away. Generally speaking, i haven't seen these things stocked very often in the Mid-Atlantic region, though admittedly i don't frequent true lumber yards very often. I've definitely never seen any at any HD or Lowes I've ever been too (not that I'd ever trust one from them anyway).

This landing area is essentially a bridge between two pairs of bedrooms. It's open air to the family room and entry way below with vaulted ceiling above. So there's no HVAC or plumbing, I'm sure, only some wiring for the lighting below. The two main plumbing trunks come up on either side of the bridge and there's zero reason for them to cross. Likewise, the 2nd floor HVAC ductwork runs vertically up next to each set of water lines, and there would be no logical reason to cross over the bridge. There's no bathroom or registers on the bridge. The 2nd floor HVAC only services the 4 bedrooms. The 1st floor HVAC services the 1st floor and this entire open area, including the 2nd floor landing.

The adhesive i saw appears to be yellow in color, which i agree is unusual. What's odd though is that it is not only on the joist, it also leaked down onto the sheetrock for the 1st floor hallway ceiling, so whatever it is it was installed after the sheetrock was put up on the first floor. I wouldn't think there would be drywall going up before the framers are finished, but there's no evidence of any yellow glue on the top side to suggest that maybe something had leaked down from a spill or something. I really don't know what to make of it honestly. It's quite a lot of glue actually.

I've been thinking a lot about what i observed on my bore scope, and the more i think about it the more i think the framing plan is wrong. The framing plan has most of these joists at a relatively short span (about 8ft), but there are 3 joists spanning about 13ft. That extra 5ft is for the top of the stairs. It looks like the joist nearest the top stair is actually not a full length joist. It might be framing into a beam that then frames into the next joist over. The plans don't call out this beam member at all, but i can distinctly see that it's an identical 14" composite I-joist. If this is truly what's going on, then i wonder if there's too large of a concentrated load on the one 13ft joist that's taking all this weight. This is right where the loudest creaking is occurring, and the entire system was deflecting a decent amount under my weight when i was recording video on my bore scope (it wasn't just the subfloor).
 
It's difficult to make out some of the text in the plans because they were on microfilm, but there's definitely nothing called out in the vicinity of the railing with the pad draped over it to suggest that there's a beam or rim joist framing into the 13ft floor joist. It's not in the schedule either. But then again, these plans are basically generic. My landing is actually wider than what's shown on the plans as that was an upgrade the original homeowner paid extra for.

I don't have detailed photos of the other locations because there's really no good place to get a bore scope in, but they are essentially well far away from the stairs or any walls above or below. There's a lot of creaking along the edge by the LVL, which makes me wonder if it's the hangers causing the noise there. Back by the stairs i can see a slight gap in the one hanger at the end of the 13ft joist, which suggests it may be pulling out. Though it doesn't actually creak in that location.
 
Status
Not open for further replies.
Back
Top