Continue to Site

Eng-Tips is the largest engineering community on the Internet

Intelligent Work Forums for Engineering Professionals

  • Congratulations waross on being selected by the Eng-Tips community for having the most helpful posts in the forums last week. Way to Go!

Replacing wood fence posts at the same location 5

Status
Not open for further replies.

miamicuse

Civil/Environmental
Nov 12, 2011
22
Location is Miami, Florida and the water table is about 24" below existing grade.

I have a 6' tall wood fence with 4X4 posts spaced at 4' interval (hurricane code). I also have a 10' wide double gate (each gate 5' wide) and the posts are 6X6 pressure treated lumber.

Posts are excavated with a post hole digger down to 24", then the post inserted, concrete mix are poured into the holes till level or slightly above grade.

Over the years the wood posts would rot (from moisture, from termites) and need replacement. The regular fence posts one can dig a hole say 2' over and install all new posts shifted and the old posts cut off at grade. However the gate posts cannot shift.

The old gate posts was removed by excavating around the concrete anchor, thus making a wider and bigger hole, then the post and concrete extracted, new posts inserted into this much bigger hole and more concrete poured into this hole to make a bigger wider anchor.

After three replacements over the past 15-20 years the hole that was excavated for the gate post went from 8" diameter to 14" diameter to 20" diameter. It is getting too wide and too heavy to attempt another iteration. If I am able to pull out the current posts and huge concrete anchor, leaving a 20"+ wide crater, how can I install a new post at the same location?

If I backfill soil/sand into the large hole, and compact the soil as much as possible, then RE-excavate a 10" diameter hole from the backfilled hole, then insert the new post and pour concrete into the new hole, I assume the post anchors will not have the same strength as the backfilled soil will have a lesser bearing capacity than the original undisturbed soil. I wonder how much weaker it will be.

I know another thing I need to tackle is to stop the posts from rotting at the base. I planned to wrap a piece of ice&shield barrier around the post where it meets grade, and build up the concrete anchor into a pyramid to allow water to run off, so hopefully that will make the posts last longer.
 
Replies continue below

Recommended for you

I'd at least try the steel. If you have trouble getting into a tight spot, use a steel rod. Home depot rents smaller vibratory compactors with a 14" plate. If you want to get it to a level of compaction that comes close to approximating undisturbed soil, you'll probably need a bit more than hand tamping.
 
miamecuse said:
After that I backfilled the hole completely, every 4" or so, I compacted with the 2X4...

That is why 2x4 hand compaction did not give the desired results... proper hand compaction this way need to be performed in small lifts, say 3" thick soil at a time. Compact the entire 3" lift with the 2x4, then add another lift and repeat. Hand compaction performed this way will be superior to any machine compaction performed on a completely backfilled hole.

Note: Even machine compaction is supposed to be performed on lifts, often specified 6" thick.

For future reference, for small quantities of backfill, say, around a post in a small hole use dry bagged concrete mix (Sakrete, Quickrete, etc.). In areas with high ground water (like Miami), soil moisture will cause it to set enough to be more or less equivalent to CLSM. Like CLSM the hydrated mix will be weak enough to allow fairly easy removal in the future. You can "save" some money, if you want to by using the dry mix for only the top 6" to 12" inches of the hole. Use compacted soil backfill below the dry mix. This works almost as well as 100% dry concrete mix backfill.

Note: The dry concrete mix makes an excellent backfill immediately (while it is still dry). The optimum mix of fine and coarse aggregate makes mix, right out to bag, ideal backfill.

 
miamicuse said:
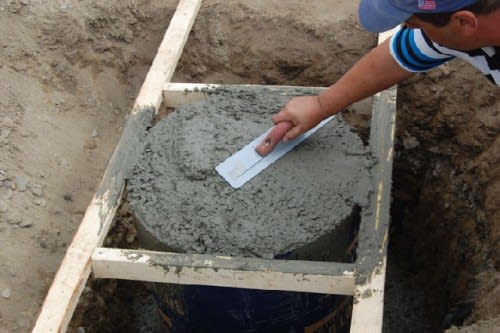
May be I will try the 12" sonotube approach, set it into the large hole, insert the post, then need some 2X4s to brace the post so it stays level. Then backfill the soil around the sonotube and compact as much as possible without deforming the sonotube. Then pour concrete into the sonotube. Once the concrete hardens, compact the soil around the sonotube a second time, as much as possible.

This is the best approach, with one caveat. Your order of operations here is set sonotube - brace sonotube - place concrete inside sonotube - let concrete cure - backfill around sonotube.

You cannot compact soil around a sonotube to the level required for real lateral support without collapsing the sonotube. Do it after you place the concrete and you can ram it in as hard as you want without issue.

Bracing the sonotube is relatively easy; this is how it's done in the commercial world:

453_Creating-Public-Art_320801_pm7omh.jpg


In other words, you don't have to go crazy. Couple 2x4s, couple wood screws, couple concrete pins and you're done.
 
Would diagonal braces be allowed? You could use a brace from the top of the gate post to the bottom of the next post to control sag of the gate.
 
That is why 2x4 hand compaction did not give the desired results... proper hand compaction this way need to be performed in small lifts, say 3" thick soil at a time. Compact the entire 3" lift with the 2x4, then add another lift and repeat. Hand compaction performed this way will be superior to any machine compaction performed on a completely backfilled hole.

I probably worded it poorly, I did do small lifts and compact as hard as I can. I said 4" lifts but more or less I was doing two to three shovels, then compact with the 2X4 into the hole all the way around, then I ran water into the hole to further settle the soil, the repeat until the hole is completely backfilled. I have a steel tamper but I really don't think it is as effective, because the footprint is bigger so when I get close to the edge of the hole, the lifting of the tamper out of the hole and back down will actually disturb the soil near the edges. With a 2X4 8' long I can pound and pound straight down AND at an angle.

I did notice that when I finished compacting one lift, and added water, the water does not drain as quickly, and I thought it was may be the soil has much less voids with the compaction. But then when I poked at it with a stick, the wet soil looks "mucky", seems to remember back in the school days taking soil mechanics this may be a "plastic" state and this is not a good thing? Did I over compact the soil such that it gets that way?
 
You cannot 'over compact' soil by hand. You could do it with equipment, but you're not using equipment.

You can, however, add too much water. If you want 'perfect' compaction, you have to add the exact right amount of water. If you add more water than the 'perfect' amount, you get less compaction no matter what you do.

I suspect you're probably adding way too much water.
 
It sounds like it is time to buy concrete posts that have been colored to nearly match the wood
Those are what we used for gate posts at my daughter's house in Palm Beach.
The we fastened the hardware to them with Tapcons.

= = = = = = = = = = = = = = = = = = = =
P.E. Metallurgy, consulting work welcomed
 
It sounds like it is time to buy concrete posts that have been colored to nearly match the wood Those are what we used for gate posts at my daughter's house in Palm Beach.
The we fastened the hardware to them with Tapcons.

That will not fly where I am. I am in a historic district where materials used are very restricted. For fences it's basically wood or wrought iron, but wrought iron is not typically usable for a privacy fence because of it's transparency, and wrought iron fences of many configurations are not allowed due to it being climmable by kids if there is a pool or pond deeper than 24" on the other side of the fence (and I do have a pool and a pond). Something that looks like "wood" will not be acceptable to the historic preservation board, everyone tried to use composite sidings that looks like wood but they have not accepted one petition yet and everyone had to use real wood sidings.
 
Maybe hire or rent a concrete hole boring rig with a 6 inch bit and run it down until it hits dirt or bottoms out.

If it bottoms out the go down the middle of the post with a one inch bit and then out to the sides with 1 inch holes, leaving wood in the corners. Snap off the concrete chordal bits and then break off the wood in the corners and put an extension on the coring bit and repeat. The bits I see are about 14 inch internal depth.

Unless they were maniacs with the concrete that should carry most of it out after 2 shots. If not, then look at renting a drill that can take out 3 to 3.5 inch diameter of wood for as deep as the post goes. Put in a 1 inch steel pipe and loosely tamp a pile of charcoal and fit up a blower to the pipe and light up the charcoal. When the charcoal is going OK, turn on the blower. Don't go with 100 psi - 2-3 psi should be enough to get the charcoal going and burn out the remaining wood. Stay upwind. See if the fire department has any worries about underground fire, but I think flooding the hole and then sucking the water back out when the wood is gone should be enough to leave a clean hole and no fire. Remember, this is after going nearly 30 inches.

If the concrete runs out before then, then drill for and install a large lag bolt to pull the stump out with. You can use the gaps in the concrete from the hole boring as clearance to remove dirt along the sides of the post - I've seen people using vacuum cleaners to remove the loose material so it doesn't fall back and block the view. How you grip the bolt is up to you maybe weld a piece of threaded rod to it and use a plate and a nut to pull with at the top so any failure doesn't release a lot of stored energy.
 
Status
Not open for further replies.

Part and Inventory Search

Sponsor