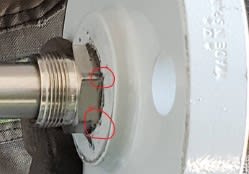
During inspection I came across a Made Up Sample Quill that has a Swagelok fitting inside a tapped flange.
The one swagelok piece that's threaded in the tapped flange item number is: #1210-1-12-BT
Stainless Steel Swagelok Tube Fitting, Bored-Through Male Connector, 3/4 in. Tube OD x 3/4 in. Male NPT.
Here is a Picture
My issue I have here in relation to code is that the fitting knuckles(Part where the wrench goes.) looks to be buried into the flange and I'm unsure if there is proper thread engagement there.
Description above from the website says the male threaded end is NPT. But that fitting looks to be hitting part of the flange tips, so it does look like it bottoms out. But both are NPT.
As for ASME B1.20.1 chart above L1 is hand tight also considered the Minimum and L2 is desirable at tight which is underlined at 0.5457 in.
Now the picture the other side of the flange, I count 7 threads that have no thread engagement as you can see. From this Chart above shows 3/4" fitting has 14 threads per square inch. So that tells me that those 7 threads are .500 of an inch that have no thread engagement. Now as per B16.5 Table F16 for 3/4 class 600 flanges it reads the minimum threaded area length must be a minimum 0.62 inches. So it looks like we must measure the flange threads of those flanges. But the Vendor refused to take out that one fitting in order for me to see total thread length.
My question is, if part of a fitting "bottoms out" on something other that thread tightening, then is there something in code that I can use to reject this sample quill? Other than they can not prove to me thread engagement.
Code is B31.3 so B1.20.1 still applies correct?

