Continue to Site

Eng-Tips is the largest engineering community on the Internet

Intelligent Work Forums for Engineering Professionals

  • Congratulations KootK on being selected by the Eng-Tips community for having the most helpful posts in the forums last week. Way to Go!

Studying for D1.1 CWI - question regarding figure 6.1 - 6.3

Status
Not open for further replies.

Sammy19

Industrial
Feb 16, 2015
37
Hello everyone. I'll keep this as short as possible. I am a member of several forums, it's a challenge to find educated professionals fluent in structural welding code. I have been on a welding torch for 15 years, since I was 19, various fabrication jobs involving low carbon steels, stainless steels, and I have been lead welder of aluminum at my company for the last 8 years or so. I figured the CWI exams were the next logical step... I put it off for quite a while because the study materials are quite intimidating, not to mention that nothing about the AWS is cheap. (I'm in over $4000 pass or fail at this point) I finally pulled the trigger on the whole thing, D1.1 seminar/exam end of next month. I have been neck deep in the books ever since. I did pretty good in High school, but at 33 years old, it's getting to where that was kind of a long time ago. The Aws D1.1 code book is highly technical, but after 15 years of welding and a history of interest in design, most of it is fairly intuitive. There are a few things that are a little sketchy for someone like me that is "self studying" without anyone to walk me through it.

My question today is regarding figures 6.1 - 6.3.

After the graphs, there are a series of diagrams accompanied by simple tables divided into 3 columns: Discontinuity dimension, limitations, and conditions.

In this case, I am interpreting "limitations" to mean "~Shall Be", and "Conditions" to mean "~When"

I am a little confused as to the meaning of the word "conditions" as it is intended here. In Fig 6.1, Case I and II the "conditions" column references "E"(weld size) but in Case III the "conditions" column references "L" and "W" (length and width of said discontinuity).

I am just trying to make sure I understand what they are trying to say here... any help to break down this set of figures in simple terms would be MUCH appreciated. Thank you in advance.

Like I said, I am not an engineer, just a highly experienced welder diving into the technical side of the trade, with a hobbyist level interest in design. Call me an enthusiastic amateur. :)

 
Replies continue below

Recommended for you

This may help you some. Understand that this is my understanding and may or may not be correct.

The page can be commented on Here if there is any tremendous error that needs to be brought out.

D1p1Quest.jpg

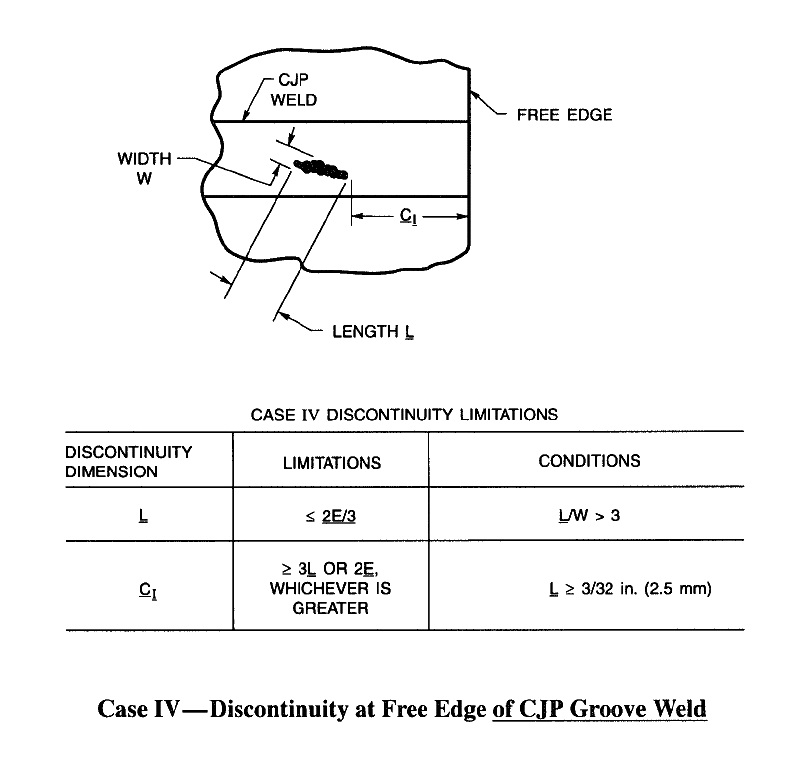
This shows Figure 6.6 out of AWS D1.1-2000 This Case (IV) figure specifies the maximum dimensions (limitations) of a discontinuity based upon a condition being met. This applies to Radiography and is referenced by prior paragraphs/tables/figures in the code

Here is a brief overview of how I read it .

Example 1st line- The Length of the discontinuity must be less than or equal to 2 times the weld size (E) divided by 3 provided the Length to Width Ratio is greater than 3.

Example 2nd Line-The distance from the Edge must be greater than 3 times the Length of the discontinuity or 2 times the Weld Size provided the Length of the discontinuity is 3/32" or more.

As with many things in any code, looking at where this information is referenced from can help with interpretation. It is safe to assume that no statement stands alone when reading a code. Always establish the context of the statement.

Gerald Austin
Iuka, Mississippi
 
The graphs are easy to use if you understand how they work.
First you have to determine the nature of the load and the type of connections. Connections are the easiest, it is a tubular connection where one or both members are hollow sections, or a nontubular connection where neither member is a hollow section.

The load condition is either static, the load doesn't change over time, or cyclic where the magnitude of the load changes frequently and the magnitude is sufficient to qualify as a cyclic load.

Cyclic loading may need some explanation. Consider a bridge girder; the static load (dead load) is the weight of the member, including the weight of the concrete deck. A single person walking across the bridge represents a moving load, but the weight of the individual is too small to be of concern. The same cannot be said of a loaded truck and trailer moving across the bridge. The loaded truck and trailer is of sufficient magnitude to be of concern. Every truck that rumbles across the bridge represents a cyclic load. Once a sufficient number to trucks have passed over the bridge, fatigue cracks can develop. As you would expect, the acceptance criteria for discontinuities are more restrictive when the design includes cyclic loading.

The graphs included in Figures 6.1, 6.2, and 6.3 delineates the maximum size of a defect and the distance from a free edge or between defects. The vertical axis on the left side is the thickness of the CJP joint (thickness does not include backing or face reinforcement). Draw a horizontal line from the vertical axis to the inclined line "B". Where the drawn line intersects the line "B" is the maximum size of the acceptable discontinuity. If the image on the radiographic film is small than the size indicated by the intersect, the discontinuity is acceptable. If the indication is large than the size indicated by the intersect, the defect is rejected. If the size of the discontinuity is known and if it is an acceptable size, it still must be far enough from a free edge and from the adjacent discontinuity.

If they are too close to each other or to a free edge, the discontinuity is classified as a defect and rejected. The size of the indication is located on line "B" and then a vertical line is dropped to the horizontal axis. The intercept between the vertical line and the horizontal axis is the minimum acceptable distance between adjacent discontinuities or a free edge. If the discontinuities are too lose, they are classified as a defect and rejected.

Look at Figure 6.1. The dotted horizontal line indicates the joint thickness is about 9/16 inch. Following the dotted line horizontally to line "B" indicates the maximum acceptable discontinuity is 3/8 inch or smaller.

If the indication on the radiograph is 1/4 inch in diameter, a vertical line is drawn from line "B" at 1/4 inch. The drawn vertical line intercepts the horizontal axis at 3/4 inch, indicating the minimum distance between the adjacent indications is 3/4 inch. If the actual distance is less than 3/4 inch, the indications are classified as defects and are rejected. If the measured distance is more than 3/4 inch and if they are both equal to or smaller than the maximum size, they are accepted.

The other figures are used in the same manner for different load conditions. The inspector must ask the Engineer what the load conditions are if the information is not on the "S" drawings. Just one more reason why the inspector has to have copies of both the design ("S" drawings) drawings and the detail shop/erection drawings.

Best regards - Al
 
Thank you both for the in depth clarification. My day job is welding some stuff for heavy cyclic / fatigue loads, I am familiar with that part of it. Both of you more or less confirmed what I was thinking, I just wanted to make sure I was understanding the language correctly. Their use of words here is a little ambiguous. I'm sure I will have more questions later lol thank you again. I will keep studying.
 
on the cwi test for d1.1, the question and answers going be identical to the code, they are not going ask you to figure or explain, but just find the paragraph. the answer is identical to whats written in the paragraph, so pay attention to the words in the answers . You going have less time than needed so find the topic of the question and look up in index. You can do better if you don't know the code but able to find the answer in the index. every paragraph in d1.1 means something, so find the topic and then index. the answer is identical to what written in the code book.
 
The practice exams I have taken also often referred me to the tables and figures for the answers. Which often require running formulas and interpreting graphs. The exam is not limited to the text portion of the code.
 
Im just giving you a tip on the exam, I passed it first go, its not as hard as people think its just a lot of information, the practice test is nothing like the actual exam on d1.1, so please excuse me for trying to help
 
Sammy19, bb29510 is right...the D1.1 practice exam is nothing like the real thing. Tab up your code, get used to using the index and pay attention to the notes and where they reference. Do not attempt to cram your brain the night before, it won't work and will put you at the corner of FUBAR and SNAFU at 7 AM Test day.
 
"Do not attempt to cram your brain the night before. . . "
Yep -- get a decent night's sleep and have a light, high-protein breakfast. And watch out for footnotes on the open-book portion. Any table that has footnotes, figure that the final answer is contained in the footnotes. NEVER change an answer. Never; only exception is if you misread the question on the first time. At the bottom of each exam-book page, check your numbers; I've gotten one line off on the answer-sheet more than once. Bring a 0.9 or 0.7 mechanical pencil, beats sharpening wood pencils. Bring a top-notch eraser, like the white Pentel stick ones. Lastly, sometimes the answer to the color of George Washington's white horse is "white". Some of the questions have simple answers; don't overthink the questions.
 
High light all foot note found in the table. They are small and can be easily overlooked.

If you skip a question, place a tick mark next to the question on your answer sheet so you don't answer question 35 on the line intended for the answer to question 34. Erase all tick marks before handing in your exam.

Place a tick mark where you should be at the end of 30 minutes, 1 hour, and hour and a half, and 1 hour forty five minutes to make sure you are keeping pace and you are not falling behind.

Answer all the easy questions first and go back to answer the harder questions once you have gone through the entire examination. There is absolutely no excuse to say you were doing great, but ran out of time and didn't get to the last twenty questions. It means you made the idiot's mistake of trying to answer every question in sequence. That is the idiot's mistake. Skip the questions that are intended to be time burners.

Best regards - Al
 
Thanks for all the tips guys. I wasn't trying to be a smartass bb I was actually standing in line at the store when I threw that response out there. I have my code book all tabbed out with a lot of notes and highlights. And you all are right... after 15 years of welding a lot of it is pretty intuitive it is just a HELL OF A LOT. A prep course at a college isn't feasible for me so I am taking the self study approach which is a little intimidating. I am going to give it my best try. I appreciate all the inside info guys thanks a lot.
 
Another thing to remember is, as I pointed out before, many who take this exam including I think most of you guys, have some background in engineering. I am just a welder with a high school diploma.
 
look don't try to ace the test, figure out how many you need to pass and try to get that many first, do the easy question first because the hard question will pop up later in the test and answer their selves. once you got all the easy questions you need to pass, the rest is gravy. but d1.1 not hard, its the easiest. the hardest will be metallurgy and symbols. eat your desert first. nobody make 100%
 
My first love was autocad. In another life I would be working in design so i am actually pretty good with blueprints and symbols. I have been reading my ass off on the metallurgy tho. Its a little overwhelming actually. A person could make a career studying the chemistry of metals. The sheer volume of available knowledge on the subject is almost endless.
 
sammy,
Listen to the advice above from the guys - I was only an ex-welder and I have now been a CWI for nearly 20 years.
Never attempted the AWS CWI but currently hold the CBIP (New Zealand) and CSWIP (British / European) qualifications and the content of the exams may be different but the premise behind is the same.
It is not a test to see how much information you can absorb and try to remember - it is a test to see how well you can navigate the applicable code / standard.
You will be given a question and the answer is in the code - now the tricky part is getting to that answer as fast as you can (that is why the guys have noted putting tabs everywhere.)
As an example - you have 30 questions to be answered in 30 minutes (obviously an average of 1 minute per question)
If you do the easy ones first as noted above you may average 45 seconds per answer so you have picked up time which will benefit you when you get to the harder questions.
Conversely, do the harder ones first and you may average 1 min 30 secs so you may not have enough time to complete all 30 questions.

As noted above you do not have to get 100% - generally somewhere around 70-80% is sufficient for a pass so don't stress yourself.
The AWS course should cover the content of what you will get in the exam so that is just a case of paying attention and taking notes.
The challenge for you to help you succeed is to know D1.1 like the back of your hand - not how to calculate formulas and quote technical info but to know exactly where to look to locate those things.
Hope that helps,
Cheers,
DD

 
Sammy, Like you I came "up the hawse-pipe" in Engineering...and understand the hill you are climbing.
Take the advice given, esp regarding highlighting handwritten notes and don't try and "know" the answers in your head. That is what the code is for...They are testing you on your ability to handle the code as it pertains to inspection, not can you recite it from memory.

Tab, Highlight and get friendly with the index. Advice here- the index is not "all knowing" so when you find a paragraph/section not noted in the Index, make a handwritten call out under the heading and highlight it.

GTAW knows his stuff as do the others...it is a small fraternity here and we all will "have your 6".
 
oh there a question on the very first page of the code book and a couple in the annex
 
Thats shady. But not surprising. The 2010 code clinic book that I bought says to clip off the annex and commentary for test day because they are not examined.
 
At one time, several years ago, AWS would allow the candidate to detach the index or photocopy the index to make it easier to use during the examination. That practice was stopped about three or four years ago.

It was good advice to add to the index. As noted, the index is not all inclusive. If you encounter something that isn't in the index, such as F numbers, add it to the index.

Another thing is to add "notes to self", if you read a clause and see a different way to paraphrase the information, add the note to the margin. For instance, The is a clause that says the thickness, width, and length of the backing must be specified. It isn't in clause 5.10 where they talk about backing, it is in the front part of clause 2 (maybe the third page in, top of the left hand column). That being the case, add the note "Backing" to the left hand margin next to the clause. In clause 5 they talk about tolerances during assembly. Bing a welder, you and I would call it "Fit up." Add the note "Fit up" to the right hand column next to the clause.

The code book is your working document. You can write notes, underline key phrases, highlight key words, highlight foot notes, add tabs, etc. to your hearts content. Be careful not to go crazy and highlight every word in every clause.

I had one fellow use five different colored highlighters to mark every word in every clause. He had so many tabs it took him minutes to find the right tab. He turned his code book into a coloring book with 101 multicolored tabs around the whole book. It looked like a Christmas tree!

Use the highlighter sparingly.

Use forwarding and return addresses. It is common for a clause to refer the user to a different clause, table, or figure. I underline the clause number and write the page where it is located in the margin. It helps you navigate through the code more easily. If you look at the different tables and figures they list the clause that directed the reader to that figure or table. I suggest writing the page number where that referencing clause can be found in the margin. Those are what I call forwarding addresses and return addresses.

DO NOT WTITE IN YOUR CODE BOOK DURING THE EXAM

Best regards - Al
 
Writing the page numbers in the margins to locate referenced sub clauses.... great advice. Took a break tonight because I was going blind on welding code but tomorrow begins my 3rd cover to cover read through... I will definitely be using that thank you.
 
Status
Not open for further replies.

Part and Inventory Search

Sponsor