Continue to Site

Eng-Tips is the largest engineering community on the Internet

Intelligent Work Forums for Engineering Professionals

  • Congratulations KootK on being selected by the Eng-Tips community for having the most helpful posts in the forums last week. Way to Go!

TJI - Bottom Cord Cracking - Repair? 9

Status
Not open for further replies.

RalphNater

Civil/Environmental
Feb 23, 2021
5
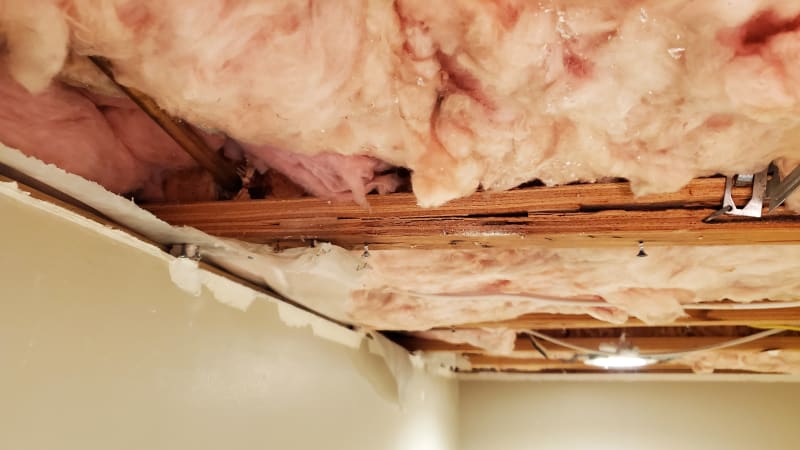
I recently ripped out the ceiling sheetrock in our basement as we have several things to be done for a remodeling project. After exposing the structure, I noticed one of the TJI's has a long crack in the middle of the span as shown in the picture. The floor above is a kitchen, nothing load-bearing. Kitchen floor is ceramic tile.
20210222_212636_kece5j.jpg


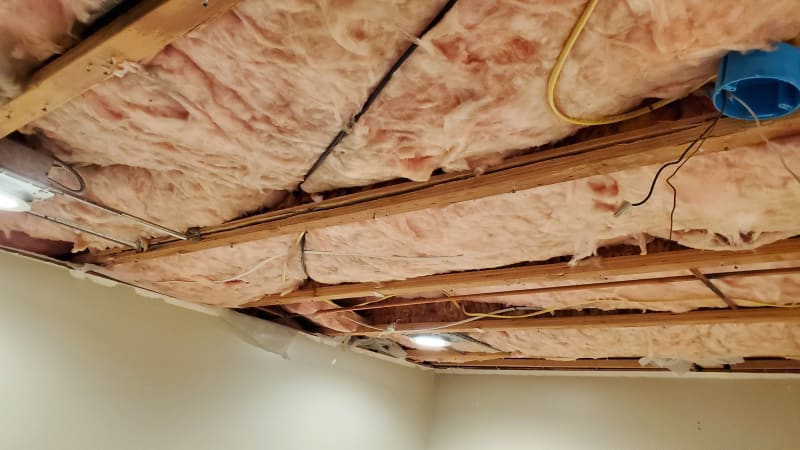
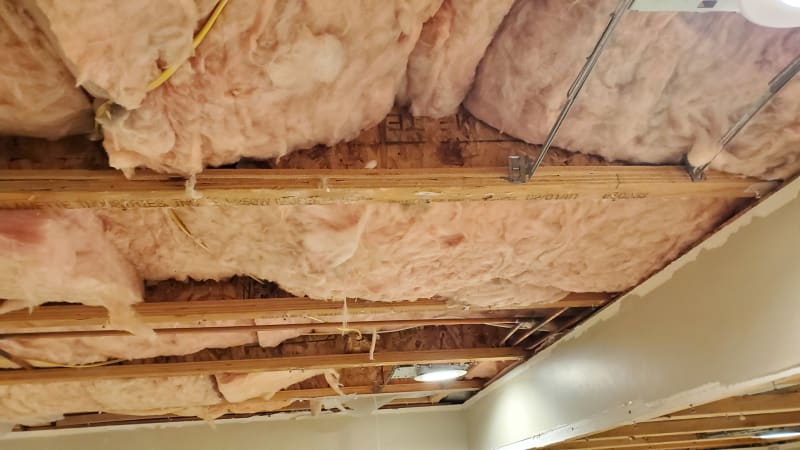
When I observed more closely, I can easily push the bottom cord up with my hands and it appears that the web is still in-tact, no severe deflection. The rest of the TJIs appear to be in good shape, so the issue is completely localized to this single joist. The span is 16-ft. I'm guessing that when the sheetrock was ripped down, the force ripped the bottom cord apart as the sheetrock fasteners were not removed, and the overall joist hasn't failed, per se.

So, the question I propose is can I jack this bottom cord back into place and apply a good adhesive and fasteners to re-secure the integrity of the joist?

Your comments and suggestions are greatly appreciated.
20210222_212639_o0k7ad.jpg
20210222_212655_p5tddi.jpg
 
Replies continue below

Recommended for you

Hi RalphNater,
I have a few thoughts comments:
-I wouldn't believe just pushing the bottom chord member back in place and gluing/screwing would really bring the member back to its original strength. Their is a lot of shear flow cal's to run and generally I haven't been successful doing something like this with timber, plus their is considerable flexibility in the timber screw connection.
-Has the tiles or grout above the joist cracked? I wouldn't be overly excited to jack the member back into place for fear of cracking the tiles/grout above.
-Can you just sister up another joist beside this one or maybe two pieces of conventional lumber (one on each side).
 
I'd use some West Epoxy and clamp it with some screws. Sistering would be better if it can be readily installed.
 
Sistering would be my go to option, but it looks like you have a couple of plumbing lines through the web near the wall. That would require additional consideration and/or work.

You could also block out the web on both sides. Complete with glue and screws up from the bottom chord to close the gap.
 
I'd be more partial to skeletron's proposal. Provide 2x blocking on the sides of the web fastened adequately through the web. Then attach the bottom chord to the blocking via an absurd amount of screws.

The contractor would hate it, but depending on the width of that bottom chord you may want to pre-drill the bottom chord to prevent splitting.
 
Funny how the cracks are right where the can-lights tie into the bott. chord of the joist. **Note to self** Running connections thru that side of bott. chord is a bad idea.
 
Thanks for all your great comments and suggestions.

@CBEngi: No, the floor above is in perfect shape - to my eyes. No cracking, heaving, slope, etc.

I thought about the idea of sistering the joist, but like @Skeletron mentioned, it would be considerable work to do a complete sistering job with all the plumbing and electrical punched through the web.

At this point, maybe there's a hybrid solution where the bottom chord gets glued and 2x blocking gets placed @12-16" OC to the web, with plenty of glue, fasteners, etc. Then, the bottom chord is also fastened to the blocking. I could even run some blocking to the neighboring joists at each "sistering" point.
 
RalphNater:
If you read the tech. literature and table footnotes carefully on TJI’s, you will find that they do not want you nailing or screwing into the t&b chords, particularly into the sides of the chord members. This is exactly because of the potential for splitting of the chord members like you are seeing. Then, look at the crappy job they did of installing those can light supports, large dia. nailing right into/near a cross ply which is prone to cracking and splitting in any case, and an inferior cross ply, at that, with a bunch of thick, overlapped, piece/ply splices. Then, this is fairly near the TJI reaction where the horiz. shear will be highest. This combination of conditions is the likely cause/origin of the cracking.

The cracking is likely just below the bottom of the groove for the flg./web connection joint. Look at the reentrant corners btwn. the flg. (ea. side) and the web, and see if this glued tong-n-groove joint is still intact. It doesn’t look like the chord member has failed in tension. Fill (inject or otherwise) the cracks with epoxy, and use C clamps to pull the plys back together. But first, use some 2x4’s, cut a little bit long and prop them up from the floor to the underside of the chord member, mostly to close the cracks and maybe lift the TJI a small amount, take a bit of load off of it, but not much. Then, apply the C clamps. I don’t think the blocking you are contemplating will fix the damaged bot. chord, gluing probably will if done right. Much screwing and nailing just violates the admonition mentioned above.
 
Call Trus Joist for an approved fix to maintain the warranty.

Mike McCann, PE, SE (WA, HI)


Thanks for the analysis dhengr. I completely agree with your assessment of the cause of failure. The basement finish work was done very poorly by inexperienced homeowners - some of which were ex-cons.

I contacted the joist manufacturer (as others have suggested), and spoke directly to one of their structural engineers here in SLC, Utah. They have been very responsive and helpful. I sent them a video to get a close-up inspection of the cracking, and they'll advise as to how we can best restore the integrity of the joist.

Again, thanks for all your great comments and suggestions. I'll let you know what the plan of attack is once the manufacturer returns with their review.
 
Joist manufacturer recommended the following repairs:

1. Glue bottom flange and all joints/separations along the web and jack it up until it's level with other joists. Use Liquid Nails, or other epoxy glue of my choice. Manufacturer has tested a variety of products, and Liquid Nails proved to be just as effective as other high-end adhesives.
2. Once the joist is properly raised and supported, run 2x6 lumber to sandwich the web directly above the bottom chord. Sandwich should extend 12-14 feet along the span...as much as possible to strengthen the member. Where needed, cut longer slots into the web to move electrical higher into the web - knowing that this will be reinforced with the sandwich blocking.
3. Same Liquid Nails adhesive or other to install the sandwich lumber, with 10d or 16d nails - staggered through the blocking. C-Clamp the sandwich lumber while doing so and allow adhesive to bond for 2 days. Apply adhesive everywhere feasible.

That's the recommendation, and we'll do just that ASAP so we can move on with the remodeling process.
 
Update:

I actually reached out to two joist Manufacturers to get their opinions and boy, are they different!

The one manufacturer, as mentioned above, recommended doing the 2x6 sandwich approach.

The other manufacturer recommends installing a like-joist right next to the existing joist. Their direct response is as follows:

Then I checked if heading out the good cut back joist sections, off the adjacent carry joists......and that doesn't stress calc out either.

So...
The only advice we can give is you must install a new like kind TJI joist in its place....or next to it (it should be ok to slightly over span the assumed 24" span rated floor sheathing)

A relatively equal joist would be a TJI 230 series....which you can find at local retail lumber yards.

Obviously utility lines will need to be pulled and reinstalled into new joist.

To easy joist installation, you can bottom bear 1 end on wall plate...and the opposite end in a Simpson Strong Tie IUS hanger into new LVL blocking on wall plate.

Install shallow predrilled #8 screws at 16" oc up into top flange up into the subfloor...check depth of screw length tip as to not hit/damage finish floor above.


So, there you have it...

I'm going to do the 2x6 approach since the floor hasn't failed on us in over 20 years. I'm guessing the floor sheathing above is helping distribute the loads pretty well.
 
Could you potentially add a shallower LVL beam instead of a TJI to span above the plumbing?

Also, if you do jack up the damaged beam obviously be very careful to not crack the tiles.
 
Status
Not open for further replies.

Part and Inventory Search

Sponsor