Continue to Site

Eng-Tips is the largest engineering community on the Internet

Intelligent Work Forums for Engineering Professionals

  • Congratulations KootK on being selected by the Eng-Tips community for having the most helpful posts in the forums last week. Way to Go!

Tolerance for dimensions without a decimal place 1

Status
Not open for further replies.

Suskam

Automotive
Nov 12, 2012
39
thread404-85074
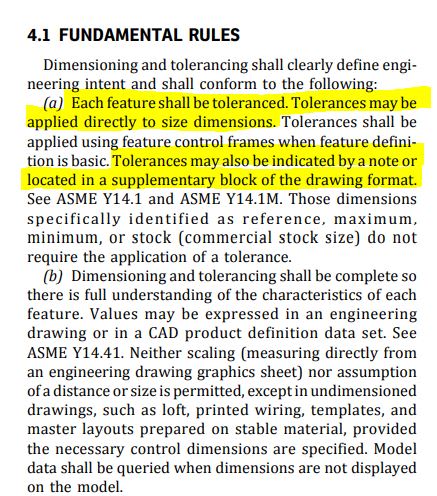
I have a related question: We have run across supplier and customer drawings (automotive industry) that have no decimal place. The ASME standard says that all dimensions must be toleranced - in the dimension itself, in the titleblock, or in a note. How do we interpret dimensions without a tolerance? Is the drawing considered in error?
All-dims-must-be-toleranced_yq4fzz.jpg


Product Designer: I-Deas/NX/Catia
Automotive Industry
 
Replies continue below

Recommended for you

You interpret by contacting the customer and have them verify.
 
Maybe it's an error. Maybe there is a customer company standard that is somewhere on the drawing or was in the contract.
 
Call the provider of the drawing and get an answer IN WRITING to your question. Really, its not about "standards" so much as making sure that you provide the parts that the customer wants and to make sure they aren't rejected. You're just trying to provide good customer service.
 
If there's "no tolerance" its usually a basic dimension which is theoretically perfect, the tolerance will be controlled otherwise by GD&T and not necessarily attached via FCF onto that particular dimension. If "without a decimal place" means you have whole numbers, it happens, no need to divide every unit whether mm or inch.

Communicating with both customers and suppliers is good, as is having a copy of their corporate drafting standards. I recommend both.
 
It is not a Basic dimension, it is a whole number dimension. We will have to contact the supplier for more information, this has happened more than once with different customers/supplier prints. Thanks for all your help.

Product Designer: I-Deas/NX/Catia
Automotive Industry
 
Suskam,

Do they have a note on the drawing that defines default tolerances? ASME Y14.5 requires that trailing zeros on metric dimensions be removed. As a mechanical designer, I do not find this inconvenient. Any dimension without a tolerance and not boxed, indicates that my drawing is not complete.

If no tolerance is explicitly specified, you need to call your customer and ask for tolerances. If they know what is good for them, they will appreciate your diligence.

--
JHG
 
One and two decimal dimensions are toleranced in titleblock, but no note or tolerance for whole numbers.

Product Designer: I-Deas/NX/Catia
Automotive Industry
 
So, why can't you just tell the customer that you assume that it's a one decimal dimension, and if they do not respond, you'll mark up the drawing to reflect that assumption, and that any errors in doing so will cost them money to fix it?

TTFN (ta ta for now)
I can do absolutely anything. I'm an expert! faq731-376 forum1529 Entire Forum list
 
Suskam Given that you're presumably in the automotive industry, any "critical" part from a supplier will have a CAD file version, not just a hardcopy drawing. With that in mind, refer to the second sentence in 4.1.b) which indicates the dimensional details can be contained within the CAD dataset.

Further - what type of dimension is causing the trouble? Chances are high that "standard" metric dimensioning (for diametrical and radial dimensions in particular) have no trailing zeros.

If you're still confused - open a dialog with the proposed supplier to obtain WRITTEN clarification for your concerns.

Converting energy to motion for more than half a century
 
I'd assume a tolerance of 1/2 the unit of the dim'n.

another day in paradise, or is paradise one day closer ?
 
Status
Not open for further replies.

Part and Inventory Search

Sponsor