Continue to Site

Eng-Tips is the largest engineering community on the Internet

Intelligent Work Forums for Engineering Professionals

  • Congratulations KootK on being selected by the Eng-Tips community for having the most helpful posts in the forums last week. Way to Go!

Warping due to heat-affected zone 1

Status
Not open for further replies.

Lsos

Mechanical
May 15, 2011
11
Gland_brlsii.png


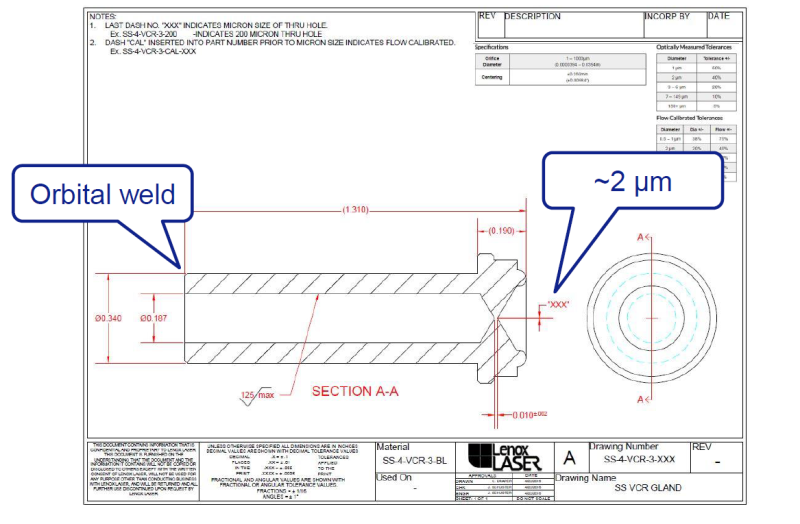
I am looking into orbital-welding the shown stainless-steel part to an ss tube and some couplings. However, some colleagues have expressed concerns that the welding process will warp the tiny, tiny 2 micrometer restriction hole at the end, possibly closing it or making it too large. I have a hard time believing that it will warp significantly (the tolerance on the hole diameter is already 20%), but I how do I convince them of this (if I am right)?

It seems that bending or stretching of the part should have minimal effect. Diametrical shrinkage or swelling would, at worst, have the same effect on the hole as on the whole part, so unless it's in the 10s percents, it won't be noticeable. Not to mention that the heat has a long way and a lot of material to go from the welding site to the restriction hole. We could also reduce the diameter of the tube at the welding site (it's outer diameter is too large anyway). Is there anything missing or incorrect from my logic?
 
Replies continue below

Recommended for you

If you have already done the trials and reduction in hole size is the result every time.

One Possible Solution:

1. You can manufacture a fixture, kind of a go gauge for the 2 micrometer restriction hole (I can see tapered cavity on the right side which can hold the gauge).
2. Put this go gauge on, every time you do the orbital GTAW.

I guess this might solve your problem for the reduction in the hole size.
 
2 um = .000,078,74

~ 80 millionths I'd say, not 8

them pesky decimals
 
The fabricator inspects the hole size either optically (with a microscope), or by a flowmeter. The flowmeter method is 2x more expensive (~$200).
 
But since flow is the property that really matters that should be what they test.
I would be pissed to get one that had the wrong flow and be told 'but the hole looks to be the right size'.

= = = = = = = = = = = = = = = = = = = =
P.E. Metallurgy, Plymouth Tube
 
I would agree with EdStainless that air-gauging is the correct method to validate the welded assembly meets flow requirements.
 
Right direction - cooling of the weld zone.
To completely eliminate the hole deformation need the part head with the hole immersion in water and to weld.
 
Status
Not open for further replies.

Part and Inventory Search

Sponsor