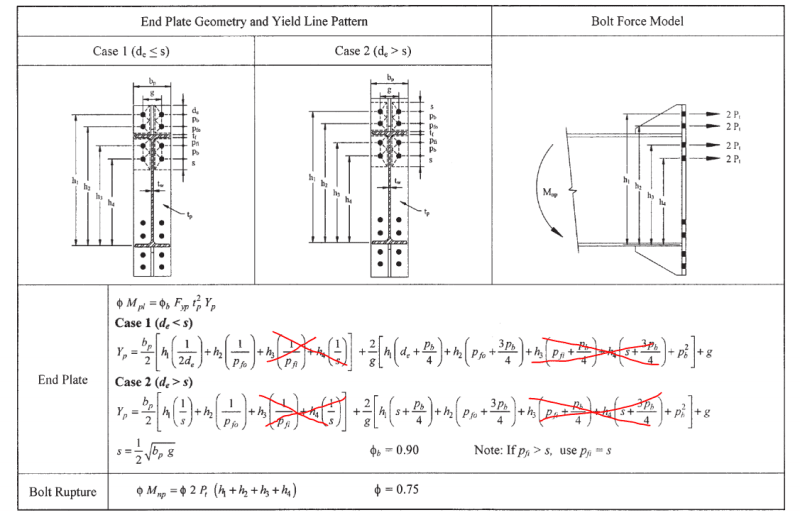
I'm designing a moment end-plate for a WF beam framing into a WF column. The geometry of the top flange connection doesn't match any of those in AISC Design Guide 4 or 16, for which you would simply use the formulas provided in the Tables. I can't find any information on the derivation of the formulas in those tables, which I understand were arrived at through YLA. I understand how YLA works in a concrete slab or plate when using a unit displacement for external work, but does anyone have information on how to perform YLA with a unit rotation? How were the formulas derived in Table 3-2 AISC Design Guide 16 for example?
Navigation
Install the app
How to install the app on iOS
Follow along with the video below to see how to install our site as a web app on your home screen.
Note: This feature may not be available in some browsers.
More options
Style variation
-
Congratulations MintJulep on being selected by the Eng-Tips community for having the most helpful posts in the forums last week. Way to Go!
You are using an out of date browser. It may not display this or other websites correctly.
You should upgrade or use an alternative browser.
You should upgrade or use an alternative browser.
Yield Line Analysis of a Moment End-Plate 4
- Thread starter rhollman
- Start date
- Status
- Not open for further replies.
I guess I'm saying this is a check for the end plate. If you satisfy the prying action checks aren't you saying the combination of bolts/plate thickness works? What additional checks would you need to do? I understand the prying action check to tell me the plate is strong enough to develop the bolt strength so the connection is limited by the bolt OR the plate is not thick enough to develop the bolts and the connection strength is limited by the plate.
For example - if you look at an axailly loads clip angle connection you just need to check prying action to verify if the clip angle is thick enough.
For example - if you look at an axailly loads clip angle connection you just need to check prying action to verify if the clip angle is thick enough.
You're counting too many yield lines. It's more like this:

That still assumes double-bending. Nowadays I tend to just check the plates as single bending cantilevers spanning from plate to bolt, and factor the bolts by 1.3 to account for any prying effects.

That still assumes double-bending. Nowadays I tend to just check the plates as single bending cantilevers spanning from plate to bolt, and factor the bolts by 1.3 to account for any prying effects.
Table 3-4 seems straightforward (see attached). The yield line pattern and the expression for 'Y' is just as expected from yield line theory with the arrangement of bolts and plates shown.
BA
BA
Table 3-5 is not quite so clear (see attached). In this case, the stiffener plate has been moved down below the four bolts. The yield line pattern is similar to Table 3-4 but the expression for 'Y' is a bit different. Offhand, it is not clear to me why 0.75 pb and 0.25 pb is attributed to h1 and h2 respectively. I would have thought it would be 0.50 pb to each. It is also not clear why the term g/2 is added. These changes appear to be a result of relocating the stiffener plate.
BA
BA
arefinmahadi
Civil/Environmental
Hi,
I came to understand the yield line calculation from rhollman's post well. Can anybody help me understand where is the term -1/2 (red boxed in attached image) is coming in the table 4-2 in AISC design guide 13. I can not perform the calculation for yield line for the unstiffened bolts ?
Thanks
I came to understand the yield line calculation from rhollman's post well. Can anybody help me understand where is the term -1/2 (red boxed in attached image) is coming in the table 4-2 in AISC design guide 13. I can not perform the calculation for yield line for the unstiffened bolts ?
Thanks
JoshPlumSE
Structural
It occurs to me that the answer to the OP's question is probably as simple as using the 8 bolt stiffened formulas.... but, getting rid of the terms that reference h3 and h4 (the bolts that don't exist in the OP's configuration).
I'm actually a little embarrassed that I didn't realize it back when the discussion was fresh.

I'm actually a little embarrassed that I didn't realize it back when the discussion was fresh.

- Thread starter
- #29
Like arefinmahadi, I too would like to know where the ‘1/2’ term comes from for extended unstiffened end plates. For what it’s worth, I’ve attached my attempt at the derivation for ‘Y’ as per AISC DG16 T4-2. I manage to get everything except the ‘1/2’ term. My only guess is that the ‘1/2’ term is somehow compensating for the top yield line that is assumed to run across full width of plate through centre of top bolts. Perhaps this yield line is too theoretical and the distance between bolts (dimension ‘g’) is too great for this yield line to actually occur as drawn.
In the end, I’m happy enough to generally understand the derivation of the ‘Y’ term and understand yield line theory a whole lot more than before stumbling across this thread. So a big thanks to the original poster and other contributors. It has been the only source of yield line theory derivation I have been able to find for steel end plates. Thanks also Agent666 and ajh1 for previous guidance on this subject.
In the end, I’m happy enough to generally understand the derivation of the ‘Y’ term and understand yield line theory a whole lot more than before stumbling across this thread. So a big thanks to the original poster and other contributors. It has been the only source of yield line theory derivation I have been able to find for steel end plates. Thanks also Agent666 and ajh1 for previous guidance on this subject.
- Status
- Not open for further replies.
Similar threads
- Replies
- 37
- Views
- 29K
- Question
- Replies
- 6
- Views
- 3K
- Replies
- 7
- Views
- 1K
- Question
- Replies
- 4
- Views
- 9K
- Question
- Replies
- 2
- Views
- 8K
