Continue to Site

Eng-Tips is the largest engineering community on the Internet

Intelligent Work Forums for Engineering Professionals

  • Congratulations waross on being selected by the Eng-Tips community for having the most helpful posts in the forums last week. Way to Go!

Dimensioning/Tolerancing of Bent Sheet Metal Part

Status
Not open for further replies.

nmine

Mechanical
Jul 7, 2023
5
Hi,

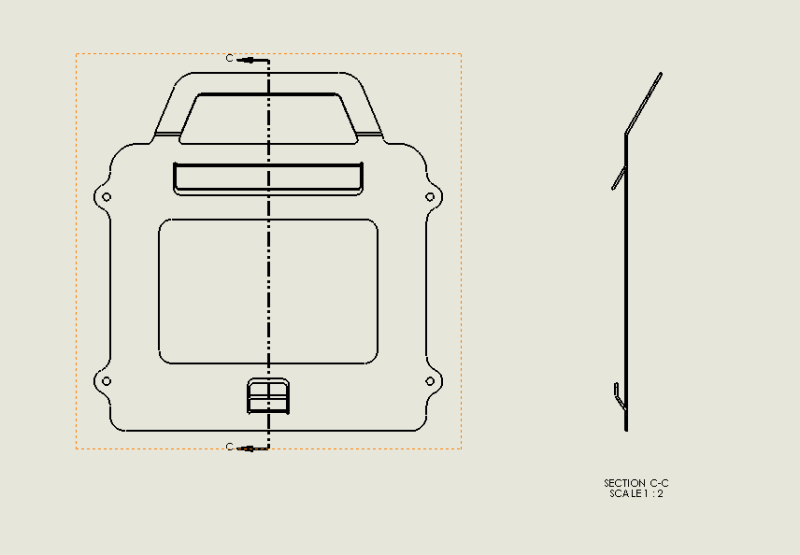
Was wondering how people would usually dimension/tolerance the outer perimeter of a part like this. If the part was not bent, a profile tolerance around the outside perimeter would be nice and easy. Since the part is bent, it makes it a little less intuitive to use a profile tolerance...
Part_n3cgr6.png
 
Replies continue below

Recommended for you

nmine,

You only care about the part in its bent state. The profile around the as-bent outside is meaningful and correct.

--
JHG
 
Hi drawoh,

Thanks for the response. That is correct, I only care about the bent state. So you are implying an all over profile tolerance with a plus minus tolerance on thickness perhaps? My question would be then, would it be harder to inspect the bent sections toleranced in this manner? Instead of measuring the bent angle you are now taking points with a CMM or height gauge with a dial indicator? Just trying to wrap my head around how it would be inspected. Thanks.
 
Hi, nmine:

The bend state is your finished goods. So, you have to inspect it on the finished goods. You need to leave geometries of blanks to your vendor because you are not going to get blanks. But you don't have to inspect every single dimension. It depends on your design intents. I would inspect overall height with a height gage and angle with an optical comparator.

Best regards,

Alex
 
How critical is the outer perimeter? Does it need to fit inside a housing of some sort? Does the bent handle feature at the top need to fit inside something? These will determine how to dimension and tolerance that part.
 
I agree with Eric. If the perimeter isn't critical, it can be among the features controlled by a loose profile of a surface tolerance specified in a general note, such as:
"UNLESS OTHERWISE SPECIFIED, ALL SURFACES [profile symbol][X.XX][A|B|C]".
 
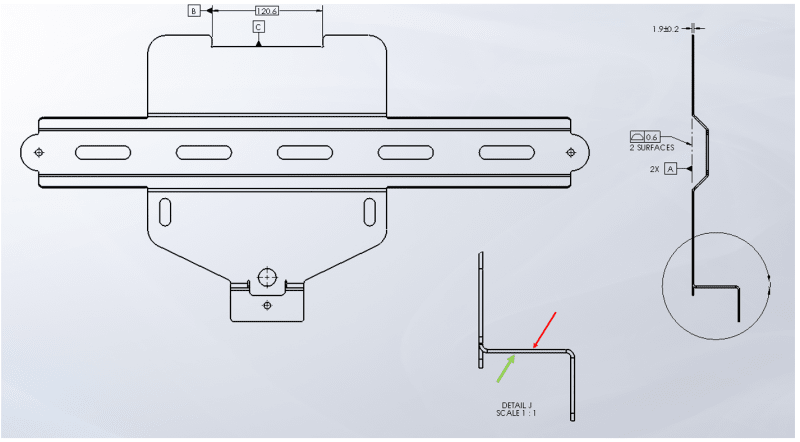
Okay thanks all for the replies. So with the "unless otherwise specified, all surfaces profile tolerance" general note, say you have a part like below with datums and a thickness specified like so. How do you know what surface is used to position the section of the part shown in detail J (red and green arrows) since there is now a thickness tolerance involved? Is it the side of the part that is continuous with the surface used as datum A? This is where I get confused...
Capture_3_fkirki.png
 
The thickness tolerance of the sheetmetal has no bearing on the profile tolerance. The bent feature in Detail J is not required to be controlled. It would just need to fall within the requirements of the title block tolerance. The profile tolerance on the two surfaces is essentially a flatness tolerance that only applies to the two surfaces. Also, I'm willing to bet that Datum C could have been Datum B and Datum B could have been Datum C. It would have been better to use Datum C as the secondary datum because it's a much wider surface than the height of the walls that make up Datum B.
 
nmine said:
 How do you know what surface is used to position the section of the part shown in detail J (red and green arrows) since there is now a thickness tolerance involved?  

The thickness tolerance only applies to the specific portion where it is shown, unless you have some kind of note that says it applies to the entire part. Typically, with a "UOS" profile note like I suggested, a model is provided as part of the product definition, and it is also specified in the notes that the model dimensions are basic. That also includes basic thickness as represented by the CAD model in places like the detail J area. General profile tolerance with a datum reference frame takes care of size, form, location, and orientation everywhere where it applies. For a concise and unambiguous definition, it is better to use a profile note and not include any title block +/- tolerance. I agree with Eric regarding the datum precedence order - datum feature C has a better ability to constrain a rotational degree of freedom and should probably be the secondary.
 
Status
Not open for further replies.

Part and Inventory Search

Sponsor