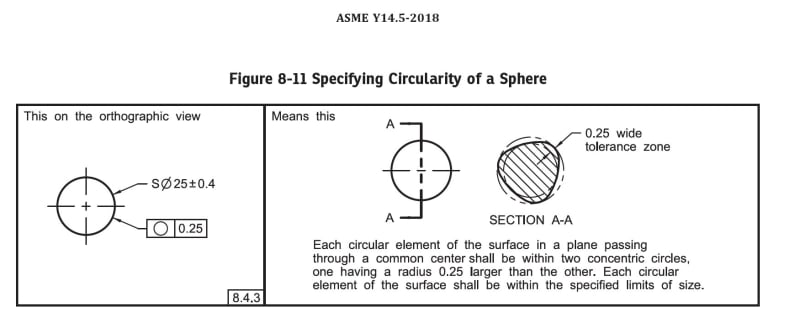
I have a ball from a manufacturer with the following specs: Diameter - 0.500+/-.005" and "sphericity" - .005" Since the term sphericity is somewhat vague I wanted to get away from the notes describing the dimensions and show it with GD&T, however it seems that GD&T fails me here. The way I understand it, I can't use a composite profile tolerance here because there is no locating dimensions. It is almost like I need a basic dimension with tolerances (don't throw rotten tomatoes at me here) and to have a profile tolerance... which naturally is not possible. Any ideas how to show something like that on a drawing without a verbal description?
Navigation
Install the app
How to install the app on iOS
Follow along with the video below to see how to install our site as a web app on your home screen.
Note: This feature may not be available in some browsers.
More options
Style variation
-
Congratulations MintJulep on being selected by the Eng-Tips community for having the most helpful posts in the forums last week. Way to Go!
You are using an out of date browser. It may not display this or other websites correctly.
You should upgrade or use an alternative browser.
You should upgrade or use an alternative browser.
A ball and GD&T 2
- Thread starter Diametrix
- Start date
- Status
- Not open for further replies.
Profile of a surface is a natural choice for a sphere. However, profile typically requires a basic dimension for the diameter, because it wants to control the form and size of the sphere. It sounds like "sphericity" is just a form idea -- much like circularity but wrapped in a spherical manner.
There is a modifier called dynamic profile, which I believe might be close to what they want, although that's shown in the standard as part of a composite profile tolerance.
Let's see what others have to say, though.
There is a modifier called dynamic profile, which I believe might be close to what they want, although that's shown in the standard as part of a composite profile tolerance.
Let's see what others have to say, though.
- Thread starter
- #4
- Thread starter
- #5
ASMEgreenimi said:ISO GPS or ASME?
-
1
- #6
- Thread starter
- #7
Wuzhee, I'm not sure if that provides the intent of sphericity.
That's because "each circular element" could be a different size. So the various rings will all be within 0.25, yet put them together and it's not a spherical shape of 0.25 accuracy.
That's because "each circular element" could be a different size. So the various rings will all be within 0.25, yet put them together and it's not a spherical shape of 0.25 accuracy.
ASME don't have a tool for it. I searched for ball bearing tolerances but the ball itself is very rarely available.
We're doing ball valves with only size tolerances. They work pretty well. Rule#1 gives it circularity so I'm pretty sure it's enough to control.
For a bearing ball I'd guess they have circularity|0.001| or similar tolerances. But I'm no bearing manufacturer, better ask FAG\SKF to give a hint.
We're doing ball valves with only size tolerances. They work pretty well. Rule#1 gives it circularity so I'm pretty sure it's enough to control.
For a bearing ball I'd guess they have circularity|0.001| or similar tolerances. But I'm no bearing manufacturer, better ask FAG\SKF to give a hint.
- Thread starter
- #10
I think it does. The key word there is "the common center", meaning that each circular element has a common diameter. That common diameter can vary within the size tolerances but the rest of the points for each circular element must lie within the profile tolerance zones.Garland23 said:Wuzhee, I'm not sure if that provides the intent of sphericity.
- Thread starter
- #11
The "ball people" usually have grades for balls, which include loose size tolerances and tight sphericity tolerances. Rule #1 would not let you match that.Wuzhee said:Rule#1 gives it circularity so I'm pretty sure it's enough to control.
- Thread starter
- #13
0.25Garland23 said:So if you put all slices together in a 3-D sphere shape for one tolerance, would the "sphericity" be 0.25 or would it be 0.8?
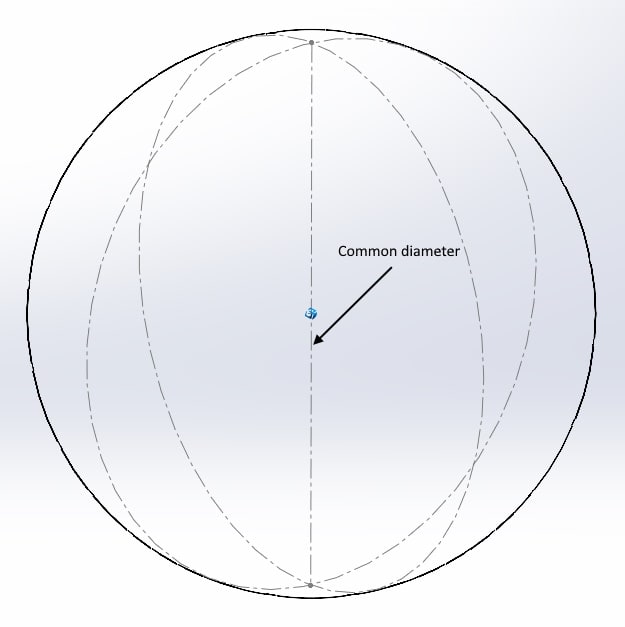
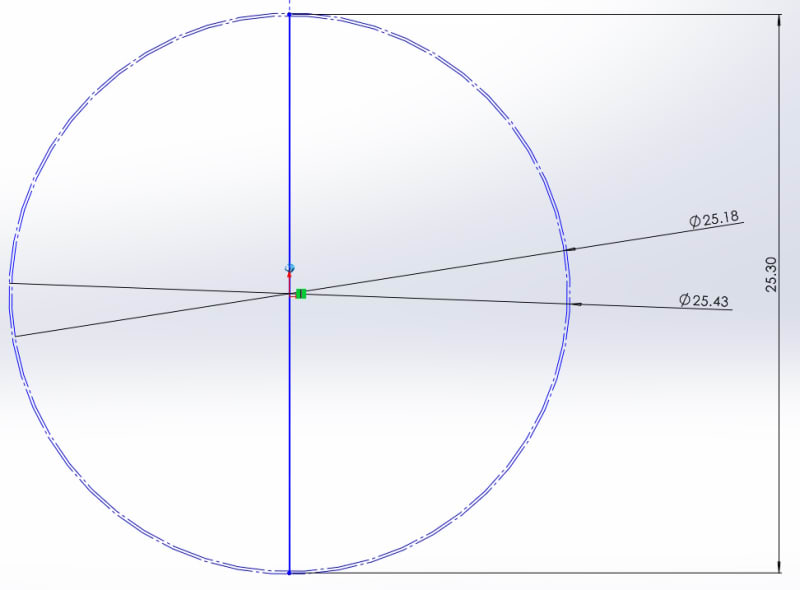
Divide the ball into four quarters, like an orange. This will form a common axis (diameter) for each circular element mentioned above. This diameter can be 25.4 max to 24.6 min, but it is going to be the same for all circular elements. Now each circular element will have three things in common with the rest of them: one actual diameter (D) and two tolerance zones. Each tolerance zone diameter is going to be D + .125 and D - 0.125. All the points of each circular element have to fall between these two tolerance zones and not violate max and min diameter constraint(for example a circular element can't be the outline of the bigger tolerance zone in the illustration below)
This is where I am having trouble seeing your viewpoint. Why must they all be the same size?Now each circular element will have three things in common with the rest of them: one actual diameter (D)
Perhaps we could back up to a simpler example of circularity of a regular cylindrical part (Fig. 8-10 of the 2018 standard). You seem to be saying that each cross-section where I measure circularity must have the same size/diameter. But that is not true, even if their center points all connect perfectly.
So when we transition to a sphere, why is it reguired that every slice where I measure circularity have the same size/diameter?
Alex, it's an issue because people are permitted to legitimately disagree with each other. The misunderstanding is probably on my end, so I'm honestly trying to understand this.
To your point: the size dimension is preceded by S, but the geo tolerance is not preceded by an S. That's the difference, and that's why I'm thinking that the many circular sweeps around the sphere don't have to all conform to the same size.
To your point: the size dimension is preceded by S, but the geo tolerance is not preceded by an S. That's the difference, and that's why I'm thinking that the many circular sweeps around the sphere don't have to all conform to the same size.
- Thread starter
- #18
I agree with Garland here, this is how I learn too. The process might seem somewhat adversarial, but unless you try to defend your position quite often you won't get to the point of understanding where you where wrong. Look how much I've learnt from all of you guys about a simple ball!jassco said:Why do you make this an issue?
Garland23 said:You seem to be saying that each cross-section where I measure circularity must have the same size/diameter
Not at all. The example from the standard is quite clear - each circular element of a cylindrical part can be any diameter within the specified limits

The difference is that those are "lengthwise slices" and have no common points. When you slice a ball along the same axis you are going to have two common points for each cross section. In other words each cross section is going to have at least one diameter in that cross section that is common for all of them. However, that's where I was wrong. There are two extreme cases here. You can build the tolerance zones here in two ways - one cross section can have the internal circle of the tolerance zone touching the common diameter and another cross section can have the external circle of the tolerance zone touching the common diameter.
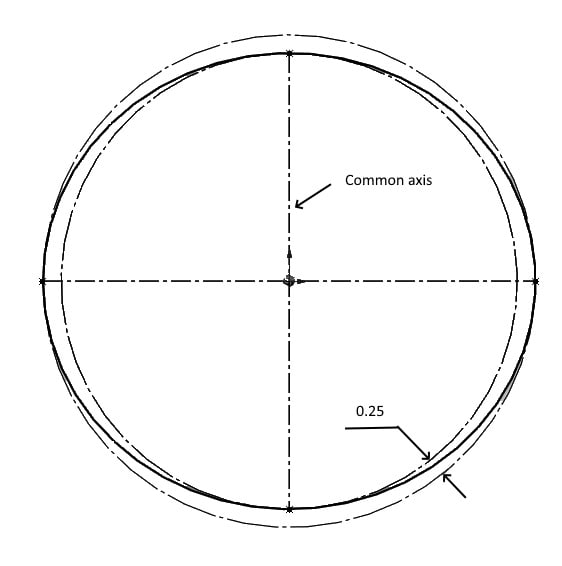
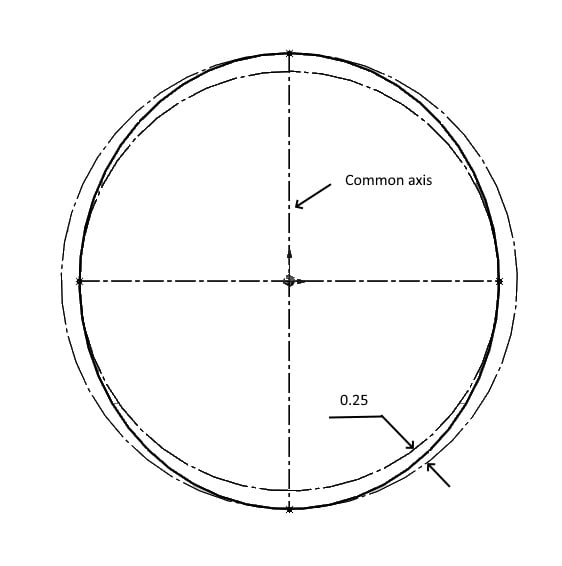
So, it appears the actual ball surface profile tolerance is going to be 0.5, which is twice that of the circularity stated on the drawing.
You just need to interpret it per its definition in the standard. It is rather simple mathematically.
You have two spherical surfaces that are concentric. You expand the smaller one until it touches the spherical. You also contract the large one until it touches the spherical surface. The thickness or normal distance between the two spherical surfaces is roundness or sphericity.
Best regards,
Alex
You have two spherical surfaces that are concentric. You expand the smaller one until it touches the spherical. You also contract the large one until it touches the spherical surface. The thickness or normal distance between the two spherical surfaces is roundness or sphericity.
Best regards,
Alex
Diametrix said:The "ball people" usually have grades for balls, which include loose size tolerances and tight sphericity tolerances. Rule #1 would not let you match that.
I was specifically talking about our balls. We only have a -0.04 size tolerance on the balls without additional geometric control and they don't leak.
For a ball in a pre-load ball screw, I'm sure a size tolerance only won't work.
- Status
- Not open for further replies.
Similar threads
- Locked
- Question
- Replies
- 14
- Views
- 1K
- Replies
- 23
- Views
- 7K
- Locked
- Question
- Replies
- 9
- Views
- 5K
- Replies
- 20
- Views
- 12K
- Question
- Replies
- 17
- Views
- 7K

![[sad] [sad] [sad]](/data/assets/smilies/sad.gif)
