Continue to Site

Eng-Tips is the largest engineering community on the Internet

Intelligent Work Forums for Engineering Professionals

  • Congratulations KootK on being selected by the Eng-Tips community for having the most helpful posts in the forums last week. Way to Go!

ASME Y14.45 Public Review and Comment Period - July 24th to September 20th, 2020 2

Status
Not open for further replies.

Dean Watts

Mechanical
Apr 12, 2020
105
Hi All,

ASME Y14.45, a new standard titled "Measurement Data Reporting", is now available for public review. Comments need to be provided using the ASME form that I will attach to a separate post, to Fred Constantino at ASME, per the instructions on the form. The last day that comments will be accepted is Tuesday, Sep 22nd, 2020.

I've attached the public review draft file. It is also available here Link

Dean
www.validate-3d.com
 
 https://files.engineering.com/getfile.aspx?folder=e8bca9df-0dd4-494b-8007-fab402efb7a1&file=ConstantinoF-Y14.45_Draft_Public_Review.pdf
Replies continue below

Recommended for you

Thank you Dean.

Back to the topic at hand, great work with the Y14.45 draft. It is interesting to see standardization applied to reporting.
 
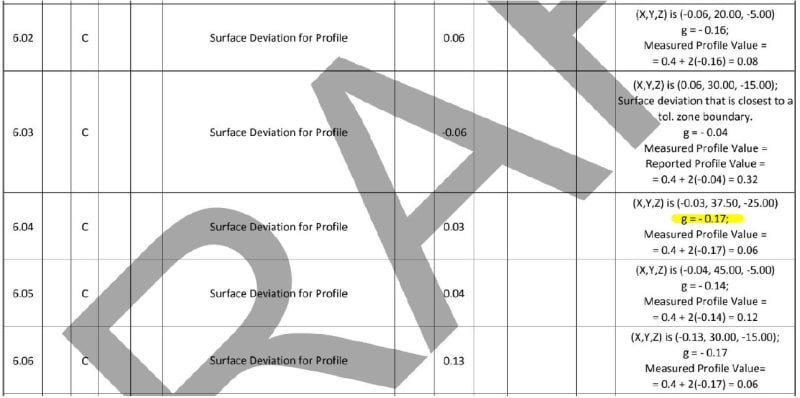
Please ref to Figure 9-4 as shown below, I am confused on how to get the data of g = - 0.17. Thanks for anyone who can give me a light here.
Will post it in a new thread should this is not the right place to talk it.
Fig_9-4_Q_gkpyw7.jpg


Season
 
SeasonLee,

I checked the calculation, and the numbers are incorrect in that cell in the table. The g value should have been -0.13, and the measured profile value should have been 0.14.

Thanks for pointing this out. I'll check the latest draft to make sure it was corrected.

Evan Janeshewski

Axymetrix Quality Engineering Inc.
 
Thank you SeasonLee and Evan,

With many eyes reviewing the Y14.45 draft, no one had noticed that error yet. Thank you. This item in Fig 9-4 has been fixed now in the draft. The next public review should be occurring during the month of December. I hope the standard will be released sometime around mid-2021, but that will depend upon ASME's processes for getting the draft published.

Dean
 
Further two more questions I have while on my understanding how to write the profile measuring report:
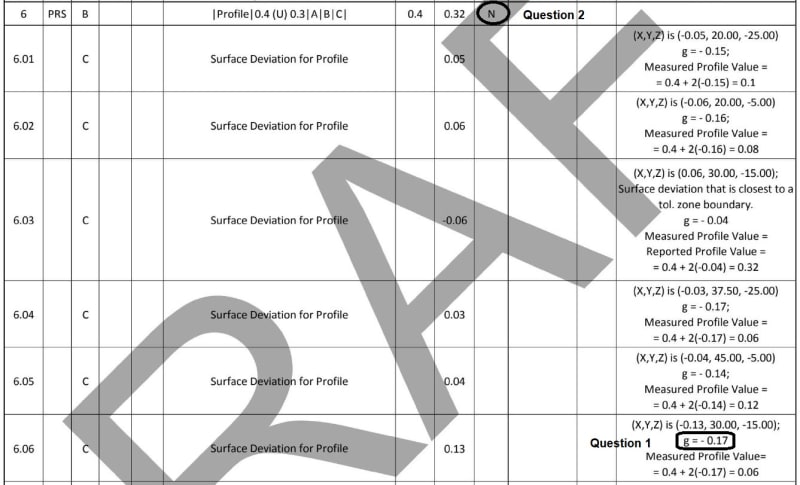
1. From the same logic, I cannot figure out how to get this g value -0.17 as shown below.
2. The reported value 0.32 is within the tolerance zone boundary, why reject this part?

2020-11-20_075611_ii7obd.jpg


Thanks in advance for the help.

Season
 
SeasonLee,

I would assume that the rejection of the surface profile characteristic is due to the unequally disposed tolerance zone. A deviation of 0.3 is allowed in the external direction, yet 0.32 was measured.
 
SeasonLee,

1. The g value is based on the proximity of the measured point to the tolerance zone boundaries, and this gets more complicated with unequally disposed profile tolerances like the one in Figure 9-4. The specification is 0.4 (U) 0.3, which means that the MMB is at +0.3 from the true profile and the LMB is at -0.1 from the true profile. The deviation of the measured point from the true profile in 6.06 is 0.13. So the point is (0.3 - 0.13 = 0.17) inside the MMB which would give a g value of -0.17. The measured point is (-0.1 + 0.13 = 0.23) inside the LMB, which would give a g value of -0.23. The g value for the measured point is based on the "worst" condition relative to a tolerance zone boundary. In this case, the measured point is closer to being out of tolerance relative to the MMB so the g value corresponding to that boundary (-0.17) is used. Another way of expressing this is that the larger of the two g values should be reported. In this case, it's the one that is less negative.

2. The N indicating that the tolerance is not accepted was incorrect in the public review draft - it should have been Y. This error has since been corrected. You're correct that a reported value of 0.32 for a profile tolerance of 0.4 should be conforming.

Evan Janeshewski

Axymetrix Quality Engineering Inc.
 
Jacob

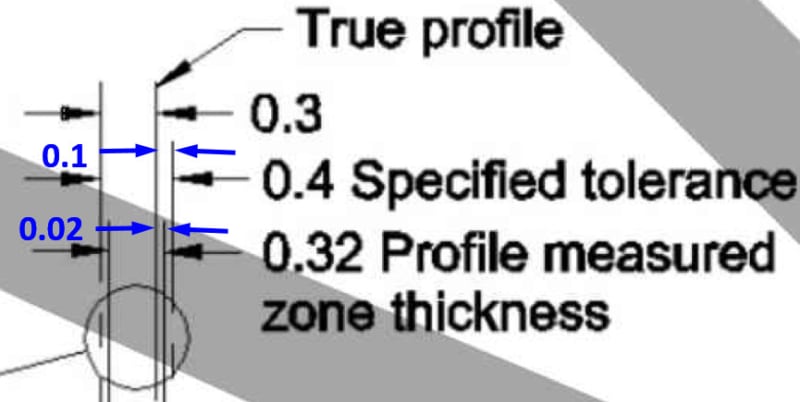
I think you are right, but can we think that .002 is also within the 0.1 tolerance zone as shown below.
2020-11-20_112551_mn6nbj.jpg


Regarding the g value, I will assume -0.17 = .030 - .013, am I right?

Season
 
Evan

Thanks for your input but I didn't noticed before my posting.

Season
 
Status
Not open for further replies.

Part and Inventory Search

Sponsor