Continue to Site

Eng-Tips is the largest engineering community on the Internet

Intelligent Work Forums for Engineering Professionals

  • Congratulations KootK on being selected by the Eng-Tips community for having the most helpful posts in the forums last week. Way to Go!

Can anyone suggests a good reliable source for fatigue life of 17-4ph H1025?

Status
Not open for further replies.

ParthZala

Mechanical
Dec 12, 2017
14
I am trying to find an S-N curve and/or the strain-life curve of 17-4ph h1025.
I found the data for high temperatures on the AMS website but nothing at room temperature. That is strange, I believe if it is tested at high temperature than there should be some reports available for room temperature fatigue life. Please lead me to the source.

Thank you
 
Replies continue below

Recommended for you

MMPDS would be the best source.
Caution, with 17-4PH the actual strength, original material size, and sample orientation are all important.
So how the material was made. Most 17-4PH is air melted, but it is available as re-melted product that has much higher toughness and fatigue properties (especially transverse).
The toughness and fatigue properties of 17-4PH start dropping off above 1" thick, and tank above about 4" (this is why 15-5PH exists).

= = = = = = = = = = = = = = = = = = = =
P.E. Metallurgy, consulting work welcomed
 
Thanks for the detailed explanation. The two things that took my interest the most are "how it's made" and "sample orientation". Can you refer me to somewhere where I can have some more details on that? I am working on a part failure analysis. Got results from a lab but those results are indicating multiple theories and I am trying to zero out the reason of failure based on stress cycle other factors.

Any help will be appreciated.

Thanks
 
So what is the item? You need to know the size and shape, as well as how it was formed from the raw material, and what size that was.
This is an alloy that for aerospace work prohibits the cutting of plate to make bar. With plate you have three directions; L - longitudinal, this is the rolling direction; T - transverse (more accurately LT long transverse) which is the width of the plate; and ST - short traverse, which is the thickness.
If they started with a thick piece of stock and machined a smaller part of of it then both orientation and location within the raw material could play a roll.
The toughness and fatigue properties will be descending in that order as well.

= = = = = = = = = = = = = = = = = = = =
P.E. Metallurgy, consulting work welcomed
 
ParthZala-

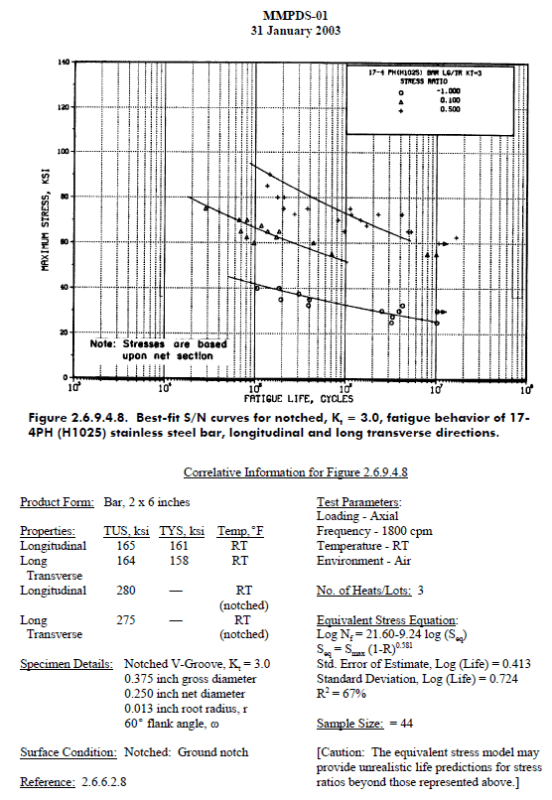
Below are S-N curves from MMPDS for notched 17-4 PH cond H1025 bar, which may differ from your case. These curves are for AMS 5643 which is air melt quality material. AMS 5622 is a vacuum melt quality form of the same material, and would have better fatigue performance as EdStainless noted.

Hope that helps.

Capture_w0bk5i.png
 
Thsnks tbuelna thanks for the help. This graph shows results with stress concentration 3. Can you please suggest me how I use this for fatigue analysis? Ideally I believe I need fatigue test results of test done without notch so no stress concentration.

Thanks
 
Status
Not open for further replies.

Part and Inventory Search

Sponsor