Continue to Site

Eng-Tips is the largest engineering community on the Internet

Intelligent Work Forums for Engineering Professionals

  • Congratulations KootK on being selected by the Eng-Tips community for having the most helpful posts in the forums last week. Way to Go!

Cracking of 4140 During Q&T 1

Status
Not open for further replies.

mfritze

Mechanical
Aug 12, 2013
32
IMG_20160906_143708_tmrvzb.jpg


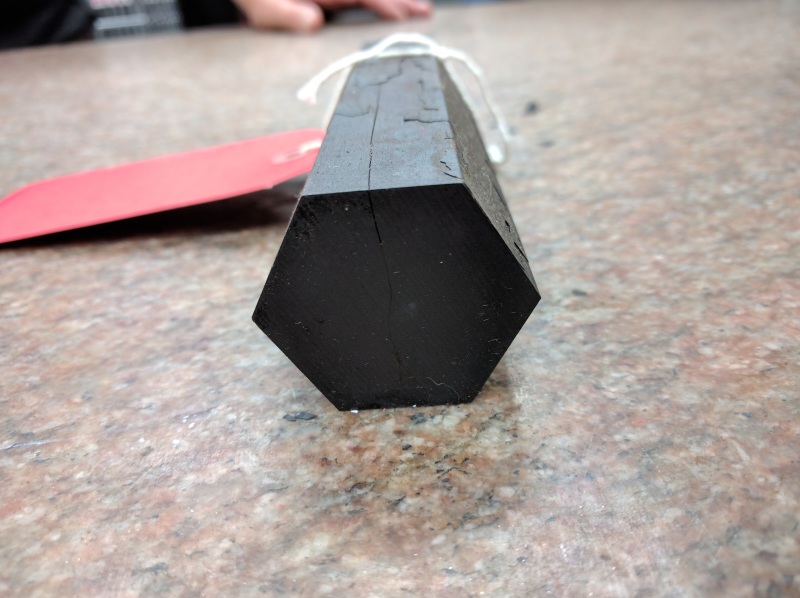
Any thoughts on what would cause this crack of 1.5inch hex stock,4140, Q&T to 30-36HRC per AMS-H-6875?
Heat treat schedule is like this:
Harden 1575F 1.5hrs oil quench
Temper 1050F 3.0hrs oil cool

About 1 out of every dozen stock like this crack. My first thought is to add a normalize step prior to quench. Ideas?

Thanks,
 
Replies continue below

Recommended for you

This appears to be a quench crack, which could be due to high concentration of phosphorus, sulfur, or other contaminants.

I am not convinced that normalizing would eliminate this condition, but it may help.

Have a good metallurgical analysis completed (chemical composition, microstructure, fractography, hardness/strength) to determine the root cause(s).
 
Do you have any results of cooling power of the oil? Something along the lines of a comparative cooling curve? We let our marquench oil get fairly oxidized and saw a significant increase in it's cooling rate. This was beginning to cause excessive distortion of the parts that we heat treat. I'd be surprised if it were enough to cause cracking in a steel like that but it's good to make sure the quench is working the way you expect it to be.

Aidan McAllister
Metallurgical Engineer
 
Sharp corners should be avoided in parts like this because they represent stress concentrations, and cracks often initiate at these types of locations during quenching. It is best to incorporate as large a radius as the design will permit at such corners.

Maui

 
yes all good info. but I disagree about the normalize. I would normalize & sub-critical anneal all the stock prior harden and temper in addition pre heat the stock per AMS2759/1 or 2 prior to harden and quench.
the oil used may be to fast acting and the stock is cracking due to residual stress in the stock. try a couple of sample parts.
 
Is there a micro (or macro)? How much reduction was there in the rolling? How uniform is the structure?

= = = = = = = = = = = = = = = = = = = =
P.E. Metallurgy, Plymouth Tube
 
mfritze... observation...

I assume that Your 1.50" hex stock is actually 1.5"-flat-to-flat dimension; and 30-to-36HRc = HT136-to-160-KSI [a very odd/non-standard HT range for 4140 HT per AMS-H-6875].

REF MMPDS-10 Metallic Materials Properties Development and Standardization
Table 2.3.0.2. Maximum Round Diameters for Low-Alloy Steel Bars (Through Hardening to at Least 90 Percent Martensite at Center)
Note a.
This table indicates the maximum diameters to which these steels may be through hardened consistently by quenching as
indicated. Any steels in this table may be used at diameters less than those indicated. The use of steels at diameters greater
than those indicated should be based on hardenability data for specific heats of steel.


Figure 2.3.0.2. Correlation between significant dimensions of common shapes other than round and the diameters of round bars. ...

The equivalent round for 4140 Hexagon bar is ER = 1.1 X [flat-to-flat dimension]

For Your Hex-stock, ER = 1.1 X 1.5" = 1.65"-ER

In the case of 4140 </=180-KSI the 'Maximum Diameter of Round or Equivalent Round, inch' for full thru quench-hardening [Note a] is limited to 1.0". For Your large hex bar, 1.65"-ER is WAY larger than QT permits for appropriate metallurgical properties... without lot/heat specific testing and metallurgical examinations permit.

Based on this 'simplified' examination there WILL be QT problems with Your hex bar.

NOTE.
Normally hex-bar like Yours is used to make parts with OD smaller than the HEX and will have a hollow ID. IF this were rough-machined to meet R/ER of 1.0 [or less to be viable for tempering] for QT operation... then be finish-machine to drawing tolerances... You probably wouldn't be having these problems.

NOTE.
IF enough machining allowance is available on the rough-machined part, then air-furnace HT/Q decarburization/scale/etc could be 100% eliminated when the surfaces were finish-machined to the final product dimensions.


Regards, Wil Taylor

o Trust - But Verify!
o We believe to be true what we prefer to be true. [Unknown]
o For those who believe, no proof is required; for those who cannot believe, no proof is possible. [variation,Stuart Chase]
o Unfortunately, in science what You 'believe' is irrelevant. ["Orion", Homebuiltairplanes.com forum]
 
To comment on what WKT said, we cold draw tubing in 4130 and 4140, with round ID and wither HEX or OCT OD, and also shaped ID with round OD. This makes HT much easier and reduces the amount of machining.

= = = = = = = = = = = = = = = = = = = =
P.E. Metallurgy, Plymouth Tube
 
A few things I would check out
First, how is the stock is cut into lengths. From the photo, it appears to be cut by a band saw. How are the lengths cut by the mill? If they are cold sheared, it is possible that the ones that are cracking are the ones from the end of the cold sheared bars and cracks from the shearing operation are opening up during the quench. This could explain why you are getting one out of 12. How many lengths do you get from a bar, 24 or so?

Second, whenever I see a quench crack, I wonder how cold the part was quenched. That is, what is the temperature of the material before it goes into the temper? I wonder if you are letting the material get too cool after quench and before temper.

If you can observe the operation, check out what the quench time is (how long the load is in the quench) and the amount of time that is spent before quench and temper. If you can get a non-contact temperature probe, check the temperature of the work pieces immediately prior to temper. With 4140, you really don't need to cool below 300F (and cooling below 400F can be done slowly, that is, in air). If the parts are cooling to room temperature (below 100F), that could be your problem right there.

Finally, from the photo it would not seem that sharp corners are your problem, which would also make me want to rule out degradation of the quench oil (the cracks are not initiating at the corners). The fact that these are splitting down the center suggests there may be a center condition with the starting material. If this was the case, however, I would expect the cracking would occur in bunches, not randomly 1 out of 12, as all the pieces in an affected bar would have an increased tendency to crack.


These types of posts that start out with one question always end up with a 100-more.

mfritze. Please go through more of your fish bone analysis and we may be able to get you better. With the info you gave it could have been in the as-received material or resulted from the quenching.

UM

 
Thank you all for the responses, its given me a lot to consider.

Given the small batch size, large structural margins, and that it is load tested, I am going to switch to 4340 with a more standard heat-treat per WKT comment. I don't think I could convince management to pay for a full metallurgical analysis. If problems persist then we will have to rough machine prior to heat-treat (which I am trying to avoid due to added cost).
 
I am not sure that switching to 4340 is going to solve your problem. While what WKTaylor has posted is accurate, it does not address the cracking issue and 4340 has just about the same quench crack sensitivity as 4140.

Now, you may find that it solves your issue if the root cause in in the raw material supply, merely because you have changed the material, which may come from a different mill or have been subjected to different processing by the mill. If the root cause is in the heat treat processing, I am doubtful that switching to 4340 is going to fix it.
 
Any idea when the bar cracks? During hardening? During the quench? During the temper? The bar looks black too. Are you liquid nitriding after you temper too? Are you third party heat treating them or do you have full internal control?

My gut tells me the crack is being created when you shock the bar during the quenching process. My logic being that the cooling rate is too fast and causing the "skin" to contract so much that it tears itself apart. Solution? Raise the temperature of your oil a bit to lessen the shock. Yeah you sacrifice a bit of strength/hardness, but how much strength do you really need with these bars?
 
You may do better with purchasing pre-hardened material such as Maintenal or Sheffield #10 which is offered in the hardness range you need 156-164 ksi). I know it comes in bars and flats as our maintenance team frequently used this product. You will have to see if hex is available but a good band saw will easily handle this material.
 
Status
Not open for further replies.

Part and Inventory Search

Sponsor