Continue to Site

Eng-Tips is the largest engineering community on the Internet

Intelligent Work Forums for Engineering Professionals

  • Congratulations IDS on being selected by the Eng-Tips community for having the most helpful posts in the forums last week. Way to Go!

Drawing - View Boundary Part Edges 1

Status
Not open for further replies.

Keith_

Mechanical
Mar 23, 2020
3
Hello,

I am trying to find a way by using the drawing boundary (manual rectangle) to make a drawing view smaller. Adjusting the rectangle works to cut-off parts that are outside of my intended view. Is there a way to show intersected edges, such as the red line I drew below?
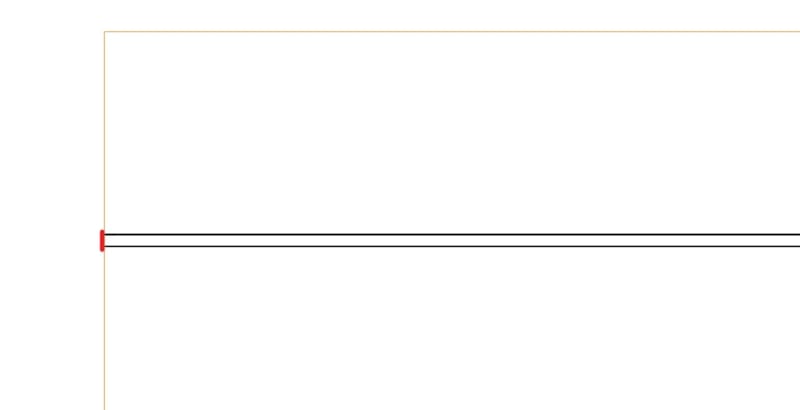
Annotation_2020-03-23_161111_kt7dqp.jpg


Thank you!

Keith
 
Replies continue below

Recommended for you

So I understood you correctly, you want to draw a line between the borders of two different views?
Although you can sketch on the sheet itself, you cannot reference the borders of the views on it.
So, drawing lines on the sheet itself is possible, but it won't be associative.

Ronald van den Broek
Senior Application Engineer
Winterthur Gas & Diesel Ltd
NX9 / TC10.1.2

Building new PLM environment from Scratch using NX12 / TC11
 
Hello Keith,

As per my understanding, you mean to say, if I drag the rectangle to select the object, there should be option that it will select the object/objects which are fully inside the rectangle & will not select the objects which are crossing the selection rectangle box.
& its depend on rectangle that we are dragging from left to right or right to left.....
This option is available in Auto-cad.

Mangesh.
 
Hi Cowski,

A view break does work in this application, and is currently what I am using. I am trying to re-create a feature a previous CAD system had, which would draw these part-boundary intersection sketch lines automatically. Hopefully these pictures explain what I am trying to do.

Original part:
Annotation_2020-03-24_111407_osavkc.jpg


Single-sided view break:
Annotation_2020-03-24_111434_netfkz.jpg


Manual rectangle boundary that is smaller than part:
Annotation_2020-03-24_111520_jijhun.jpg


Manually drawn lines at part-boundary intersection:
Annotation_2020-03-24_111711_q4uluy.jpg


Is there a way to get the last step by enabling an option?

One could argue that the proper way is a regular view break, as shown below, but this is not the legacy feature I am trying to re-create.
Annotation_2020-03-24_112409_orvpus.jpg


Thanks!

Keith
 
There is no option that I know of to get exactly what you want. If this is part of an existing drafting standard, you should contact GTAC so they can implement it; they give greater weight to existing drafting standards when adding functionality. However, since your procedure will essentially create a "not to scale" view without any indication to the reader, I suspect it is a non-standard practice...

www.nxjournaling.com
 
What is available in a different system is completely irrelevant because we are not discussing that system in this forum.

I think that you want a line where the view boundary cuts off the model contour, and no, NX will not create that automatically.
You can draw that line yourself, either having the view or the sheet as the active sketch view. If its drawn on the sheet, it will not follow if you move the view.
if its drawn "in" the view, it will follow if the view is moved but you will have to draw the line slightly -slightly inside that border, else it will not be visible.

Regards,
Tomas


Btw, a detail view will do "partly" what you are looking for, the boundary will be visible and the contour stops at that boundary.

/ Tomas

 
Status
Not open for further replies.

Part and Inventory Search

Sponsor