Continue to Site

Eng-Tips is the largest engineering community on the Internet

Intelligent Work Forums for Engineering Professionals

  • Congratulations KootK on being selected by the Eng-Tips community for having the most helpful posts in the forums last week. Way to Go!

Flush Type Clean out Door NDT Reqd. 2

Status
Not open for further replies.

syed051

Mechanical
Apr 20, 2015
3
Dear Experts,
Kindly let me know, Which NDT is feasible to proceed with accurate result of Flush Type Clean Out Doors of newly construction of water Tanks? We recommended contractor to conduct PAUT but they decline stating it will provide fake result as there is a gap of 1.5MM in the assembly of RF pad-to-Neck plate Fit-up.
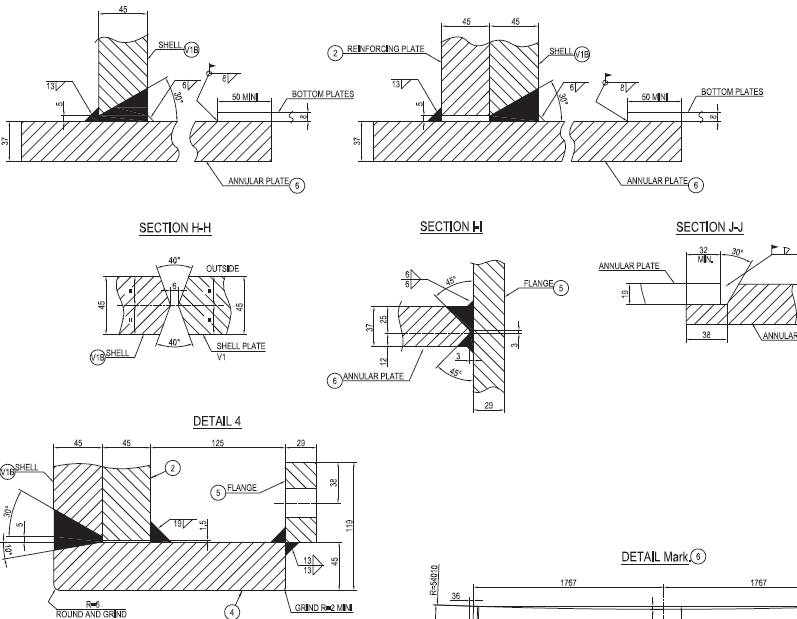
FTCO_i2qagk.png
 
Replies continue below

Recommended for you

I think UT inspector will be able to judge accurately whether it is fake signal or not.
 
I wasn't entirely clear from your original post; so I will ask for clarification. Is the contactor telling you PUAT will give false readings the fabricator or your NDT contractor? I will proceed assuming that you are talking about your fabricator. What type of inspection is he recommending in the place of PAUT? I'm guessing that you have a UT tech on site for other welds on the tank. He should be able to inform you about whether or not he is capable of inspecting the weld due to the gap. If you are talking about the NDE technician call his company and speak with whoever writes their inspection procedures about the problem. They will be able to recommend an alternative inspection plan based on code requirements and the feasibility of inspection.
 
Thanks all,
Its the fabricator,who declares PAUT is not applicable as when we asked them to conduct PAUT in beginning, all joints got rejected and now instead of PAUT they are performing UT only in which We are not able to identify all the defects and joints are getting accepted. As per API 650 its directly represented "UT in lieu with RT" so have no backup of any standard/Spec. through which we as a consultant can demand for PAUT instead of any other NDT.
 
Most fabricators don't like NDT methods which causes their work to be rejected. If PAUT showed indications were any of them marked up and excavated? Were the indicated defects actually found? If so then that should prove the acceptability of the method. I'm not as well acquainted with ultrasonic methods as I am with RT, PT and MT; because, I have never performed or been certified to perform ultrasonic testing. With that being said my understanding is that any defect that can be detected with PAUT is detectable with regular sheer wave UT. The PAUT scans all wedge angles simultaneously, and the only reason is would be unacceptable was limited space making it difficult to maneuver the array. Watch the manual UT to make sure that the technician is scanning all of the wedge angles indicated on the inspection report. This sounds like a fabricator try to keep the repair rate down to me, but as I said I'm not as knowledgeable about ultrasonic testing as I should be to fully answer your question. Your NDT contractors LV 3 technician should be though.
 
The manual UT tech should be able to determine if he has the room to get the sound thru the weld. They very well may get a signal at the gap where the RF plate is gapped, however simple trig will tell them if thats where the signal is coming from. If i am looking at the detail correctly (4)and the RF pad is on already the weld would need to be scanned from the ID of the tank shel to induce sound into the weld, he could get a partial look at the weld from the ID of the fluch clean out but you may miss the shell side bevel near the root. These should be scanned prior to the RF pad being installed so the tech could shoot sound from both the ID and OD of the shell.
 
PAUT is currently mandated by API, over manual UT; when using "UT in lieu of RT". If the Owner, and the Owner's Inspector declare that manual UT be used in your spec, the builder is obliged to comply. And yes, fit-up gaps like the above will give a large indication. And basic trig will show where the gap is. Just make sure that the UT tech, manual or PAUT, can do that trig evaluation.
Poorly trained UT techs have historically caused a lot of false rejects because of the above, and welds with backing bars. But only the lousy techs. NOTE: I do MT, PT, RT, UT and have trained on PAUT.
 
Duwe6,

With your UT experience if you had a similar corner joint as seen in the above 'Detail 4'.. but with a full-penetration weld throughout the insert and repad thickness; Is this something a competent level II UT could handle in a shop environment or would you be leaning more towards PAUT?

This is something that needs to be checked pre and post PWHT with the same tech.
 
I always lean toward PAUT; it gives a 3-dimensional data set, in color. But yes, a good L/II UT tech can successfully scan your joint, BUT that tech will need to plot out the results to be sure of the results. Would be a very good thing to give the teck multiple copies of a scaled dwg [like above] with a grid overlaid on it. Makes it easy to plot out 'indications', and dtermine if those indications are flaws, or just geometric reflections.
 
Status
Not open for further replies.

Part and Inventory Search

Sponsor