Eng-Tips is the largest engineering community on the Internet

Intelligent Work Forums for Engineering Professionals

  • Congratulations waross on being selected by the Tek-Tips community for having the most helpful posts in the forums last week. Way to Go!

GD&T Novice - Help/guidance greatly appreciated

Status
Not open for further replies.

Geordil

Mechanical
Jul 25, 2018
19
0
0
US
Continuing this from the other thread so as not to hijack.

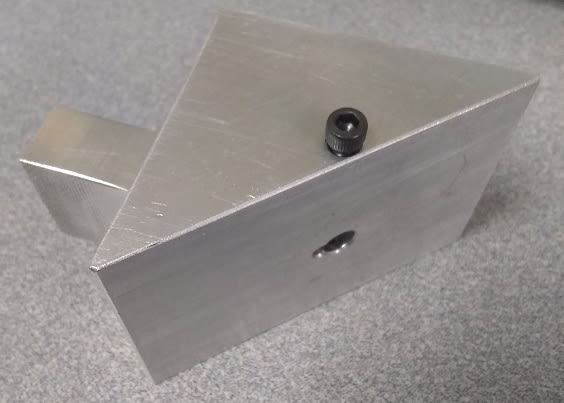
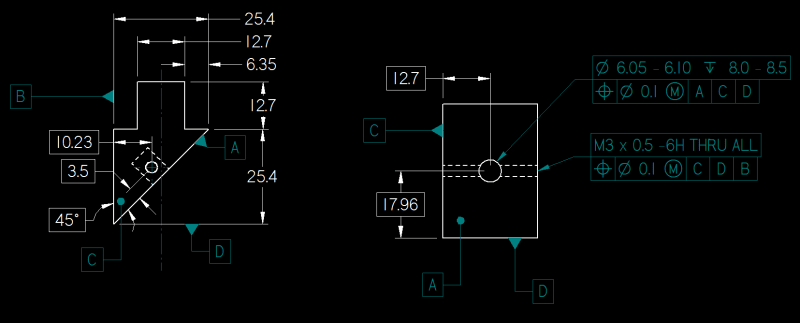
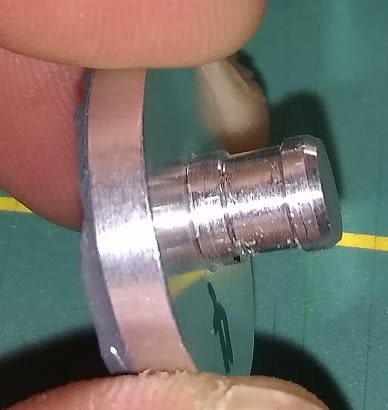
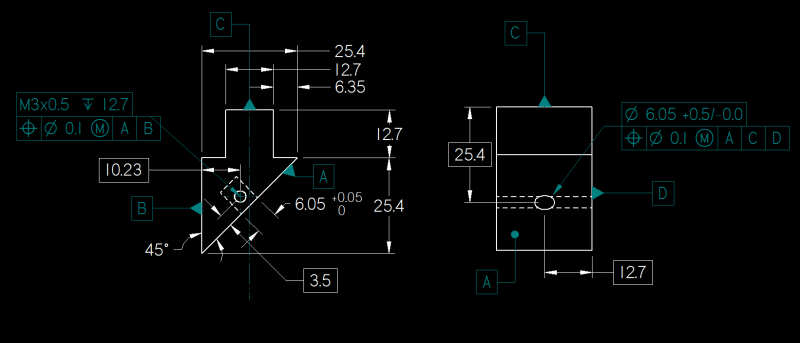
Here is what I have so far, after making some adjustments based on advice already received.

I_have_no_idea_whats_happening_uwuq4t.png


Thanks to all in advance.
 
Replies continue below

Recommended for you

Here is a picture of the actual part, but I'm changing it so it's made from 1" square bar stock instead of 2" and removing the relief hole.
IMG_20181012_160746268_epmnpv.jpg
 
Geordil,

Based on the original post by sammcc in thread1103-445168, I will assume that you are also working to ASME Y14.5 (-2009 specifically). If not, please specify.

ASME Y14.5-2009 para. 1.4 (g) said:
Dimensions should be shown in true profile views and refer to visible outlines.
This means the unthreaded hole should be dimensioned in a view where it appears circular or in a section view where the cutting plane contains the hole's axis. Neither of these are currently shown, so an additional view is probably required.

The 12.7 depth value in the threaded hole callout is not really meaningful because there is no material at that depth. The drawing should make it visually obvious that the threaded holes go through to the unthreaded hole, and the callout should probably read "2X M3x0.5" or possibly "2X M3x0.5 THRU".

A section view where the cutting plane contains the axes of all three holes would probably be a good way to handle all of the above.

The hole callouts should not be in boxes. That notation is typically reserved for basic dimensions.

With the datum reference frames currently used for the position tolerances, the 45° dimension needs to be basic.

If the threaded holes are for set screws that engage another part inserted into the unthreaded hole, then the combination of datum reference frames currently used does not make much sense.


pylfrm
 
Pylfrm,

Okay, I think I understand. A few more questions...

I will add a view that contains the axes of the three holes and dimension said holes in that plane. Is there an accepted way to identify that view, or should I just indicate datums in the view and write a description?

For the hole callouts, specifically the M3 callout, should I use thread class, like 6H, to designate tolerance? And then the positional tolerance would be called out in a feature control frame?

When should I or shouldn't I use basic dimensions, and is there no tolerance associated with them? My impression was that the tolerance for basic dimensions was called out in the FCF, but it seems it's that's not the case.

pylfrm said:
If the threaded holes are for set screws that engage another part inserted into the unthreaded hole, then the combination of datum reference frames currently used does not make much sense.
Here's, I think, where my basic misunderstanding lies. The set screws on this part need to be positioned to hit a certain groove in the mating part, and the hole for the mating part needs to have as little play as possible. What datum reference frames would be best to use here?

I have a copy of ASME Y14.5-2009 and have been trying to pick stuff up from there before asking here, so if there's sections or figures that answers any of my questions please feel free to just refer me to those.

Thank you!
 
Okay, here's what I've got so far. I know the hole callouts should not be in boxes, but I haven't figured out a clean way to do that in solid edge yet.

Still not sure what should and should not be a basic dimension, but I'm basing my understand of the concept on figure 3-29 in ASME Y14.5-2009.

The other thing I'd like to specify is that the hole on the angled face should be as "in line" as possible with the half inch tab on the top of the part. Is there a nice, elegant callout for that, or should I just stick to positional? Maybe just position on the tab combined with position on the hole.
I_have_no_idea_whats_happening_gxgdma.png
 
My impression was that the tolerance for basic dimensions was called out in the FCF

ASME Y14.5-2009 para. 1.4 (a) certainly implies something like that, but I think it's a bad way of looking at things. Basic dimensions are used to define theoretical perfect geometry from which deviations are measured, so I find it more useful to think of them as not having tolerances at all.


Here's, I think, where my basic misunderstanding lies. The set screws on this part need to be positioned to hit a certain groove in the mating part, and the hole for the mating part needs to have as little play as possible. What datum reference frames would be best to use here?

Presumably there are certain features on this part that determine where the groove in the mating part ends up when assembled. Consider using those features to establish the datum reference frame used to control the position of the set screw holes. It's hard to be more specific without seeing the drawing of the mating part and knowing how the assembly works.


The other thing I'd like to specify is that the hole on the angled face should be as "in line" as possible with the half inch tab on the top of the part.

A more detailed explanation of what you mean here would probably be helpful.


pylfrm
 
I typically approach such problems this way:

1) Identify those surfaces or widths or diameters which will locate and orient the part, typically in order of leverage. This usually is part of a degree-of-freedom count with orientation having first priority, though it is often simultaneous with location. For example a planar surface controls two rotations and, unavoidably, one translation when brought into contact with the mating part, so that is 3 out of 6. 6 is the maximum required, but some cases may require fewer.

2) For each of these surfaces or widths or diameters identify just what type and how much variation is allowed from the most controlling to the least. If the primary is a planar surface, then flatness is usually a start. Then others get either location or orientation tolerances of variation.

3) For each surface that performs a function other than to locate and orient the part, I look at each one and build up references back to the initially selected surfaces and determine the type and how much variation can be tolerated. They may also get individual refinements as required for their function.

4) If there are features that depend on references other than the primary ones, then I identify which features those depend on.

For example, for a block to hold a bearing that has a mounting surface and a couple of mounting holes, those will be the primary orientation and locating features. The bearing bore will be the feature that is controlled to the primary. But a snap ring groove in the bore should probably be controlled to the bore.

In your example it isn't clear what the primary location and orientation are based on. It is also unclear why [D] is of any importance. [D] could be wiped out when the part is deburred.

There are a lot of alternatives, but they depend on how the part is to be installed, how it interacts with other parts and how it is intended to avoid other parts.
 
Okay, I think I understand more now how this all works. It's more simple than I initially thought. Thinking through 3DDave's process, how features relate to each other, how the part is fixtured, machined, and gaged, helped me a lot.

I_have_no_idea_whats_happening_qi3wb9.png


pylfrm,

pylfrm said:
Presumably there are certain features on this part that determine where the groove in the mating part ends up when assembled. Consider using those features to establish the datum reference frame used to control the position of the set screw holes. It's hard to be more specific without seeing the drawing of the mating part and knowing how the assembly works.

So the mating part is just a small test disc like this:
IMG_20181016_123055573_qmi98j.jpg

So lining that groove up with the set screw hole is just a matter of getting those two surfaces mated appropriately. Therefore a flatness tolerance is called for on that surface and that set screw hole should be dimensioned in reference to that surface. I also tried to dimension that set screw hole and the hole for the mating part from same datum features to make sure they line up right. AND, because of the functional necessity of the 'tab' on top and the hole being in line, I dimensioned that tab from the same datum feature. To give greater context, this will be one of two fixtures that will hold one of the aluminum discs each and be pulled apart in a tensile testing machine. This is for adhesives testing.


3DDave,

Thank you very much! Walking through that process really brought everything in focus for me. Extremely helpful. In my text above, and the modified drawing, hopefully you can see how I digested your advice. I really appreciate it.

I'm going to look over it more and make sure things make sense, but the only thing I see now is that my dimensions on the first view look pretty cluttered and potentially confusing. It's also going to a job shop who really won't know what all this GD&T nonsense is, so I'll need to make a more simple drawing after I wrap my head around this.
 
Not exactly GD&T, but the projection of the RH view is not defined. Your original RH view was correctly projected, but your new one isn't.
As noted, "Dimensions should be shown in true profile views and refer to visible outlines." The key word is should; you could instead add "TRUE" to the Ø6.05-6.10 hole callout which would infer that the hole is normal to the surface. While this is not a preferred practice, it may be simpler than correcting and defining the RH view projection.

"Know the rules well, so you can break them effectively."
-Dalai Lama XIV
 
Status
Not open for further replies.
Back
Top