Continue to Site

Eng-Tips is the largest engineering community on the Internet

Intelligent Work Forums for Engineering Professionals

  • Congratulations cowski on being selected by the Eng-Tips community for having the most helpful posts in the forums last week. Way to Go!

High demand 3-5/8" jamb stud connection cantilevering 2" past rough slab edge.

Status
Not open for further replies.

KootK

Structural
Oct 16, 2001
18,563
This thread introduction may well be too long for busy folks to read. If so, you can probably get a pretty good jist of it just by scrolling through the graphics. I won't be lambasting anybody because they bring up something that I have already mentioned in the text.

I've presented some possible solutions below that I would like to have vetted by the gang. Naturally, I would also be utterly thrilled to entertain alternate, better solutions. In my heart of hearts, I'd like to rip out the walls and replace them with the 6" studs that should have been there to begin with. That would not be good client care in this instance however.

THE SITUATION

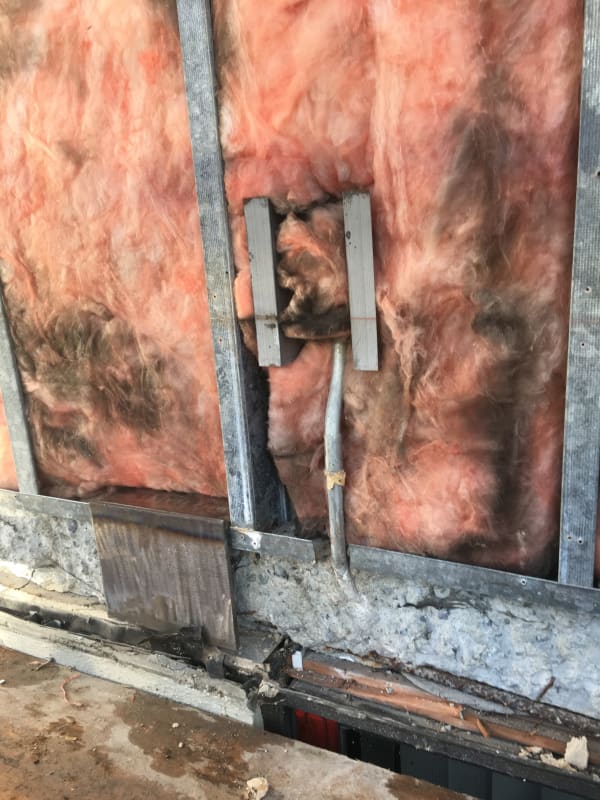
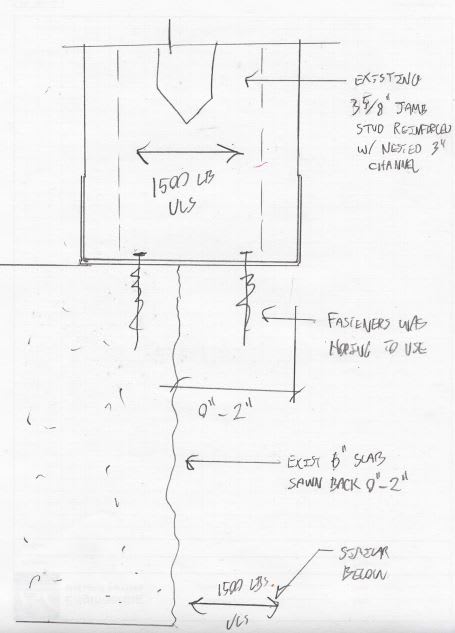
1) existing 3-5/8" jamb stud for a rather large wall opening in a highrise condo.

2) jamb stud will deliver about 1500 lbs ULS wind shear to its slab connection.

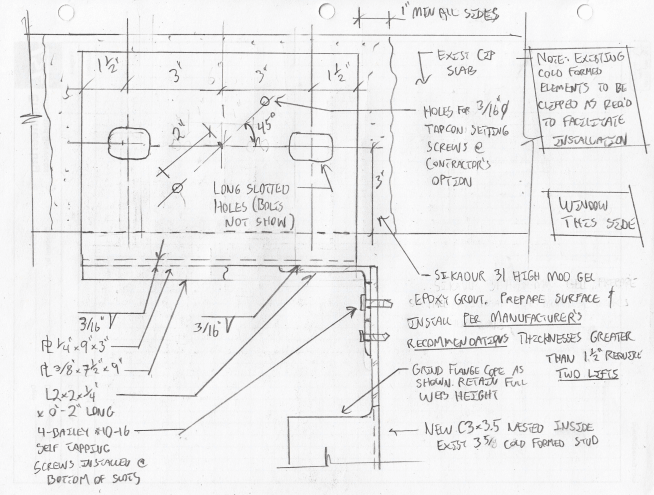
3) jamb stud is already being reinforced with a nested, 3" steel channel.

4) original connection design was some aggressively designed clips and concrete screws.

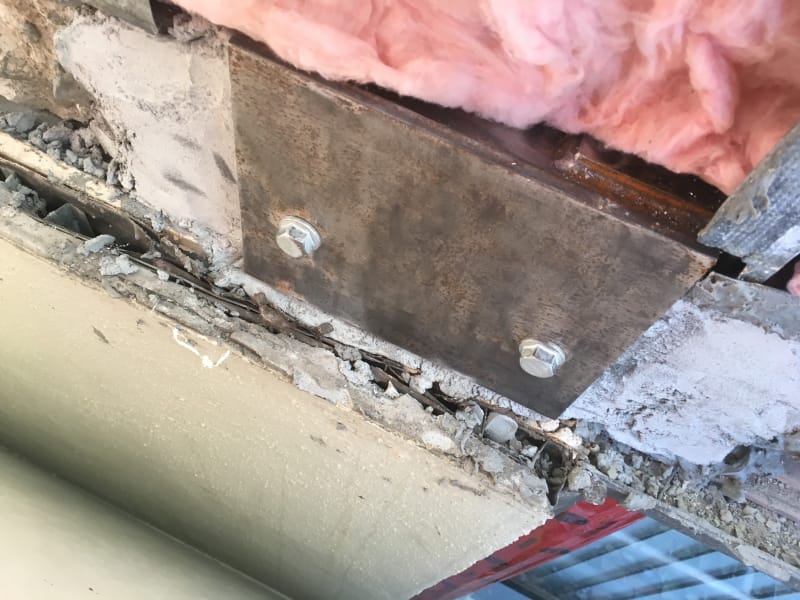
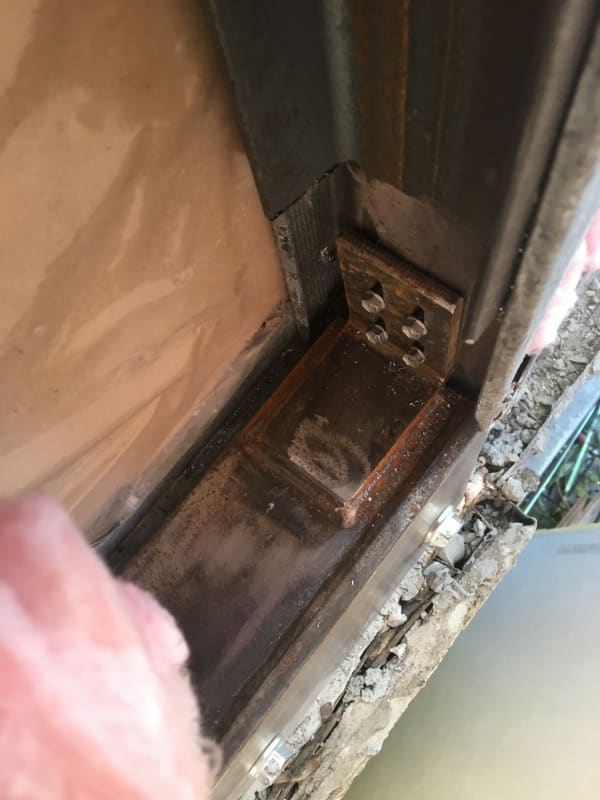
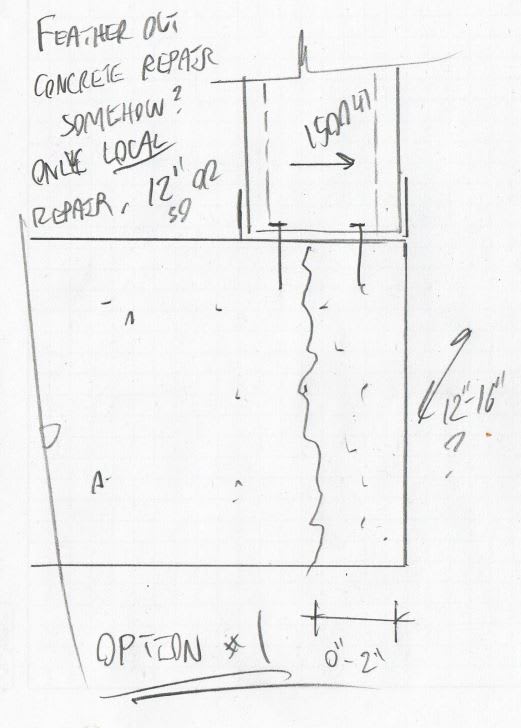
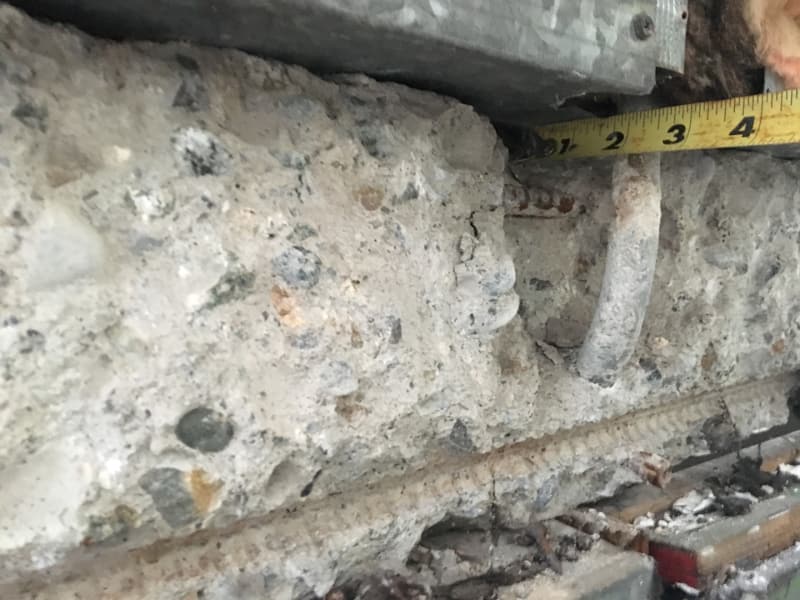
5) site work has revealed that, in some locations, the slab edge was originally saw cut as shown in the the photo below. Some kind of field error presumably.

6) my hardworking jamb stud connection now has a stud cantilever of up to 2".

7) expensive folks are standing around on site seeking direction.

THE CONSTRAINTS (AT LEAST FOR NOW)

8) Existing wall system is to remain in place during repair. Exterior sheathing will come off.

9) Need a solution that works for stud cantilevers ranging from 1/2" min to 2" max.

10) No field welding.

11) Need to be a little sensitive to building envelope concerns. I can, locally, have a bit of steel that would project into the exterior sheathing/insulation space.

THE OPTIONS CURRENTLY TABLED

OPTION 1. For a short length of slab, feather out the slab edge with repair concrete somehow. This would, ostensibly, be pretty great. Can that be done in such a way that we'd trust that repair concrete to be able to handle the fastener shear loads coming in from the jamb studs though? It gives me the heebee jeebess. I also worry that it's hard to do without removing the existing stud work. I would be interested to hear if this solution is viable and, if it is, recommendations for appropriate materials and procedures.

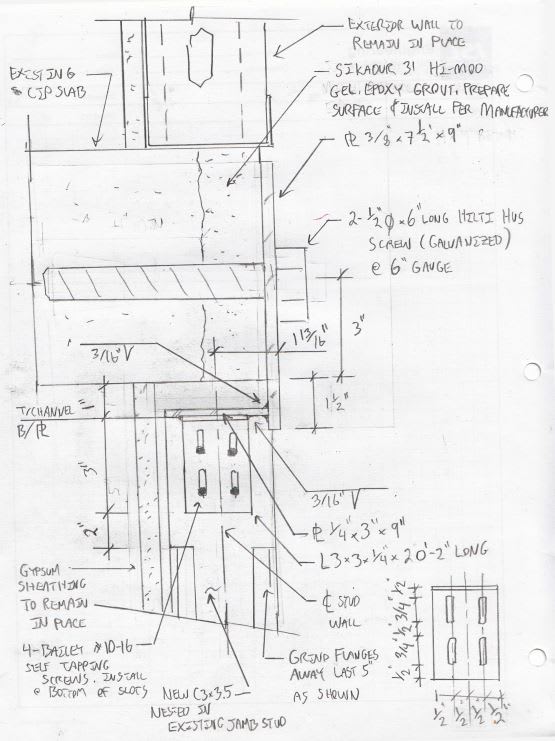
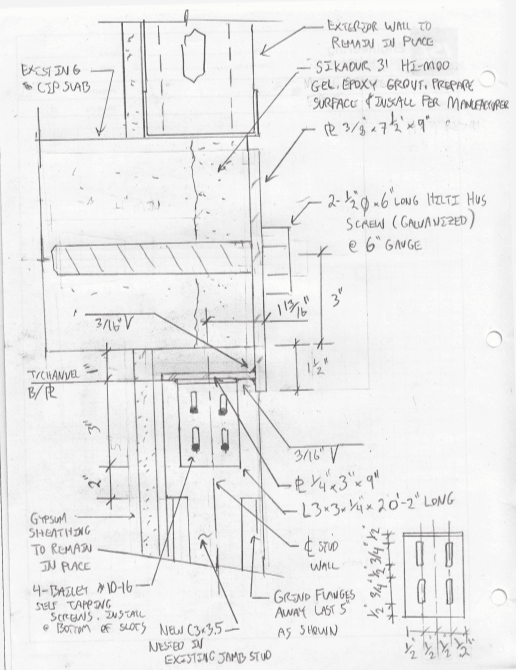
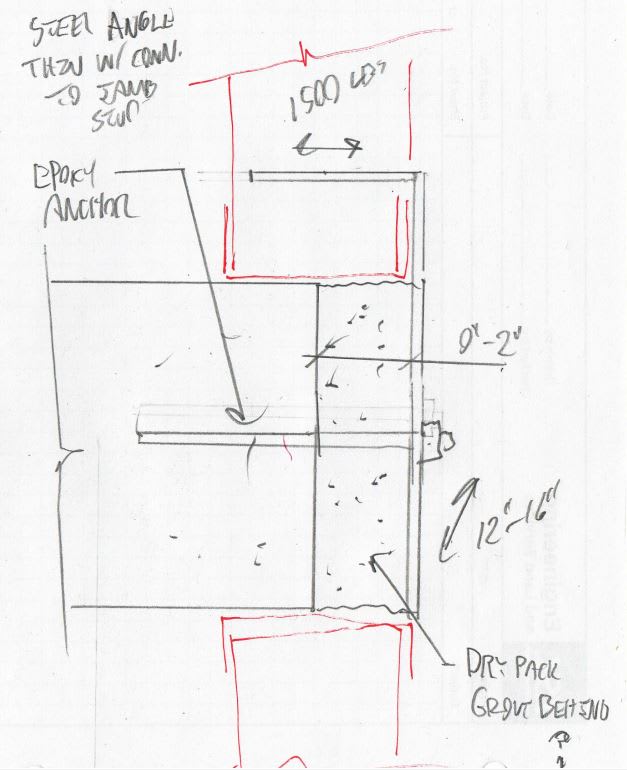
OPTION 2. This is a clever solution suggested by the client. My main concern with this is the viability of the grouting which would need to work at thicknesses ranging from 1/2" to 2". If the grout is installed before the bolt, will it just fall off during drill & epoxy'ing of the bolt? Would it be feasible to install the bolt first, grout around it, and then attach the angle? Could the bolt and angle be installed first, with the angle kept still somehow, and then grout be stuffed in behind the angle as a final operation?

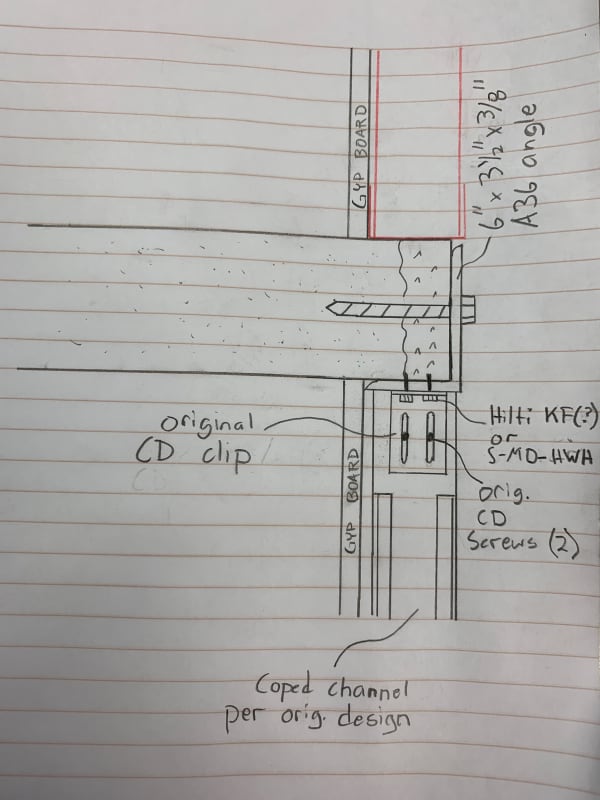
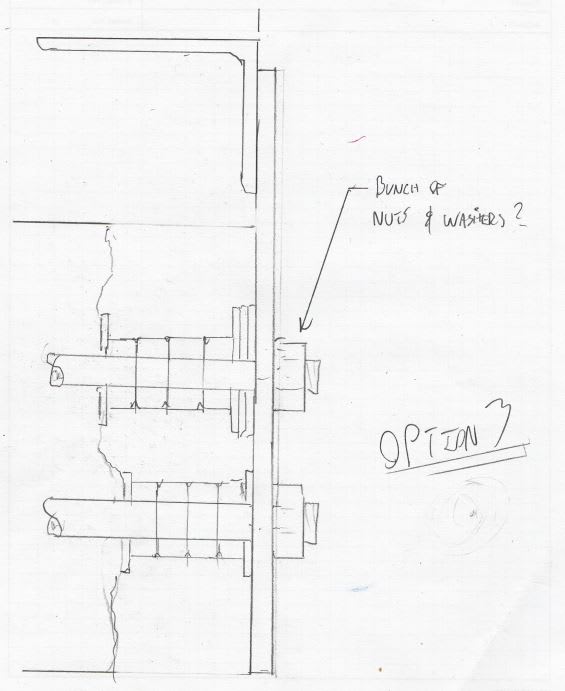
OPTION 3. Similar to option two but no longer reliant on grouting feasibility. It's just... kinda silly looking. I would like to do something similar with a single back side nut, much like traffic sign structure bases are handled sometimes. Given the access situation, however, is there any way that I could use a single, backside not and be confident that it would be locked in place for the long haul? This would be easier at the 2" dimension and harder at the 1/2" dimension I reckon.

c01_ytwxui.jpg

c02_apsi9j.jpg

c05_gtsyed.jpg

c03_fgrurj.jpg

c04_cblfbq.jpg
 
Replies continue below

Recommended for you

Pretty good for only 2 minutes!

Yeah, I had your detail rotated in my head. Seems like it could work but it cuts through the sills and the bent plate would have a high flexural demand to be stiff enough to transfer the load into the bolt. Obviously, only 1500 lbs but still enough to flex a small piece of metal like that.

Ian Riley, PE, SE
Professional Engineer (ME, NH, VT, CT, MA, FL) Structural Engineer (IL)
American Concrete Industries
 
I like TME's setup with the notched angle. Looks like it would provide a solid connection to the stud.

If having it stick up above the floor is unacceptable, you could cut/grind out a slot in the concrete to recess the plate/angle leg, countersink the holes and use flat-head tap-cons (Might need more than 2, though) or drop-in expanding anchors like one of these and flat socket cap screws.
 
That's another way to accomplish the flush condition, kipfoot. Just have to make sure the concrete is chipped out to accommodate the fillet weld, or use a thicker angle and thread the hole (that requires a way to lock the threaded rod in place, such as high-strength threadlocker or a small tack weld on the top or bottom)
 
Interesting development: apparently fire rating from the out side means that I can't have any connection plates projecting past the exterior face of stud. Botls and nuts ok I guess.
 
1) I would like to thank everyone for their contributions on this. 'Twas a great help.

2) See below for the current solution. If anyone spots any issues, I would love to hear about them. You know, other than ridiculous cost.

You know when you develop a complex detail to solve an overly constrained problem and, at the end, you look back and say to yourslef yeah, that's just waaaay too much? This is that for me I'm afraid.

c01_lb4vrz.jpg


c02_rtntvi.jpg
 
Yeah the welded arrangement makes that no fun.

Are you not comfortable with just running your original Kwik-Cons into the grout, hence the need to provide a different load path through the steel? (not saying you should be comfortable with that, you've done the math I'm sure).

6" x 3 1/2" angle is an off-the-shelf size. How about:

angle_bxdql3.jpg
 
jgKRI said:
Are you not comfortable with just running your original Kwik-Cons into the grout, hence the need to provide a different load path through the steel?

That's right, I am not comfortable relying on the grout repair to serve as equivalent to original concrete from the perspective of anchor edge performance. To be frank, I didn't run any numbers on that. I don't actually know how to. It came down to just my visceral feel for whether not I could trust the patch to be stuck on there awesomely. In a way, I was kind of hoping that I'd come here and hear a whole bunch of "don't be silly, just count on the screws in the grout!". But, alas, I did not hear that. As a data point, can you tell me if you would be comfortable with just the original screws in the grout repair? Better still, do you know how to run the numbers on that?

jgKRI said:
6" x 3 1/2" angle is an off-the-shelf size.

That is tempting. Here's what went into my decision not to do that:

1) I'd shift the angle down to miss the slab edge with the heel fillet. With the bolt remaining located where I put it, this would take my lever arm on the bolt down from 2" to 1". I could probably deal with that anchor wise or I could move the HUS anchor down a bit.

2) The 3.5" angle leg is only 1/8 shy of the inside face of the drywall. So not much tolerance for the depth of the concrete repair. Would it be the end of the world if the angle leg had to squish into the drywall a bit? Probably not.

3) I worry about accessibility and workers' ability to drill in this small cavity. Normally, when these kinds of clips etc are being installed, it's with no sheathing on either side which is obviously more forgiving. As qualitative antidotes to that:

- I set it up to eliminate the vertical screws between clip and bracket.
- I set it up to shift the horizontal screws further from the drywall than the would have been with off the shelf CFM hardware.
- I set it up so that, even if the column of screws closest to the drywall can't be installed, the numbers still work.

Thanks for the additional contribution jgKRI. I'm grateful to have it.

 
KootK said:
That's right, I am not comfortable relying on the grout repair to serve as equivalent to original concrete from the perspective of anchor edge performance. To be frank, I didn't run any numbers on that. I don't actually know how to. It came down to just my visceral feel for whether not I could trust the patch to be stuck on there awesomely. In a way, I was kind of hoping that I'd come here and hear a whole bunch of "don't be silly, just count on the screws in the grout!". But, alas, I did not hear that. As a data point, can you tell me if you would be comfortable with just the original screws in the grout repair? Better still, do you know how to run the numbers on that?

I don't have enough experience in arrangements like this, or concrete in general, to trust my own intuition in this case. If I were in your shoes and having to solve this problem, I definitely do not think I would be comfortable treating any new grout as if it was equivalent to original, monolithic concrete, but my attitude when I get spooked is to go ultra-conservative so that applies here.

As far as a reliable/conservative calculation for this scenario? Man... I'd have no idea where to start. I apologize if the tone of my post came across as condescending at all- not my goal. This is a tricky situation and if you or any other known expert-level engineer had a solution, I was eager to learn it, hence my involvement in this thread when I'm actually out of my depth.

With that said... I don't see any other way to approach analyzing this thing other than to assume that all the forces ultimately resolve to tension in those horizontal concrete anchors... even the vertical load on the studs gets handled by bearing/friction at the grout/concrete joint, which is held together by tension in the anchor. But I digress.

KootK said:
That is tempting. Here's what went into my decision not to do that:

1) I'd shift the angle down to miss the slab edge with the heel fillet. With the bolt remaining located where I put it, this would take my lever arm on the bolt down from 2" to 1". I could probably deal with that anchor wise or I could move the HUS anchor down a bit.

2) The 3.5" angle leg is only 1/8 shy of the inside face of the drywall. So not much tolerance for the depth of the concrete repair. Would it be the end of the world if the angle leg had to squish into the drywall a bit? Probably not.

3) I worry about accessibility and workers' ability to drill in this small cavity. Normally, when these kinds of clips etc are being installed, it's with no sheathing on either side which is obviously more forgiving. As qualitative antidotes to that:

- I set it up to eliminate the vertical screws between clip and bracket.
- I set it up to shift the horizontal screws further from the drywall than the would have been with off the shelf CFM hardware.
- I set it up so that, even if the column of screws closest to the drywall can't be installed, the numbers still work.

Thanks for the additional contribution jgKRI. I'm grateful to have it.

One major point I missed when reading your solution- your original constraints called for no field welding. When I saw welds in your sketches, I was confused- until just now when I realized that, duh, there's nothing preventing your arrangement from being welded before it's hung.

Also, access for placing the fasteners is a major problem, no doubt about that.

You're welcome, I hope my attempts to contribute aren't an annoyance to you and the other structural gurus on this forum- your threads often represent highly interesting thought problems, and it's fun and educational for me to try and keep up with the discussion. So, thank you for the effort you go through to explain your thought process and how you decide your approach.
 
If you haven’t already, double check with Sika about what grout product they recommend for this application. I believe Sikadur 31 is more like a thin adhesive gel than a grout.

Not sure if this is already your intention, but it would probably make the contractor’s life a lot easier if the plate assembly could be anchored first then do double duty as a grout form. In which case you’d be better off with a threaded anchor that can have a clamping nut on the back side of the plate. That would also give them the adjustability requires to get the plate perfectly flush with the stud, which might be tricky to do if they grout first and bolt a plate on after.

 
jgKRI said:
I apologize if the tone of my post came across as condescending at all- not my goal.

jgKRI said:
I hope my attempts to contribute aren't an annoyance to you and the other structural gurus on this forum

Hell no. I didn't register your post as being condescending at all. I took your comments to be thoughtful challenges to the viability of my own solution. And that's exactly the kind of help that I need in order to vet this properly. Your latest proposal would be more economical than my solution in many respects. When I first saw it, I had to step back and revisit my assumptions in order to re-convince myself that I've been on the right path. And that's nothing but healthy.

With complicated details like this, two problems invariably plague my efforts:

1) I tend to fall irrevocably in love with my own ideas.

2) I resist revisiting my core starting assumptions because I've got so much invested in the solution currently tabled.

I only asked if you knew how to calc out the slab edge patch because I do not and I was truly hoping that you might. A hail Mary probing as it were.


Bones said:
Not sure if this is already your intention, but it would probably make the contractor’s life a lot easier if the plate assembly could be anchored first then do double duty as a grout form.

I agree that would be desirable but that is not my current intention. A few reasons for that:

1) With the grout gap being as little as 1/2" and rough, I wasn't confident that grout could be poured / packed in all instances.

2) As currently envisioned, we don't have top side access to this thing into which we would pour goop into the "form".

3) Having a nut, while great for adjust ability, make for more of an envelope protrusion.

This is merely my thinking to date. Your way may well be better, I don't know for certain.

Bones said:
If you haven’t already, double check with Sika about what grout product they recommend for this application.

I did that as part of my detail development. They green lighted the epoxy. That said:

- They forced me to talk to a local sales guy rather than a tech svengali. I hate that.

- I stalked my local sales rep online. MBA, no formal training in engineering, and only with Sika nine months. Hopefully he is talking to the svengali behind the curtain.

- Sometimes I feel as though, in presenting my case, I wind up convincing these guys into agreeing with me rather than getting their best possible advice.

Your comments have had me wondering if Sika MonoTop 622 might be an acceptable, or even preferable, choice. It's non-epoxy and can be applied to vertical surfaces up to 2" without the need for forming. I wonder if it might be able to be shaved down after the fact as a poor man's version of tolerance mitigation. I'm guessing the epoxy grout might be too stiff for that.

c01_k2sjgv.jpg
 
Monotop 622 does look better suited for this... maybe the Sika reps have a good reason for suggesting Sikadur, but I dunno. It seems more like an adhesive than a grout.

There’s such a wide range of products, it’s hard to know which is best. I’ve specified Sikadur to be used with Combiflex joint membrane, which is a completely different application that what you’ve got going on. Maybe it can be modified somehow to be used as a thicker repair mortar? Might be worth asking a contractor if they’ve used it like that on other jobs.

 
I haven't used Sikadur yet, so I watched a few marketing videos from Sika about the Sikadur and now I would also agree with bones. I've used Sikatop 123 Plus; which I presume is somewhat similar to the Monotop 622 in general applicability. The Monotop seems like a repair mortar suitable for your needs. The Sikadur 31 looks more like an epoxy adhesive repair material for bonding two components together.

I'd use Sikadur 31 if I wanted to put pieces of concrete back onto the broken surface or was highly worried about bond strength. For your needs it seems like overkill.

Ian Riley, PE, SE
Professional Engineer (ME, NH, VT, CT, MA, FL) Structural Engineer (IL)
American Concrete Industries
 
This thread popped into my head today..

Checking in, KootK- how did this repair work out? Did you wind up using your last-pitched idea to solve this?
 
Probably missed the party on this one, but something to be acutely aware of with Sikadur 32 is you need to put it on almost immediately prior to the concrete pour (there is a very small window). Often where you need it you cannot get access or have very poor access due to reinforcement, formwork, etc. But if you use it the bond of the two pours should make it more or less monolithic if the epoxy tie coat and the grout are applied correctly.

Additionally if I've learnt anything over the years, the contractor needs to get a licensed Sika applicator involved, and not try to attempt it themselves (instructions rarely followed otherwise, with understandably poor results).

EDIT - realised I meant sikadur 32 epoxy tie coat instead of sikadur 31... i'll go back to my hole now.
 
jgKRI said:
Checking in, KootK- how did this repair work out? Did you wind up using your last-pitched idea to solve this?

Well... I'm flattered by your continued interest in my little problem jgKRI. Thanks for that.

Yes, I did go with my last pitched idea. I'll post the final sketches below.

After seeing your latest post, I queried the contractor for some site photos which I was owed anyhow. I'll post those too.

The most interesting part of this ended up being the choice of Sika product for grouting. It unfolded like this:

1) I asked my Sika rep what product I should use and indicated that I was considering the Sikadur 31 epoxy system.

2) Sika rep said "we agree, Sikadur 31 will work for this applicaiton".

3) After some concept vetting here, I inquired again to the tune of "While I understand that Sikadur 31 would work, is that your recommendation for the best option for this application? Perhaps Sikatop 123 would be better?". That, per TME's input.

4) Sika rep said "yes, Sikatop 123 is our recommendation".

5) After a little research, I went to the contractor and said "hey, this Sikatop 123 might be a better choice than the Sikadur 31 that I originally specified. If you want to use it, I'm fine with it. The one caveat being that the Sikatop 123 requires a heating and hoarding period if temperatures will drop below freezing overnight. Even in December, an over night freeze in Vancouver is unlikely, but you never know".

6) The contractor, being rather adventurous, said "nah, I'm curious to try the Sikadur 31 anyhow and the hoarding may well be a problem. Let's stick with the Sikadur 31".

7) During the install, the contractor called and said "this stuff is very stiff and nearly impossible for me to work with. Can I switch to the Sikatop 123?".

So the correct answer here ended up being the Sikadur 123.


Hey, I'm a guy who always loves a little closure.

Thanks for the update. Looks like your solution worked out very well.

Interesting dialogue as far as working out which Sika product to use.

How well did the contractor take your proposal overall?
 
appreciate the follow up/closure....and wow that is one nasty looking slab edge in those photos it almost looks like a chunk spalled off during construction and was disposed of w/o any subsequent patching..odd.

Open Source Structural Applications:
 
Status
Not open for further replies.

Part and Inventory Search

Sponsor