JohnStarling
Mechanical
Hello,
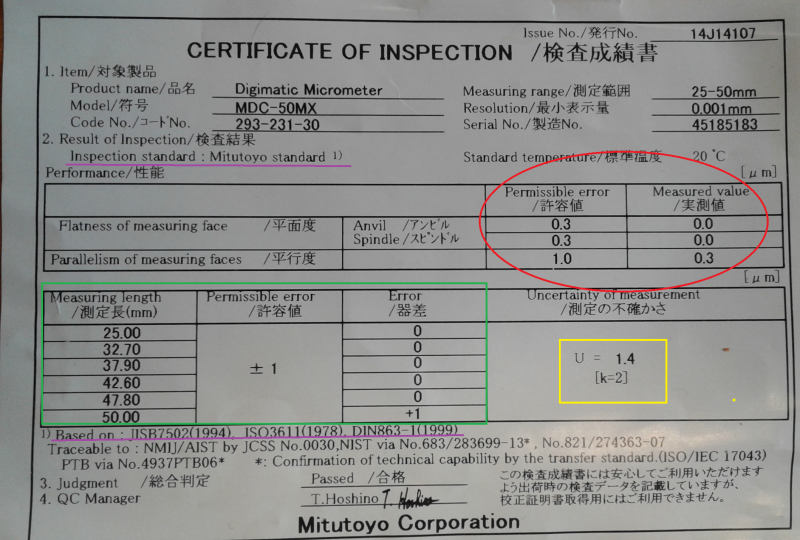
I`m trying to make some sense out of a Mitutoyo external micrometer CERTIFICATE of INSPECTION. Maybe someone smarter can comment my thougth`s.
So the way I understand it:
1) The process of inspection is set up in accordance to Mitutoyo Corp. internal standtard which is based on several international standards (violet lines).
2) According to Mitut. standard the permissible value of measuring faces flatness is 0,3 µm. The actual measured value is 0,0 µm for both the anvil and spindle (the actual value could have been <=0,04 µm, but they round it to one decimal place). And the permissible value for parallelism of measuring faces is 1 µm, the actual measured value is 0,3 µm. (red circle)
3) They have measured the lengths of some precision gauge blocks (25,00; 32,70...50,00 mm). For other gauge blocks the error was zero (actual error could have been <=0,04 µm, but they propably rounded it to one decimal point), but only for the 50,00 mm block the error was +1 µm, which is permissible.
(green box).
4) The uncertainty of measurement is U=1,4 µm. So this means, that if we don`t take operator, environment and workpiece uncertainty components into account, we can trust the measuring result to be correct with a possible deviation of +/-1,4µm . (yellow box)
BR

